2023 Halloween Costume Contest
Enter 2023 Costume Contest
 

Alien Abduction Costume

Rate this costume:

143 votes
19 comments  ·  add a comment 
Alien Abduction Costume

First time putting it on

More views: (click to enlarge)
Photo #1 - First time putting it on Photo #2 - custom built arduino based microprocessor Photo #3 - Spray-paint the UFO with Gold and Silver Photo #4 - UFO and battery pack
Costume type:  Costumes for Men
Category:Halloween Costumes

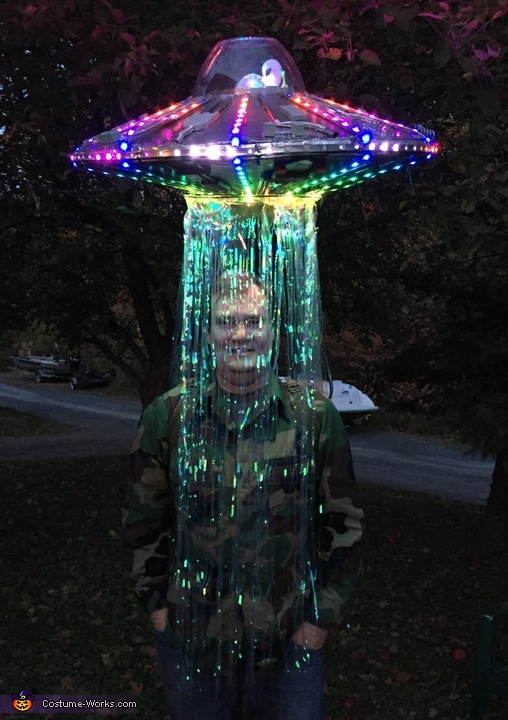
This homemade costume for men entered our 2015 Halloween Costume Contest, and won 2nd place in the Most Creative Costume nomination!

A word from Jeff, the 'Alien Abduction' costume creator:

Alien abduction is made using sheets of foam-core posterboard, and stablied with spray-foam insulation.

The costume has 750 color LED's which can produce 16million colors. Each LED is individually controld by an Arduino microprocessor and code I wrote myself.

The lights on this costume cost aproximately $100.
The rest of the costume is just stuff I pulled out of my closet.
The battery pack which goes in the backpack has enough power to run the costume for about 20 hours continuously.

Instructions:

The space ship is made from dollar store items and a $5 can of sprayfoam.
I got 4 foam-core poster boards, taped them together, and drew a large circle using some string and a pencil.
I then drew lines that divided the circle into 12 pieces. I cut them all out. Then duct-taped them back together again - minus 1 piece. do this twice (top and bottom) and this creates the saucer shape.
Some more ducttape and you've got a space ship.

I used two cheap hook style canes that I found at a bargin center as support poles (using just one made it wobble too much),
I cut two holes into the saucer bottom. next I proped the saucer up with two chairs and put the poles into the holes so that the poles stuck up about 4 inches from the saucer bottom. Then I spray-foamed a mountin of foam over the poles and let it dry. Once dry I pried loose the poles. and removed them. they can then be put back at will.
I trimmed the dried foam so that it didn't interfere with the top half of the saucer. It remains very light but ridged.

The lighting was all custom progammed but since then I found a $4 controller with remote that can do the exact same thing.

The lights are WS2812b LED strips. Each lights color can be set to any of 16million colors. ($40 for 10 meters but the price comes down every month!)

I used several large USB battery-banks to power all the leds. 20,000mah battery banks can be bought for about $12 and can power the costume for many hours.

The bottom had several concentric cirle LEDs, which spun around making the effect of a beam, in addition to the clear cellophane curtain. I stuck the poles into a backpack and spray foamed them into place permanently.

Rating: 4.1 of 5. Votes: 143

143 votes

Comments

#1 comment by WENDI August 28, 2016

BEST COSTUME EVER!!!!! You should sell it to me!

#2 comment by Jeff August 29, 2016

Here is a video of it in action. I spent months making the lights blink and change colors to my will. Great fun.

This year I am making a Butterfly costume. It is 11' wide at the top and 8 feet high. It has 818 lights that make dazzling effects on the wings.

Anyway, here is my page to show off my costumes. Have fun checking it out.
And thanks for the wonderful comment. :-)

#3 comment by Kailyn September 8, 2016

Can you give some details about how you built it? I want to try to recreate it :) thanks

#4 comment by Jeff September 9, 2016

The space ship is made from dollar store items and a $5 can of sprayfoam.
I got 4 foam-core poster boards, taped them together, and drew a large circle using some string and a pencil.
I then drew lines that divided the circle into 12 pieces. I cut them all out. Then duct-taped them back together again - minus 1 piece. do this twice (top and bottom) and this creates the saucer shape.
Some more ducttape and you've got a space ship.

I used two cheap hook style canes that I found at a bargin center as support poles (using just one made it wobble too much),
I cut two holes into the saucer bottom. next I proped the saucer up with two chairs and put the poles into the holes so that the poles stuck up about 4 inches from the saucer bottom. Then I spray-foamed a mountin of foam over the poles and let it dry. Once dry I pried loose the poles. and removed them. they can then be put back at will.
I trimmed the dried foam so that it didn't interfere with the top half of the saucer. It remains very light but ridged.

The lighting was all custom progammed but since then I found a $4 controller with remote that can do the exact same thing.

The lights are WS2812b LED strips. Each lights color can be set to any of 16million colors. ($40 for 10 meters but the price comes down every month!)

I used several large USB battery-banks to power all the leds. 20,000mah battery banks can be bought for about $12 and can power the costume for many hours.

The bottom had several concentric cirle LEDs, which spun around making the effect of a beam, in addition to the clear cellophane curtain. I stuck the poles into a backpack and spray foamed them into place permanently.

Thats about it. Questions? I am happy to help.

#5 comment by Kailyn September 9, 2016

OMG thanks so much

#6 comment by Kailyn September 9, 2016

Also was programming the lights hard? If so do you know the name of the remote you had seen? thanks again :)

#7 comment by Jeannie September 9, 2016

I don't see a link or address to your page to see your video or other costumes. Can you repost please? Can you tell me what/where the $4 came from? I LOVE this costume! I would like to try to make one for my son this year. I'm always kidding about living in the Crop Cirle...this costume would be PERFECT!!

#8 comment by jeff September 10, 2016

Awesome to see so much interest!

Here is the remote controller
https://www.ebay.com/itm/21-Key-IR-Remote-LED-Controller-for-Strip-WS2811-WS2812B-2811-IC-Module-Light-/351740812522?hash=item51e562dcea:g:XasAAOSwhcJWPGDd

It is like $3.00.

The trick to know is that, if you connect two (or 8 or 50(thats alot!) strips together just so (in parallel), you can make each strip show the patterns from the controller in syncroniceity. It took me litterally a month to program the same thing! and now it can be done easily for just a couple bucks.

The lighting is so easy, it is Literally a few parts from china. Now you can buy these componetnst cheap as hell from china, but for just a couple more $$ you can get it here in the usa and it will arrive in only a couple days (from china is cheaper, but possibly requiring 4 to 6 weeks for delivery..so order early!)

You need 1. IR controller...
https://www.ebay.com/itm/21-Key-IR-Remote-LED-Controller-for-Strip-WS2811-WS2812B-2811-IC-Module-Light-/351740812522?hash=item51e562dcea:g:XasAAOSwhcJWPGDd

10 or so meters of ws2812 LED strip. I recommend that you order strip from an american seller -- It all comes from china, buy if you can spend just a couple extra bucks, american sellers can get it to you in just a few days as opposed to weeks.
Another caveat is that there is a similar LED strip that is NOT what you want. It is labled as WS2811 strip, Ws2811 strip has two important WRONG characterristics.

1. it is 12 volts not 5v.
2. The strip can only access led in groups of three. In other words a strip with 30 LEDS can only be addressed as 10 groups of three. Basically reducing the resolution from 30 to 10.

Be careffull when you order led strip..."RGB LED" strip is not the same as "WS2812" or "WS2812b". "RGB" LED strip is a string of 3 leds that are R, G ,B in THREE SEPERATE leds. They are not "Addressable" or wired for a controller to access them individually.
Additionally, WS2811 strip IS addressable, but only in groups of three. So be extra carefull to order "WS2812" or "WS2812B"

#9 comment by Jeannie September 14, 2016

Thanks SO much for the info!!!!

#10 comment by Jeannie September 14, 2016

Oh, I forgot....can we see your page with your other costumes? There is no link and I'm dying to see what other stuff you have come up with!!!

Thanks again!!!

#11 comment by Jeff September 16, 2016

Check out my work here

https://www.facebook.com/JeffsLEDs/

#12 comment by Annie k October 3, 2016

Very cool

#13 comment by ArielkH October 11, 2016

I LOVE this! I would like to know how best to balance the poles and saucer in the backpack. Do I need to add weight to the backpack as ballast or anything (like your battery pack)? Or is just spray foam and the poles enough to keep it from swinging away from me (and beating me up through the party)? Did you encounter any issues walking with the backpack?

#14 comment by Jeff October 11, 2016

Put the poles offset (i.e.toward the back). The spray foam will keep things ridged. If you are careful not to put anything heavy in the ship, it sits quite level even . I found no counter weight was needed but the batteries in the backpack did help to make it more stable.

the spray foam is what makes it not be "front heavy" even though the poles are toward the back. Here is a pic that might help you see what I'm talking about.

If you cant get there, it is in with the pictures on my Jeff's leds page listed above. You will see the ship, on its poles and under it the battery pack I used. I have since found a way to use only ONE battey instead of 7. So it's much lighter though you would still want the battery in a back back because if it were in the ship it would be top heavy and move around too much.

#15 comment by Megan October 17, 2016

Love this costume! What did you use for the clear dome on top of the ship and how did you attach it?

#16 comment by ArielkH October 19, 2016

I have another question about the saucer: How did you attach the top part to the lower part? I see the pics where you seem to be able to lift the lid to access the light panel, but how did you secure the lid when you did not need to access the inside of the saucer? Did you use tape, a hinge, or what? I still LOVE this costume. I hope mine looks even 1/10 as good as yours! You did such a creative, awesome job! Thank you for sharing with us! (Oh, speaking of sharing: here a tip for anyone making their own saucer - test your spray paint on a scrap of foam core first! Using very light coats is best - prevents bubbles of the paper/foam core.) Good luck!

#17 comment by Vee October 28, 2016

Hi Jeff,
My son saw this costume and now I have to make it. I have such a hard time trying to figure out how you put the poles inside the saucer to make it stand and do I really need a backpack. I purchased the lights that already come with a mini battery pack.

#18 comment by Lynn October 7, 2018

Can you explain how you used the canes to support the space ship over your head, please.

#19 comment by Jeff Buck October 11, 2018

I chose the canes because they were black and they were extendable (retractable).

I made a small box out of cardboard that allowed the canes to lay inside with the poles extruding from the "top". then I spray -foamed the canes in place using the box as a "form" to hold the sprayfoam in place. After the sprayfoam dried, I used a knife to cut the foam in a shape that contoured to my back (this helps keep the whole thing in place as opposed to something flat which will not "grip" your body as well.

After the base is made and the poles are extending parallel out the top of the back-plate, I made two holes and inserted the ploles inside the UFO. I wrapped them in plastic wrap and then sprayfoamed them into place to hold up the ufo. Once the foam had dried, I putted the poles out of the ufo. It is a bit difficult, but the foam will not grip the poles because the plastic wrap protected them from the glue-effects of the foam. Now you have a base (back-plate) with two poles extending that fit perfectly back into the ufo. I'm going to be working on my ufo page today because I have some pictures that might make this description clearer.

Add Your Comment

* Comment: 
* Your Name: 
* Your Email: