

Under Construction Costume
Rate this costume:
|
18 votes
| 1 comment · add a comment |
Halloween 2019: Under Construction


| Costume type: | Costumes for Families |
| Category: |
This homemade costume for families entered our 2019 Halloween Costume Contest,
A word from Christine, the 'Under Construction' costume creator:
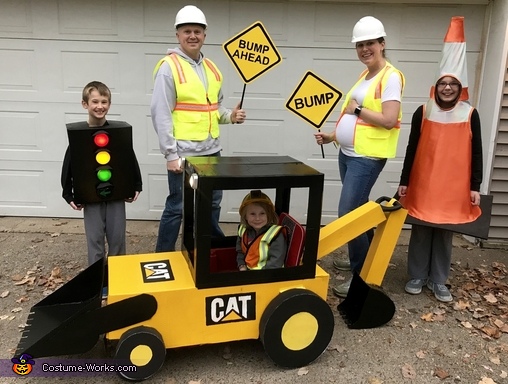
Our family theme for 2019 was determined by a wish my toddler had in 2018, when he told us he wanted to dress up as a construction worker on Halloween morning. We told him he'd have to wait a year, and he didn't let us forget it. Once we found out I would be noticeably pregnant for Halloween 2019, it was obvious that we needed to figure out how to incorporate a baby bump into a construction theme. After a few internet searches, I decided that my husband and I would be construction workers carrying signs. His sign would say "Bump Ahead." I debated what mine should say. I saw several examples of pregnant construction costumes online that said "Under Construction," but ultimately I decided to have my sign say "Bump," since it coincided with the Bump Ahead sign better. I made our signs out of foam board and dowels that I hand painted. We borrowed our construction vests and helmets.
I made my toddler's construction vest using a free pattern I found online at https://ourhomecreations.blogspot.com. I improved the pattern slightly by lining the vest, mostly since I had more than enough material to do so. The cost for materials was $4.51 after coupons. I decided that his costume was almost too simple, and I opted to turn our wagon into a backhoe loader after finding images online of other wagons turned into construction vehicles.
The backhoe loader is made of cardboard that's painted with spray paint and acrylic paint, duct tape, hot glue, and foam board and bulletin board border for the wheels. I got all the cardboard for free which helped keep the cost down, considering how much spray paint I used—probably 3 cans of yellow and 2 cans of black. Painting cardboard with acrylic paint first helps cut back on the amount of spray paint needed. Lesson learned.
Figuring out what to make the older kids in the construction theme was a bit trickier. After several internet searches, I got the idea to make a traffic light costume and a traffic cone costume. The traffic light was pretty easy. A cardboard box painted black with 4 painted tap lights—Red, yellow, green, and a green arrow. After having troubles with tap lights staying on our wagon fire truck last year, I opted to use screws, washers, and nuts to attach the tap lights to a piece of cardboard. I cut holes in the main structure and lined up the lights. I used some craft foam to make the light visors and I hot glued them on above each tap light. I purchased the tap lights on Amazon.com for less than $6. I got the box for free. The most expensive part of the traffic light costume was the 4 colors of spray paint.
The traffic cone costume was by far the most challenging costume I made this year. Maybe ever. I've never really made such a structured costume that didn't involve papier-mache or cardboard. But I knew I wanted the costume to be sewn, if only to keep it from being too heavy.
I ended up using a tomato/plant cage for an under structure and I covered it in roll craft foam. I did my best to make a pattern using paper, and I used that pattern to help cut the foam and the material. For the base of the traffic cone I used a piece of black EVA foam. The sewn cone was basically a slip-cover over the craft foam structure and I hot glued the bottom of the sewn cone to the EVA foam.The cost for the material for the cone was around $30, with the EVA foam being the most expensive part.
Rating: 4.3 of 5. Votes: 18
|
18 votes
|