

The Devil's Reaper Costume
Rate this costume:
|
5 votes
| add a comment |
The Devil's Reaper Costume


| Costume type: | Costumes for Men |
| Category: |
This homemade costume for men entered our 2019 Halloween Costume Contest.
A word from Fred, the 'The Devil's Reaper' costume creator:
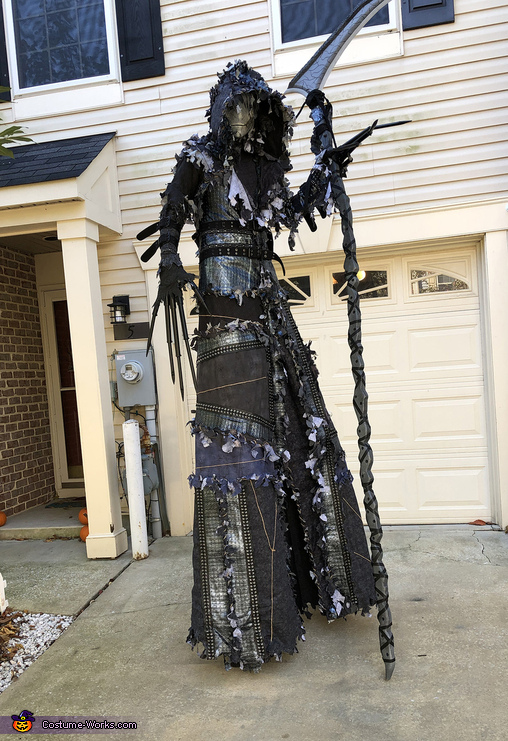
This costume has been in the works for the past 2 months in preparation for competing in local Halloween contests in my area. I wanted to make my own unique version of the grim reaper after seeing a character of the same name in the movie Solomon Kane.
The costume stands at around 9.5' to the top of the hood, and about 10.5' to the top of the staff. I am walking on 3' circus peg stilts in order to achieve this look. The base coat and mask I purchased, and everything else was sourced and built myself. One element I wanted was something that would really creep people out outside of the mask, so I came up with the idea of making my own extended creepy hands.
For the hands, I used cpvc pipe that I cut and bolted together so that the joints actually function, then painted, and contact cemented on to a pair of gloves for easy on and off. I decorated the glove itself in fabric, and decided to leave the fingers exposed as the sound of them hitting together only adds to the creepy factor.
The coat is a combination of many things...hot glue, contact cement, fabric, belts, trim fabric, twine, etc. I wanted the coat to really make an impression, so I worked very hard at making it look patched and stitched together. Everywhere two fabrics come together, I punched holes along the seam, and hand stitched twine through all of it. I further burned each piece of twine to singe off the little twine hairs to make it look cleaner along the stitching. Once I got a base layer of fabric on the coat, including the inside of the flaps of the coat at the bottom (the coat splits in the front and back at the waist down to the ground), I worked on adding in all of the detail you can see in the photos. I used a studded silvery fabric to add edging accents, threaded random pieces of twine through certain panels, added corset trim material along many edges, hand stitched all exterior edges around the coat, etc. After that I attached two double grommet belts around each arm as well as the body. The body belts actually function and can be buckled up once the coat is zipped up. And all fabric edges were hand tattered using scissors.
The hood of the coat is decorated the same as the coat to match, and created a more "rowed" look down it with how the fabric comes together. I further lined the hood in such a way that I am able to insert pliable wire along the edges to create my own shape and keep the hood up and pointed.
The staff is a piece of 2x10 cuz down and sanded into the shape you see. The top sickle part is cut out of a 1x10 and layered with different pieces of EVA foam, and further burned with a wood burning tool to create the line detail. The edge of the sickle is also sanded down into a blade edge and the staff itself has 1/2' holes drilled through the whole thing. Polyester strapping was then wrapped down and up the staff and matching ropes/fabric were tied around the top joint. And a custom paint job rounds out the look, with gray/black/metallic paints.
I hope you enjoy this costume and I can't wait to take it out for Halloween parties!
Rating: 4.6 of 5. Votes: 5
|
5 votes
|