
by Jamie


Rate this costume:
|
59 votes
| 1 comment · add a comment |
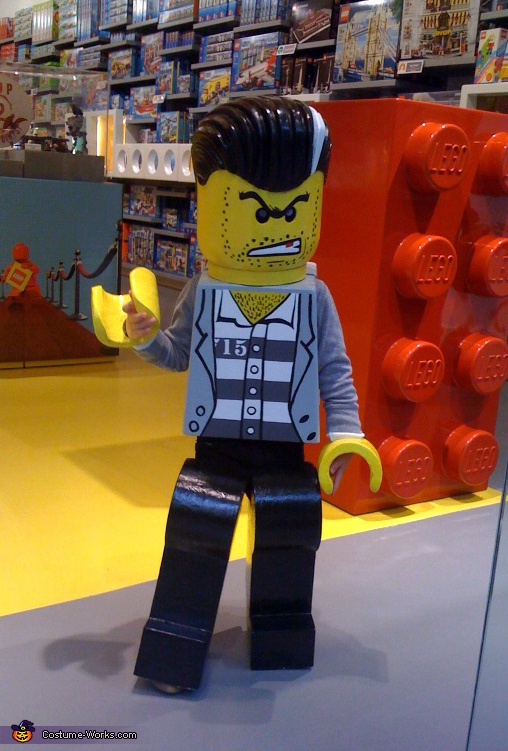
Lego "Bad Guy" at the Lego Store


Check out other great homemade Lego costumes in our gallery.
| Costume type: | Costumes for Boys |
| Categories: |
This homemade costume for boys entered our 2011 Halloween Costume Contest.
I sculpted and built this costume for my 4 year old son. He is a huge fan of Lego City (in particular, the police series) and wanted to be a Lego "Bad Guy" for Halloween. The costume was originally inspired by one of his minfigures, however, after watching the Lego police movies on the Lego website, he decided he wanted to be the leader of the crooks who has a distinct look.
The costume was created using various materials and techniques. The majority of materials were inexpensive, however, I was concerned about strength, durability and authenticity so I decided to use a compound called Aqua Resign in conjunction with a thin layer of fibre glass in order to ensure the costume would survive the holiday season.
The legs and torso were built using foamcore, or foam board. Foamcore is extremely lightweight, smooth and easy to cut. I tried to keep the proportions close to an actual minfigure while making it functional for a 4 year old to wear. I built the torso in 2 plates, front and back, in order to keep the neck hole smaller as well as the torso's proportions. It also allowed my son to get into the costume quick and easy. I constructed opposing tabs that housed velco to fasten the front and back plate. Once the torso was complete and fitted, I coated it with Aqua Resin using a brush. Then a fine layer of fibre glass fabric was applied and coated a few more times with resin. Sanding was then done to smooth out any rough texture.
The same technique was used for the legs, but the legs were strapped on using elastic material and velcro.
In creating the head, I first started with a thick paper to create the cylinder. I used a styrofoam insulation sheet to create the hair and beveled edge of the head. Layers were cut, stacked and glued together until enough volume was created. Then I carved the hair using a kitchen knife, exacto knife and a rasp. After it was complete, I sanded all of the rough edges off and coated the entire head in resin.
The hands were sculpted using the same technique of cutting styrofaom shapes (horseshoe), layering them and gluing. Then I carved the curvature in the hands, sanded them and coated them in resin before painting. A carboard mailing tube was used to create the wrists and access point for my son's hands to go through.
The costume was painted using spray paint and acrylic artist paint. The graphics were put on by scanning and drawing a minifigure using adobe illustrator, scaled to size and printed. I transferred the illustration graphics onto the costume using the old technique of scribbling a soft pencil on the back of the paper then tracing on the graphics. After which I hand painted the face and torso.
Overall, material costs were fairly inexpensive but the resin and fibreglass material costs were $78.00 This step is optional, and the costume can be created without using it.
Foamcore sheet 30" x 40": $5-$7 1 sheet was enough to create the torso and legs.
2' x 8' styrofoam sheet: $7-$8
Spray paint: $5-$7 a can, I used 3 cans.
Misc., Hot glue, velcro, mailing tube etc.
Similar costumes:
Rating: 4.7 of 5. Votes: 59
|
59 votes
|


