
by Jacqueline


Rate this costume:
|
27 votes
| 2 comments · add a comment |
Angry Birds Homemade Costumes


| Costume type: | Costumes for Kids |
| Categories: |
This homemade costume for kids entered our 2011 Halloween Costume Contest.
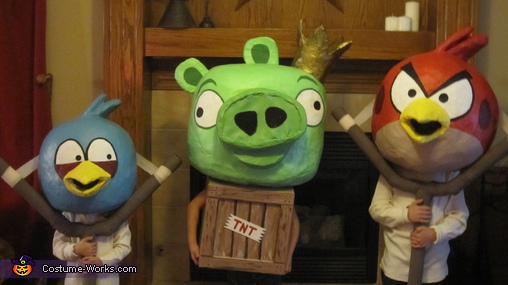
I am the mother of 3 very energetic kids, ages 9, 7, and 4. Staying at home all day with them can get a little "routine". However, the only time all 3 are quiet and get along, is when they are playing Angry Birds. I really don't know what it is about that game, but it works. Coming up with this years Halloween costumes was pretty easy! Let's do what they like as a group! I looked everywhere online and just couldn't find costumes I liked! So why not make some ourselves!?!
I first started the costumes with chicken wire. I determined a general circumference and cut it. Make sure you secure all of the wires by twisting them, as you move up the column of wire. Once you have that done, it is pretty easy to manipulate the wire to get your desired shapes. I made sure to periodically try them on my kids to ensure there was enough room to fit over their heads (the red bird and pig are big enough for adults to wear). For the beaks, pig snout, tails, and top combs of the birds; I simply cut smaller pieces of wire, shaped them, and then attached them to the wire shells. After you have all the wire shaped and ready to go, use plastic bags full of newspaper to fill the inner cavities. This will ensure that nothing fills up the space that you will be occupying.
On to the next step!!!
Foam! Buy lots of cans of expanding foam. Any brand will do! Working in sections, spray the wire shells. It doesn’t take long to dry and then you can move on to the next spot. I did the top, then the sides, then back, and ended with the bottom of the animals. The foam can get very thick and may need extra time to dry. After they were all coated, I waited a few days before carving.
CARVING!!! This is by far one of my favorite parts of these costumes. Not only does it give the birds and pig their final shape, but it has fantastic therapeutic qualities!!! Nothing says stress reliever than using sharp knives to carve and shape! Move slowly and don't take too much off at a time! You might find that your shape will have air pockets or holes. Don't worry! Once you are ending the carving stage, you can go back with another can of foam and "fill" in any parts you'd like. When I was finished, I used a palm sander and fine sanding paper to get it as smooth as possible.
Ahh...we're getting closer! After the sanding, I used Elmer's glue (literally a gallon jug from Lowe's) and tissue paper to paper-mache the entire thing. It was a fairly slow process because I used small/medium size pieces of paper, so it wouldn't wrinkle or show creases. I feel this is a critical part to do. It gives you a rock hard and smooth surface to paint!
PAINITING!!! My other favorite part of these costumes! My kids happened to have little figurines of their Angry Birds. This made it really easy to match paint colors. The main bodies were painted with samples of Benjamin Moore paint at my local hardware store. The details were painted with basic acrylic paint from the craft store.
Sling-Shots and TNT Box: I hate to admit it, but these were sort of an after thought. Since we made the red bird and pig big enough for adults to wear, they weren't really fitted enough for the kids to hold up on their own. Well unless you have them hold their hands up to the heads all night. (Would be funny and I wonder how long they would last...but alas...I came up with a plan!) I made the sling-shots with 3/4" PVC, one T bracket, and 2 elbows (since there is no perfect "Y" bracket). Once we got them all glued together, I then took foam pipe insulator to "fatten" them up. And finally I wrapped the whole things in brown streamer to give them a finished look.
The TNT box was just a simple box from Wal-Mart, 2" wide pieces of foam sheeting to trim around the outside for a "crate" look, and then some creative painting. (I bought a big sheet of foam and the cut the pieces 2" wide x by the desired length)
All in all, I think I put a good 15 hours into these costumes. Seems like a long time and a lot of effort, but I would do anything for my kids! Plus I LOVE A CHALLENGE!!!
Happy Crafting!!!
Similar costumes:
Rating: 4.6 of 5. Votes: 27
|
27 votes
|

