

Torn Up Old Burlap Samhain Cat Plush Costume
Rate this costume:
|
6 votes
| add a comment |
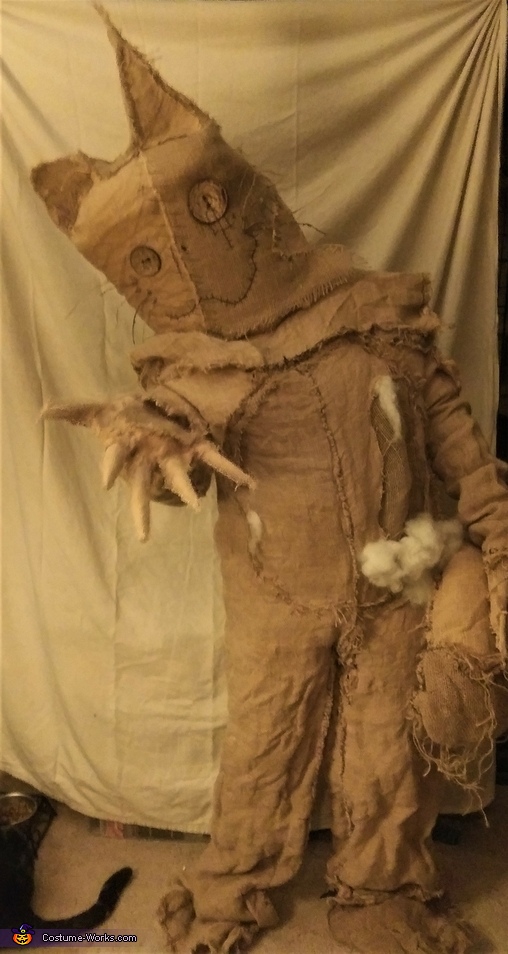
Burlap Cat Holding Tail


| Costume type: | Costumes for Adults |
| Category: |
This homemade costume for adults entered our 2021 Halloween Costume Contest.
A word from Raven, the 'Torn Up Old Burlap Samhain Cat Plush' costume creator:
How our costume got started was odd. Last year around late October, early November Walmart had some burlap on sale, a massive roll for a mere six dollars, so we bought it and decided we would make something with it. At the time we were thinking of just making a really creepy scarecrow mask and a burlap top hat to be an extra spooky scarecrow, we bought a small roll of hemp twine while at Walmart for a few dollars and after a few months of hearing about and seeing scarecrow costumes, we could not bring ourself to make one. We simply could not stand the idea of of being just another scarecrow. A friend online was talking about how they wanted to dress as Sam from the Movie "Trick 'r Treat". Cute, but we are not really one who likes to dress as movie characters, still we did like the burlap head with the buttons. A creepy rag doll we made for a friend broke back in April of 2021, and she asked we repair it. Looking at the yarn hair, large obvious stitching, and voodoodoll-esque appearance, we decided we wanted to make more of a rag doll costume. Unfortunately more and more disappointing and overdone stories and images of rag doll and voodoo doll costumes kept coming up. So come May we were sick of that idea and were struggling to come up with something.
Our mom commented on the burlap over and over, saying we wasted $6 on the fabric that was 'just in the way'. She then suggested Oogie Boogie, another great idea, but again we do not like to dress as movie characters! We looked online for "Creepy Burlap Costumes", again and again, scarecrows, a few dolls, and several Oogie Boogies. It was almost June and we still had no ideas, someone suggested the bunny from Donnie Darko. Great idea of course, but it was another character from a movie. However it gave us an idea, so we looked at burlap bunny costumes, masks, toys. There was dozens of creepy burlap masks with bunny ears and stitches, there was too many, it was clearly over done. Creepy burlap bunny mask, with a dark reaper hood. Looking more, we found "The Lifeless Bunny Costume". It was simply, but creepy, still, already something that was done. HOWEVER, it gave us an idea. What about a cat? We are a cat after all, we love cats, and surely cats are more creepy than bunnies? We wanted to be a stuffed cat toy, a very old one, like a rag doll, a mixture of the different ideas we had over the past few months. We would make it entirely burlap and bring the creepy stitches to an entirely new level. From early June to September we hand sewed the main body of the costume together, entirely from the burlap, trying to make it look as roughly handstitched as possible to get the look we wanted.
We did not want a flat looking head like the Lifeless Bunny Costume either, he wanted to look like an actual doll, with a really round head, one that you'd find on a teddy bear. Using three foam sheets we had leftover from a previous costume we bought (for about $9- you do not need to buy as much foam as we did) we made a head. Sewing the foam together, it did not work as well as we hoped, so we looked online and read that Furries used hot glue to make their heads, so we glued the already stitched together foam to keep it sturdy, and it worked, keeping its slightly lopsided shape. We hot glued burlap directly to the head, unfortunately, the $6 roll of burlap was running low, so back to Walmart. They had black, which we wanted to add creepy patches too, but returned it after finding a cancer warning on the packaging. Back to Walmart again, some organic jute burlap table runner, it was about two dollars, so we bought two just in case. Then the idea hit us when we returned home, this burlap was darker than the one we bought the year before, it would look weird, then we had the idea of being a really falling apart old doll. So we used the dark new burlap to do the other half of the head, and it looked CREEPY. We had to sew the two burlaps together, to give it the creepy half half two-face effect. Leading us to mix the two again for patches. Unfortunately the random patches did not look so good, so that was a week of ripping out stitches. Our Mother suggested we use the dark burlap to make the classic circle tummy you see on a lot of plush animal toys, it was a great idea, and we tore open a pillow and stuffed the stomach to make us look more cuddling.
Now we looked TOO cute, TOO cuddly! So the mittens we made, modeled after oven mittens, we took apart, put on our hands, cut them smaller, and directly hot glued them on, giving us prefect fitting, more hand shaped gloves. We took some of that plasticly bubble paper from an amazon package we received a few months back and rolled it up around our fingers, taping them to keep them together until we formed solid long claws with a sturdy point. With more burlap we wrapped our new long fingers and hot glued it again. It looked eerie for sure, more claws and less paws, maybe too much. So we cut out some paw-pads with the dark burlap and hot glued them on, sewing a few stitches on to help the creepy doll look. There was not enough of the old burlap to make a full tail after using so much to fix and re-fix the gloves, no issues, we used what was left and used the dark stuff as a nice bottom patch for the tail. Using some of the pillow to stuff the tail.
Being a Cat we needed whiskers, but we did not want to use wire, in case someone pushed on the whiskers, we would not want the wire to slide into the form and stab us in the face. How to make stiff whiskers? Our mom suggested soaking string in glue and water. We saved the loose strings from every time we cut the burlap, and soaked them in gluey water. At first nothing happened, but after doing it a few times they were finally stiff enough to stand up on their own. We painted a few of them with dark brown bronzy paint, to keep up the half and half effect, hot glued them on them added a few stitches just to keep up the stitched on illusion. A stitched on creepy cat smile and everything was basically done. Eyes ahh eyes. How could we forget the eyes?! Eyes are the windows into the soul! Everyone suggested simply cutting holes and using using black mesh. Being someone who is highly photosensitive, simply allowing light through so much would not be a good idea, plus those black mesh eyes always looked tacky and sort of illusion breaking to us.
We recalled wanting button eyes, so with days before October arrives, we went back to Walmart. We looked for the largest buttons they had, sure black looked great, but it was too offsetting for the mostly light burlap so we went with brown, our mother suggesting we use one with a pattern on it, helping to keep up the two faced look. The jumbo wooden buttons we bought each cost about a dollar each. We put on our head, and used our fingers to press through to where our eyes were, then, carefully used a sharpie to make where our eyes were. We cut through the black spots, keeping the hole very small, then hot glued the button around the hole, lining up the button's hole with the hole we made to see from. We then sewed it on just to make it look cool and keep it sturdy. The other larger button 'eye' we made sure to place higher, to keep up the lopsided look.
We had to adjust a few things over October, add in extra stitching and some of the leftover pillow fluff to make it look like we were really falling apart, then for the extra creepy factor, we used some glow in the dark fabric glue to the eyes and mouth for a spooky surprise. After realizing we were suppose to be an OLD doll, we took one extra step and using some old tea bags, coffee grounds, and water, gave our costume some staining and darkening on the exposed cotton. Sure there was more we could do after that, more details we could add, but after four months of working on it, we just wanted our costume to be done. Total cost is about $19-$23 depending on where you buy your stuff. By the way, we say "we" but we are just one guy.
Rating: 3.3 of 5. Votes: 6
|
6 votes
|