

R2D2 DIY Costume
Rate this costume:
|
7 votes
| add a comment |
R2D2 Visits the Bronx Zoo for 'Boo at the Zoo!'


| Costume type: | Costumes for Boys |
| Categories: |
This homemade costume for boys entered our 2016 Halloween Costume Contest.
A word from Jan, the 'R2D2' costume creator:
My 7-year-old grand-nephew Xavier is wearing the costume.
After Xavier told us that he wanted to be R2D2 for Halloween, we tried to buy a costume on-line, but we couldn’t find any. However, as we were searching on the web, we starting finding lots of instructions from other people who had made their own and we decided that it would be a fun family project to make the costume ourselves. We asked Xavier and he was very excited with the prospect of helping to design and make his own costume (as were his Mom and Grandma).
We made the costume over an annual 4-day Columbus Day Weekend (Canadian Thanksgiving) visit to our house. The plan was to complete the costume so that Xavier could wear it for our annual trip to the Bronx Zoo for their Boo at the Zoo event (held each weekend in October). That way, he would also have the costume for all of the other Halloween events back at home through the end of the month.
Advance Prep:
Several weeks before their trip to visit us, we started by sending Xavier several sets of designs and photos of costumes made by other families and asked him to make some design decisions a few weeks in advance so that I would have time to order or find any supplies that we might need. This also helped to build the excitement about the project across the family members and it added to the fun. Of the designs that we sent him, he decided that he liked costumes best that were based on a flip-top trash bin, so I found one on-line and bought it for $11.99 from SpaceSavers. Other people had purchased a grey or black one and then painted it, but we decided it would be easier to buy a white one and not paint it. I also bought some blue paint in advance and a couple of brushes. I bought a small bottle of DecoArt Dazzling Metallics 2-Ounce Ice Blue Acrylic Paint that cost $1.99 on Amazon (I also bought a bottle of red, but we didn’t use it). In hind-sight, it would have been better to use a paint specifically made for plastic since we have to keep touching up the spots where the paint sometimes comes off, but it is a nice, shiny color. Finally, I bought one large roll each of white, black and blue vinyl tape (between $6 and $7 each). From what I already had around the house I collected a couple of rolls of gray duck-tape, a roll of black electrical tape, and some sheets of blue and red glossy cellophane.
During our planning weeks, I also spent some time cleaning out my “work room” and gathered up a big box of all kinds of plastic and metal “shapes” and things that Xavier could sort through to decide what he might want to attach to the outside of the costume that would look R2D2-ish.
Finally, I printed out several sets of different people’s instructions and costume photos and many different “real” photos of R2D2 from various angles for us to use as design ideas and decision-making.
The Body:
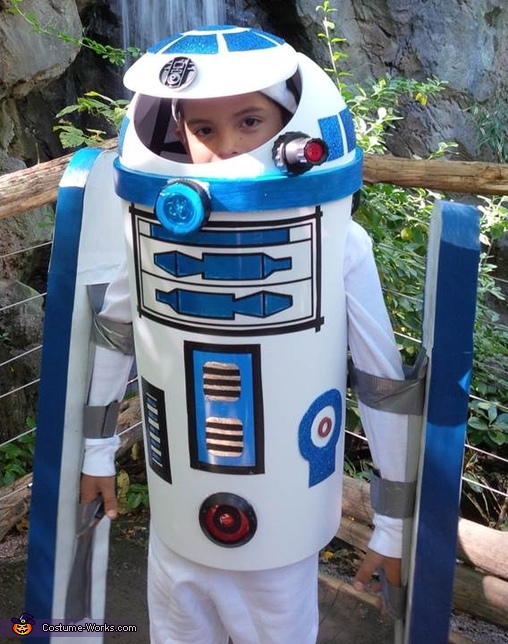
We started with the “body” and the plastic trash can. To cut the bottom out of the can, we drilled a hole with a drill (for a spot to start with the saw) and then cut off the bottom with a jig saw. After we removed the bottom, Xavier sanded the edges smooth with some sand paper.
In other designs we saw, the kids had their arms out between the top of the body and the head, but Xavier wanted the top of the trash can to stay connected to the bottom while he was inside, so that required that we cut arm holes in the sides.
So, next, we penciled in arm holes in the sides at spots about an inch below the rim and sawed them out with the jig saw. We had seen other sets of instructions on the Internet where kids kept their arms inside, but Xavier wanted his arms outside so that he could control R2D2’s legs. It was just as well, because Xavier’s arms didn’t really fit inside the can very well (the kids who used that approach seemed much younger and smaller).
For the designs on the outside of the body we decided to make stencils using some R2D2 photos and patterns that his Grandma had found on the Internet. The plan was to print them out on paper from the computer, cut the paper into a stencil, and apply the blue paint using the stencil. But, since we used “regular” paper for the stencils, they ripped easily and also didn’t allow Xavier to draw crisp, straight lines, a detail that frustrated him. In addition, since the paint I had purchased wasn’t designed to be used on plastic, the paint started to chip in some places.
To solve all of these problems, we decided to print the template on a plastic overhead transparency that I had at the house since I’m a former teacher. The transparencies printed with nice thick, black, straight lines and Xavier was able to just add the blue paint in the spaces and then we attached the transparencies (with the paint side against the body) using black electrical tape that we had around the house. The electrical tape served to hold on the pieces of overhead transparency while at the same time adding a nice dark border around the outside of each piece that we cut out and applied.
We put three different pieces of painted transparency on the front (one horizontal on the top and two vertical ones below). Xavier then sorted through the big box of “junk” that I had collected from cleaning out my workroom and selected three circular objects that each had some depth to them. We decided that it would make the costume more colorful if he backed the pieces with red cellophane since it is so shiny and brightly colored. We used double-sided tape (and a touch of epoxy glue) to attach the red “lights” to the bottom of both the front and the back of the body. We put some clamps on the pieces to let them dry for a few hours as we worked on other pieces.
The Head:
There were lots of things to decide about for the head (whether to close the flip top completely and cut a hole to look out of; whether to have the head sit above the chest barrel, etc.; we had seem several different variations from other people). Xavier decided that he wanted the head connected to the chest and that he wanted to be able to “peek” out through a small opening made by partially flipping the lid open. To accomplish this, we put some crumpled newspaper and a small piece of Styrofoam underneath the back of the flip top and then taped the back of the head with white vinyl tape so that the opening in the front stayed a certain size and the back still looked like it was closed. Before we did the taping on that, Xavier painted the rim of the top/head with the blue paint.
We knew that the rounded top of the head would be tricky since we couldn’t use the overhead transparency approach since the head is much more rounded than the body. First his Grandma went back on the Internet and located a few different template possibilities for designs that we could put on the head. When we found one that we liked, we had to change the size somewhat to adjust for the actual size of the trash-can lid, but we were able to use the basic design and the same basic trapezoid shapes and angles around the outside of the lid and the circle in the center.
Since we didn’t have anything that we liked to make the trapezoids and circles out of, we headed to the local Michael’s store and found a piece of sparkly-blue “glitter paper” – which is a thick, foam-like paper covered with glitter and with a sticky backing - that was perfect ($1.99). We liked the look of the trapezoids made with the glitter paper so much that we decided to use the same material for the circle on the top/lid/head and also the rectangles along the edges of the top/lid/head. There was a small circular piece and a small square of the blue glitter paper left over when we finished the head and we added it to the right side of the body in a spot that looked “empty.” Then Xavier added a small red piece of plastic from the junk box in the center.
Also from the junk box, Xavier picked out three more items to add to the head. First, he picked out part of an old black plastic nozzle that he thought looked like a camera. He added a big red button to the center of the piece to add color and to make it look like the camera was “on.” He also picked out a small puck light that I had left over from an old project and we decided that if it were covered in blue cellophane that it would make a cool “headlight.” [The headlight also turned out to be very handy on Halloween in the dark!]. Because of how puck lights are designed, Xavier could just push in on the light any time he wanted to turn it on or off. Finally, he added another black plastic circle above his forehead. These were all attached with double-sided tape with a little glue and held in place with clamps until they dried.
Connecting the Head and the Body:
After looking at designs from other people, Xavier had first decided that he wanted to use the option of a bicycle helmet on his head underneath the lid to the trash can. So he and his Mom covered an old bicycle helmet of our son’s with white vinyl tape and we tested it out. When we did that though, (probably because Xavier is pretty tall for his age) there was too big of a gap for the lid to fit back snuggly on top of the body. So we ditched the idea of the helmet and decided to use an old white baseball cap turned backwards on his head. We taped over the hole in the back of the cap with while vinyl tape because Xavier didn’t want us to be able to see his hair through the back of the cap. To hold the trash can up off the ground we took the cushioned strap off of an old briefcase. We were originally going to try to fashion shoulder straps to hold the can up, but instead we slipped the strap through the arm holes and rested the strap on his head. And although we were first afraid that it would be very uncomfortable, Xavier said that it was really pretty comfortable, so we stuck with that.
When we put the lid back on the body though, it kept separating every time he moved, so we had to figure out a way to keep the top and the bottom together while he had them both on. Eventually the solution that we came upon was to fashioned two “straps” out of duck tape (by taping the sticky sides of two strips together) and we attached them to the top and bottom of the can with a couple of pieces of Velcro that we had in the junk box.
R2D2’s Legs:
A couple of years ago we had our cellar insulated with 2” foam board and I had kept the leftover pieces in case we ever needed them, so we cut the two legs from foam insulation. The foam board can be purchased at any store like Home Depot or Lowes. Next we spray-painted the legs with white paint so that you couldn’t read the writing on the face of the board. Since spray paint won’t adhere to the foam edges, we covered the front edge and top of the foam with blue vinyl tape and the back edge and bottom of the foam edge with black vinyl tape. In our cellar we also found two pieces of old Styrofoam packing foam that looked the right size and shape for “feet,” and we covered the tops and sides of those with blue vinyl tape and the bottoms with black vinyl tape. We used two more strips of Velcro to attach the feet to the legs.
When we first cut the foam for the legs we had made them rectangular on the top, but after they were done we decided that they would look better if they were curved at the top near Xavier’s shoulders and so we sawed a couple of rounded pieces to add to the top of each “leg.”
Next we needed to design a way to “attach” his legs but also make them so that he could move them since he wanted to be able to control the legs and make it look like it was walking. To do that, we made 6 “arm bands,” three for each of Xavier’s arms. To make the arm bands, his Mom put together 3 layers of back-to-back duck-tape with pieces of Velcro at each end of the band. For each arm we made one band that it would fit him near the top of his arm, one that would go around the middle of his arm and then one that he could wrap around his hand. After we tested out where the bands should be attached on Xavier’s arms and hands and where that would put them on R2D2’s legs, we attached each of the bands to R2D2’s legs using two long strips of duck tape. In hind sight, I wish that we had used white duck tape so they would have been less noticeable, but we didn’t have white duck tape and the white vinyl tape was too stiff and not strong enough.
The adults in the family wanted to put some designs on the legs like we had done on the body, but Xavier insisted that it should just be a simple stripe (in the end, we all decided that he was right). So the finishing touch on the legs, and the whole costume was a simple blue vinyl stripe down the center of the outside of each leg (over of the white spray paint).
What a fun family project! Now we were ready to be off to the Bronx Zoo for Boo at the Zoo!
Supplies:
1 white plastic flip-top trash can (we used a 10.5 gallon Sterilite White Swing Top Trash Can)
1 small bottle blue paint (we used DecoArt Dazzling Metallics 2-Ounce Ice Blue Acrylic Paint)
1 roll gray duck-tape (although you might want to use white duck tape)
1 roll each White, black and blue vinyl tape
1 sheet sand paper
1 roll black electrical tape
1 sheet each blue and red glossy cellophane
1 roll double-sided tape
1 tube epoxy cement
1 sheet blue glitter-paper
1 white baseball cap
1 cushioned strap (like from an old briefcase)
2 long strips industrial strength Velco
2” foam insulation board
1 can white spray paint
assorted pieces of round black plastic “found objects”
Equipment:
jig saw
Exacto knife
drill, drill bits
extension chord
1 small, flat paint brush
scissors
hand saw
keyhole saw
Rating: 4.3 of 5. Votes: 7
|
7 votes
|