

Orange Fidget Spinner Costume
Rate this costume:
|
6 votes
| add a comment |
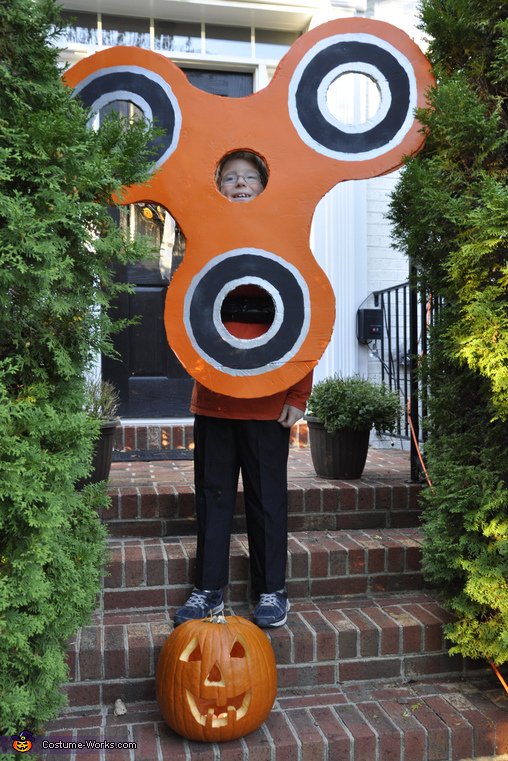
Orange Fidget Spinner on Halloween night!


| Costume type: | Costumes for Boys |
| Categories: |
This homemade costume for boys entered our 2017 Halloween Costume Contest.
A word from Megan, the 'Orange Fidget Spinner' costume creator:
Megan Hepp (mom of costume wearer) 8 year-old Brian Hepp is wearing the Fidget Spinner homemade costume!
How did we come up with the idea? Our eight year-old son loves his fidget spinner! He was playing with it while we were thinking out loud of ideas to be for Halloween when I (his mom) half-jokingly said “You ought to be a Fidget Spinner”. He laughed but I got to thinking that it might actually be possible! And if possible then boy that would be a pretty cool costume and timely given their popularity right now!! I had some ideas on how to create it but investigated and found one person on the internet Rob Cockerham in California who had made a 6ft working spinner for a Cosplay event in San Diego. So we used his as our inspiration!
How did we make our homemade Fidget Spinner Costume?
To make a Fidget Spinner for an eight year-old, it was imperative that it be light weight and not too cumbersome so he could Trick or Treat for a couple of hours around the neighborhood. We used PVC pipe, a heat gun, foam board, plywood, glue, a lazy susan, paint (orange, silver and black), some screws, black duct tape, and some foam padding. There was some trial and error, so we are just listing the steps that worked.
1. First, we purchased the parts to build the spinner which included a lazy susan bearing (approx. 11-12” diameter circular and perfect size opening of a face). This is the key piece to make it a “spinning” Fidget Spinner. Some ½ inch PVC Pipe, screws, thin plywood (1 - 2 by 4 piece), three pieces of foam board and spray glue. We purchased a heat gun and used our own glue gun.
2. Next step was to get building the spinner. We measured a real spinner to determine key distances and scaled it up to match the size of the hole in the lazy susan bearing. Each of the three spinner holes then was made to match that. We then made a tracing and this was important as we were able to draw/re-draw and get this perfect before cutting anything.
3. Using the template, we cut three foam boards into pretty identical copies of the spinner. Eventually these pieces would be laid on top of each other to form the key part of the costume.
4. Once we had the three spinners cut out, I used the spray glue to get them into one piece. Then the spinner was spray painted in orange on both sides.
5. The next part was to create the harness so the spinner could be worn. The harness made of PVC pipe sits on the shoulders and attaches to the lazy susan bearing. We cut the PVC into 2 pieces about 4 feet each. One piece would be attach to the lazy susan bearing and have two equal sides come down to about mid chest. The heat gun was then used to mold the PVC. One piece was bent to make a collar around the shoulders and the ends ran down to fit against the end of a piece bent to go around the lazy susan bearing. Once we had the two pieces that way we wanted, we did a fitting on our son and used duct tape to pull the PVC pieces together at the bottom to be sure the harness fit. Note: we did have to bend the legs of the harness a bit away from the spinner (maybe 10 degrees) to make sure it could spin without hitting the PVC.
6. The next step was to cut out two spinner circles from the plywood that be used to help secure the foam board spinner to the lazy susan bearing. We traced the circles and used a jigsaw to cut these out. These were open in the middle and simply fit over the center hole of the spinner and are probably 3-4 “ wide. The point is to provide a more secure way to fasten the screws to the lazy susan bearing.
7. We then glued one on these onto the inside of the foam spinner and painted this orange as well.
8. We then used the glue gun to glue the harness to the lazy susan bearing.
9. We then then glued the other piece of cut out plywood to the outside (side that faces away from the wearer) of the lazy susan bearing. So, on the inside is now the harness and the outside the cut out plywood circle.
10. The last major step was to fasten the harness/lazy susan bearing to the painted spinner foam board/plywood. There are pre-made holes in the lazy susan bearing which we used to screw the lazy susan into both pieces of plywood into the foam but not all the way thru the foam. I used ½ “ length screws. They need to sit flush so that they do not impede the rotation of the lazy susan.
11. Lastly, we painted the black/silver circles around the front of the spinner. Then used the black duct tape to secure some foam padding over the PVC harness that rested on the neck and shoulders to give it some cushion. We also put attached some foam around the harness where it hit the chest.
12. Then we tried it on numerous times to make sure it was comfortable and could spin!
In total our costume cost about $75 but the reactions we got from our son when he wore it and from everyone who saw it at a school Trunk or Treat and Halloween night in our neighborhood---well that was Priceless :)
What kind of reactions did we get to this costume?
Walking around next to a 4 1/2 foot tall orange Fidget Spinner is one thing but one that spins too! The experience was surreal! Children and adults alike were like moths to a flame once they caught sight of the Fidget Spinner. Shouts came from every direction! Often we met up with friends, neighbors and others trick or treating on the streets but sometimes we could only hear excited people shouting, “Love the Spinner” or “Best Costume ever!” Our favorite comments from the night: “Wow, cool costume!”, “That’s the most amazing costume I’ve ever seen in my whole life”, It’s a Fidget Spinner boy! Whoa I love your costume! Did you make that? “Can I spin you? Unbelievable!” It was so much fun to see everyone’s reactions and then when my son spun it for them their reactions doubled! Watching the faces of parents opening their doors was a riot too! Their eyes got big and then a huge smile came over their face as they realized what he was! Often they’d call others in the house to come see and my son would have to spin it for them a few times! The funniest reaction was one lady who immediately laughed and said “Hey, aren’t you outlawed in schools?’ This was a very memorable night and boy did our son haul in a load of candy- 9 lbs. between Trunk or Treat and Halloween night!
Additional Details--
Mom and Dad were dressed up with “big foam fingers” to work the Fidget Spinner. Lots of people asked him if they could give him a whirl! We worked on the costume for a couple of weeks but had we worked on it non-stop it wouldn’t have taken but a couple of days. It was very lightweight and comfortable to wear albeit wide. The only negative was that was hard for our son to lean down and pick his candy from bowls placed on the ground and maneuvering through crowds at Trunk or Treat was tricky for him too. But overall our son LOVED his unique costume and is already asking what ideas we have for next year!
Rating: 3.3 of 5. Votes: 6
|
6 votes
|