
by Annissë


Rate this costume:
|
4 votes
| 1 comment · add a comment |
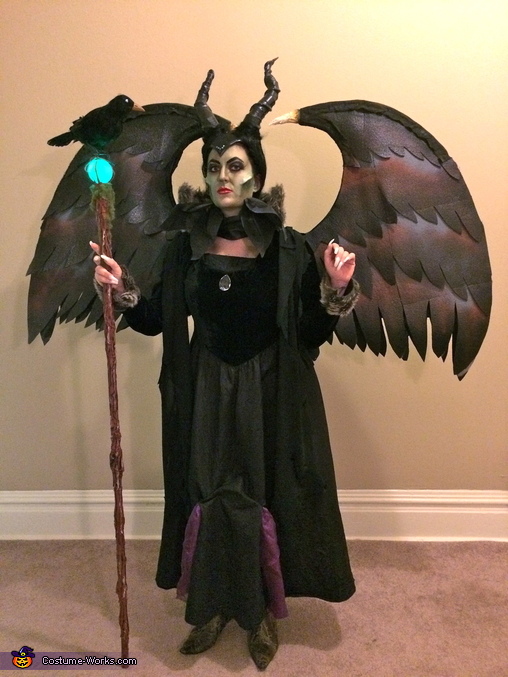
Front full view


| Costume type: | Costumes for Women |
| Categories: |
This homemade costume for women entered our 2014 Halloween Costume Contest.
When Maleficent came out in theaters this year, I promptly went to see it. Having grown up watching Sleeping Beauty, she became the most trancing Disney character I'd had ever watched. Maleficent was so inspiring visually. I was very taken from beginning to end by the graphics in the movie, but Maleficent's look and wardrobe was the most interesting by far. I loved all the details of her outfit, horns, and makeup. After the movie, I just could not stopping thinking about her image. When it came time to decide on a costume, it wasn't hard to do. It was obvious that I needed to recreate her look since I just couldn't let it go anyways.
When coming up with the exact look I wanted to with, I decided to reinvent the costume a little by combining the Maleficents from both movies.
I did my best to come up with easy, effective, and affordable materials for the costume. I started by making the wings. These were crafted with polyethylene foam sheets that you use for shipping stuffing. I started by making one template wing out of paper. I made four of those out of the foam. Then continued that process, each time making them shorter wing sets in order to get a layered effect. I hot glued them together with strips of fabric between, because the foam wouldn't glue well without it. The sets were glued back to back so all sides would be interesting. I spray painted them black then added burnt red and gray for some color. For stability, I put a sheet of cardboard inside the four pieces. This would also connect them. I cut an old backpack up and glued the whole thing on it, so I could just wear it like a backpack. Fabric was added to the top of the backpack strap to cover it and give the look of a cape.
The dress was a find at a thrift store that I altered in several ways. I added a faux fur collar that had cardboard inside to keep it up really straight. I added fur cuffs at the bottom of the arms too. At the base of the dress, I added purple pleats to the front and back. Finally, I added a chandelier crystal in the middle of the chest area.
I created my horns from cereal boxes that I cut and made into rings. The rings got smaller as they grew towards the top. I glued some hemp rope around the horns. Then I wrapped them both in electric tape. I formed a small sheet of craft foam around a mannequin head with a heat gun to make the base of the headpiece. I then attached the horns to the formed foam and added some alligator-like print felt. Finally, I trimmed the piece with some more electric tape. It was all glued to a headband. Five green jewels were added for some sparkle.
My staff was made from a broom stick. I loosely wrapped it in duct tape to give a limb like texture. I bought a dog toy that glows for the orb. It was set within some wire wrapped in tape at the top. The stick was spray painted burnt red, and I hand painted lines on top for some depth. The crow was bought at a craft store, but I did paint it to resemble the crow in the movie better. It was attached with wire at the top.
I made another collar out of a small piece of black leather. I attached some leaf-like pieces of Tyvek hard structure fabric that I had painted to the inside of the collar. Since it's stiff, it stuck out a little better than regular fabric. It all went on with velcro.
When it was actually time to get ready, I started with makeup. I used Ben Nye's Nose and Scar Wax to create prosthetic cheek bones. It was my first time to try this, but I thought it turned out well. I chose to have a green face like the cartoon movie version. I used Ben Nye green makeup and eye shadow to darken it. I tried to create contours similar to hers with the colors. I added eyelashes with purple sparkles for a little drama. My lips were red with makeup grade glitter on top. I sealed it all with hairspray.
After putting on my horns headband, I wanted to use my own black hair to finish the cap. I twisted my black hair around the headpiece and held it with bobby pins and hairspray to create that illusion.
I found the perfect green snakeskin shoes at a thrift store for the outfit. Then, I finished off the whole thing by attaching some pointy fake nails.
The costume was definitely a hit when I went out. I could not do much other than pose in photos with people. Even though Maleficent was mainly considered an evil character, she is one of the most interesting of the villains in Disney movies I think. I could tell that people were really drawn to this character.
Most people wanted to talk to me about how I made the costume. I was told that even though it looked professional that you could tell it was handmade. I really appreciated that comment. That is something I strive for. If I wanted a costume that looked like it was made in a factory then I would have bought one. I'm glad people can tell there was a lot of effort put into it.
I felt like a celebrity when I went out. I received much attention. I hope that I was able to do the character justice. I even recited the curse she tells to some people. It was nice to share my creation with people I didn't even know.
I am so happy that I decided to do this costume. I didn't expect to enjoy the process, completion, and celebration of Maleficent as much as I did. I worked really hard for several weeks on it, and I feel like it stands up well to professional costumes. It was so inspiring that I actually became her character while I was in it.
Similar costumes:
Rating: 4.8 of 5. Votes: 4
|
4 votes
|

