
by Christina


Rate this costume:
|
7 votes
| add a comment |
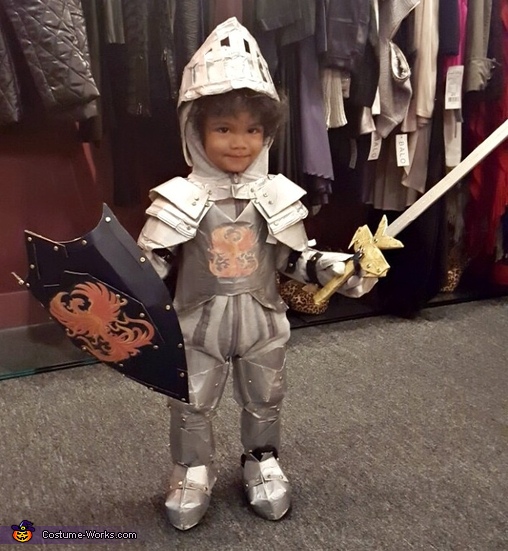
Little Knight in Shining Armor Costume


| Costume type: | Costumes for Babies |
| Category: |
This homemade costume for babies entered our 2016 Halloween Costume Contest,
Costume Wearer/Idea Origination:
I decided to go with a little knight-in-shining armor costume for my two-year-old son, Zackary, and the reason being is I aim to help instill a sense of chivalry and an adventurous spirit in him. I merely thought about the wonderful qualities that my son already possesses. I thought about how considerate he can be. As an example, the moment I accidentally stub my toe and he sees and hears me express pain, he will immediately run up to me to kiss what he calls the "boo-boo" away and comfort me with a hug. I also notice his sense of adventure and how enthusiastic he gets and how wild his imagination goes when he pretends to sword fight with me and his father using paper towel rolls. Massive amounts of giggles are to be heard from him whenever he plays sword fight. And my son also enjoys being my little helper by eagerly trying to help me put the groceries in the refrigerator, as well as other small tasks. I honestly believe because of these wonderful qualities, I have my very own little knight-in-shining armor. I also decided to go with the phoenix bird as the knight's sigil because they are known to rise from the ashes. And for me that means even though we can have failures in life, it is important to never allow those failures to prevent us from rising and trying to succeed again. I will always want my son to be aware of that fact. Furthermore, I had made a Juliet Capulet costume, but it can interchangeably be a lady of the court/fair maiden/noblewoman/princess costume so that it could compliment his. I made it years before, but I never truly got to show it off, but what better way to do so than with my son.
Materials Used/How to Instructions:
~For the suit of armor, I used about seven compostable plant fiber molded rectangular food containers with curved corners with lids, general beige tape, black and white velcro tape, gold metal paper fasteners, non-toxic metallic sterling silver paint, printed image of a phoenix sigil using computer paper, homemade glue using tapioca starch mixed in water to paper mache the sigil on to the armor, scissors, old make-up brush to paint
~For the sword and the shield that doubles as the sword's sheath (the sword can be placed in the front shield open pocket), dark navy shoe box, non-toxic metallic gold paint, non-toxic metallic pewter paint, non-toxic metallic steel paint, gold metal paper fasteners, general beige tape, clear packaging tape and computer paper for phoenix bird sigil, container lid for the bottom handle of the sword, white velcro as a handle behind the shield, scissors, old make-up brush to paint
~I used one of my son's hooded coverall in grey and bought him a pair of grey gloves and skull cap to finish off the look.
In my attempt to create this costume, I looked at about 30 different images of knight suit of armors on google and I tried my best to imagine the shapes and molds of the armor plates and I creatively manifested those shapes and molds into tangible forms. Basically, I constructed the shapes out of the containers by deconstructing them into flattened forms. I was able to flatten the containers by cutting slits on all sides, pressing it down until flat and then covering the flattened containers with beige general tape. The beige general tape also covered the spaces that was created when I cut slits and flattened the container and in doing so, this created a continuously solid flat surface for me to mold into shapes for the armor plates/parts. What is more, the general beige tape not only added layers, but strength and pliability to the armor. I then cut additional slits on the now deconstructed flattened container to overlap one section of it to another and secured it with tape. This process helps to create a
curvature of the knight armor parts and plates meant for the elbows, shoulders, thighs, and feet area. At times it helped that the rectangular containers had originally
curved corners and so on specific parts, such as the knee plates and helmet, I mostly worked with the natural curves of the containers. But there were also times that the natural curves weren't so helpful, because as explained earlier, I needed to force the containers to be a flat surface and create my own curvatures.
With the armor part concerning the feet/shoe area, I made it so that it can be place on top of practically any shoe. And with the helmet, I made it so that it had a movable visor/eye shield with the help of the gold paper fasteners.
I also used the gold paper fasteners to help reinforce certain areas of the armor. Not only were the gold paper fasteners great for securing the armor parts in its position, but they also added a decorative aspect to it. But because the gold paper fasteners can potentially undo itself and poke my son when he stretches and moves about in the costume, I added white velcro tape on the backs of the gold paper fasteners to prevent them from doing so. That extra step made for a more comfortable costume. I also used the black velcro tape as the main fastener for the whole costume so it can be worn properly without coming off of my son. I painted the whole suit of armor and topped it off with the paper mache phoenix sigil onto the breast plate part of the armor. And underneath all that armor, he was wearing a warm and soft grey coverall to blend with the suit of armor.
And as for the shield, I mainly used a shoe box that I took apart. After I cut out a general shape of the shield, I cut two slits on opposing sides and overlapped one section to another and secured it with general beige tape. I then gently bent the whole thing to create even more of a curvature. I used general beige tape and the gold paper fasteners to put together and stabilize all the parts I cut out. I left the shield unpainted and added a print out of a larger version of the phoenix sigil that I painstakingly put clear tape over and pressed it on top of the shield. I made the front of the shield so that it can hold the sword, almost like a sheath-like pocket. So whenever my son gets tired of holding the sword, it can be placed there whilst keeping and adding to the whole design integrity. I also used white velcro held by gold paper fasteners as a handle for the sword and since it was made of velcro, it attached to the material that the gloves that my son wore, even if my son was not purposely holding the shield.
And as for the sword, the very bottom part is made from one of the container lids and the rest was made from the shoe box material. I used general beige tape to cover the whole sword and then secured it with gold paper fasteners and then painted it.
Other Info:
~The costume was a huge hit! Everywhere we went (from downtown Chicago and then to a couple of nearby suburbs), everybody was just in awe. I saw people taking pictures with their phones and pointing at him and saying things like, "How cuuuuute!, Awwwwww!, and someone saying "Look at that little adorable knight." We had strangers stop us and asked about the costumes and give compliments. Strangers literally stopped what they were doing to take a look and ask questions. People were blown away when I told them that I made the costume. And when I told my family and friends that I made it mostly out of the usual food containers they have seen me used on many occasions, they get a puzzled look in their face, which is really fun to see. One of my relatives even said that they wouldn't be surprised if the costume became an internet hit. But truth be told, the best compliment I received was the smile plastered on my two-year-old's face all day.
~Most of the materials and tools I used were already things I had at home, which was really great budget-wise.
~I started making this costume six days prior to Halloween and worked anywhere from 4-8 hours/day on it.
~During this whole process, I didn't use a measuring tape. I basically just eyeballed the size of the armor parts in comparison to the size of my son and luckily they fit my son perfectly. But it did also help that I made the costume so that most every part is adjustable. I had him try on the main top breast plate piece that has the sigil on it twice in the middle of making it and I had him try on the other parts once before I painted the whole costume just to make certain it would have a great fit. I honestly just went along with what felt natural. I didn't have a set pattern. Since all the suit of armors I saw had their own unique patterns to their makeup, I decided that it didn't necessarily have to be exact and I just went with the flow. It did help that growing up in a large family, my siblings and I didn't have a lot of toys to play with and so we made do with what we had. We would make all sorts of things out of cardboard paper and anything else you can find around the house.
~My son never complained wearing the costume. He felt comfortable even when he was wearing it while in his car seat. He even fell twice as he loves to run around, but he didn't get hurt or cry because the suit of armor protected him. With all the running about and falling he did, I am somewhat surprised that the costume held up as nicely as it did. I did have a small fear that it may not last the whole day considering how active my son can be. But it did and it did even when practically all my relatives picked him up and carried him around. I will have to repaint small areas here and there to make the paint job consistent again, but that is something I expected to do.
~The best part of this costume is that it really is adjustable. I can keep adding to the suit of armor as my son grows bigger and the velcro tape helps with adjusting to the size, as well.
~Also, the armor looks all dented and not perfectly smooth as if the knight has been at war and slaying dragons, which I believe adds to its authenticity and which I liked very much. To top that off, what was amusing and actually pretty cool are some of the naturally gallant-fighting-like stances/poses that my son would make. This is what made it very difficult to choose which pictures to submit, because there were plenty of other good ones.
~This will definitely be a costume not only for my son to wear on Halloween, but a costume he will wear any other day to encourage a sense of wonder and imagination in him.
Similar costumes:
Rating: 3.9 of 5. Votes: 7
|
7 votes
|

