
by Beth


Rate this costume:
|
20 votes
| 2 comments · add a comment |
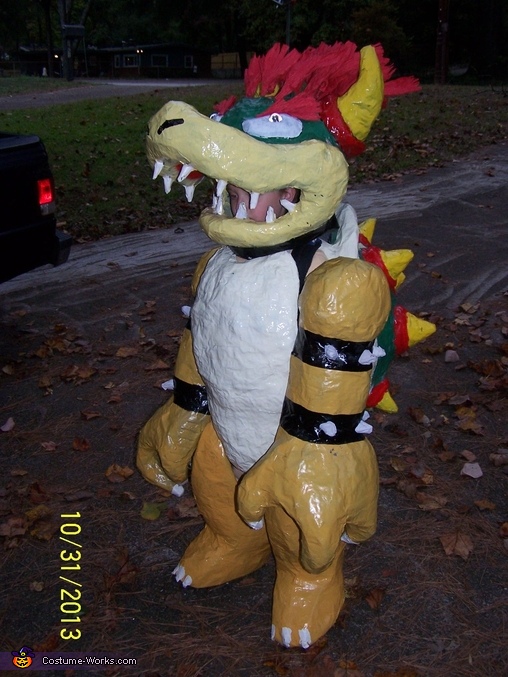
Bowser front


| Costume type: | Costumes for Boys |
| Categories: |
This homemade costume for boys entered our 2013 Halloween Costume Contest.
Each year for Halloween we create a new costume design that my son dreams up. This year it was Nintendos Bowser Game character.
The process starts out with a brainstorm session that lists out all the possible things he wants to be in character. We then go to the computer to Google images of the various ideas from the brainstorm list. The images are reviewed and narrowed down to the top 2 or 3 most interesting. We talk about the ideas, size, difficulty, WOW factor; then decide on the final costume. Bowser is a paper mache costume. The total material list consists of; Flour, water, newspaper, masking tape, wire clothes hangers, spray enamel paint, twisted paper cord, hot glue (for the hair) shoulder straps from an old back pack, scissors, a couple bowls, spoons, wire cutter and pliers. The eyes were made from red white and blue LEDs mounted into 2 plastic marbles hooked to small batteries and a switch. The total project time was 2 people, 8 days for 4 hours per day (evening). We also created a Waluigi hat and a Toadette costume frame at the same time.
Step 1. Create wire frames for the body parts using straightened clothes hangers, masking tape and pliers if required.
Step 2. Create paper ribs and tape to the wire frame sections. the parts are now paper framed.
Step 3. Infill the voids between all the wire ribs with crumpled newspaper, taped into place.
Step 4. Mix paper mache mix (flour/water) to thin pancake batter look. Apply paper strips 1 to 2 inches wide on frames. 2 layers are required for strength in the costume. Allow paper to dry between layers
Step 5. Prime all parts inside and out with a good light gray enamel primer (thourough enamel; paint bonds with the paper and makes the costume uninteresting as food for bugs)
Step 6. Spray paint or brush paint as desired, I tape off sections and spray gloss enamel.
Step 7. Dry all paint thouroughly ( I use a dehumidifier in a small storage room to dry all wet work)
Step 8. Mount shoulder straps and legs straps
Step 9. Touch up paint as required
Step 10 Suit up and have fun
Similar costumes:
Rating: 4.5 of 5. Votes: 20
|
20 votes
|

