

A Farmer & her Chicks Costume
Rate this costume:
|
7 votes
| add a comment |
A Farmer & her Chicks Costume


| Costume type: | Costumes for Babies |
| Category: |
This homemade costume for babies entered our 2022 Halloween Costume Contest.
A word from Renea, the 'A Farmer & her Chicks' costume creator:
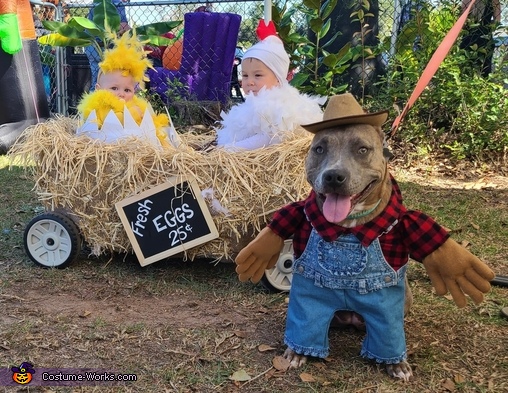
Most importantly, I can't begin to tell you how difficult it is to get a good picture ...everyone looking in the same direction, smiles on their faces, posed correctly, etc., when it involves a dog and 2 babies! LOL.. But we did our best.
I saw the chicken costume on Pinterest a while back and thought it was just adorable. Since I have two small grandchildren, one who isn't mobile at all yet and one who was just beginning to walk, I thought this would work perfect as a "couples" costume and they could both be pulled around in the wagon. When our local vet clinic held a Halloween festival, to include a costume contest for your fur babies, we pulled our dog into the costume idea and made her the farmer.
First up is our fur baby, Corona...and no, she isn't named after COVID. We got our sweet girl, pre-COVID, from Amazing Grace Bully Rescue. She was part of a liter that was brought in that somebody had just dumped on the side of the road...GRRR. The shelter gives liters they take in "themed" names. These particular pups were beer themed; hence the name Corona.
Anyway, I couldn't find the costume I had in mind for Corona without spending a lot of money on it. After much searching, I decided on a Big Bad Wolf costume bought from Chewy.com. The costume had a "base" I thought I could work with, flannel shirt and denim pants.. and the price was only $12. To turn it into a farmers outfit, I got a pair of my granddaughters overalls that she had outgrown and cut it up for the pieces I wanted to use. I attached the bib of the overalls over the flannel shirt of the costume using hot glue on the front/waist and sewing the overall straps in place. I removed the ruffling around the pockets of the overalls and attached it to the hem of costume pants with hot glue. Now, because the costume was originally a wolf, it had big, hairy paws. I cut those off and added kid mittens stuffed with Poly-fil (pillow stuffing) using hot glue (I'd truly be lost without my hot glue gun..lol). Topped it off with a dog hat from Walmart, and Corona was finished.
Now for the chicks. My grandchildren, Aubrey - in yellow (6 months), and Phoenix - in white (1 yr). Their costumes were made the same with the exception of the head pieces. I used long sleeve onesies that they already had and attached 2 feather boas to each one using hot glue. Both are wearing yellow tights, which are hard to find unless you order them online. I chose to buy white tights and color them yellow with fabric spray paint I already had. Though their feet can't really be been seen in the pictures but they both had chicken feet. To make those I cut 2 pieces of felt in the shape of chicken feet, attached the 2 pieces together using a combination of glue and actual sewing, and that made sort of a "slipper" that fit over their shoes. So obviously, I made 4 of these slippers. Aubrey's headpiece is simply a headband with feathers from her boa glued on. Phoenix's is a white baby hat, a rooster comb made of felt and stuffed with Poly-fil, and attached to the hat by sewing and a little bit of glue in some spots.
The last thing to do was the wagon/nest and the hatched egg Aubrey is sitting in. For the wagon, I completely wrapped it with brown butcher paper and tried putting hay on top of that using spray adhesive. I wasn't happy with the look of it and it just wasn't working how I planned it to. So, I went over the brown paper with 5.5" burlap ribbon that I already had. Now it was starting to look a little more "nesty". Now to try and get the hay to stick on the ribbon. The spray adhesive just wasn't working with holding the hay in place, so...you guessed it, I busted out my trusty hot glue gun. With the wagon laying on its side, I just swirled a bunch of hot glue around on the burlap, threw a pile of hay on top, used my hands to press it down good, let it dry a couple of minutes, and then stood the wagon upright and bumped the excess hay off. And I did this all the way around the wagon. Bundles of raffia were used for the inside of the nest and along the top edge of the wagon. To finish the wagon, we used 2 chalkboards purchased at Dollar General to advertise their Fresh Eggs.
Aubrey's egg was probably the hardest to figure out how I was going to make it. I considered paper mache but ultimately decided against that for a couple of reason. 1. The sizing had to be just right...big enough for her to sit in and small enough to fit in the wagon. 2. Paper mache can be difficult to get a smooth, non-lumpy surface if you're not a pro...which I'm not. Then, while watching Aubrey and her Pops playing outside, inspiration struck me. Since she was about 3 or 4 months old, we put her bumbo seat in the wagon for her to sit in and be pulled around. The wagon seats fold out to make sort of a table inside the wagon, but works great for the bumbo to sit on securely and keeps Aubrey from tumbling over. I wanted a material that was flexible enough to wrap smoothly around the bumbo, but also stiff enough to keep its shape at the points of the cracked egg part. After looking through Hobby Lobby at different materials, I decide on a heavyweight interlacing used for quilting. Seeing as a bumbo seat is made of low-density foam, I didn't use the handy dandy glue. Instead, I used some Gorilla heavy-duty mounting tape that I already had to attach the interfacing to the seat. All that was left was to cut the top to look like a hatched egg, and Viola...A farmer and her chicks!
Cost of materials - excluding those I already had on hand
Dog costume - $12. Chewy.com
Dog hat - $5. Walmart
4 feather boas - $16. Hobby Lobby
5 pieces of felt - $4. Hobby Lobby
Baby tights - $5. Walmart
Interlacing - $10. Hobby Lobby
3 raffia bundles - $9 Walmart
2 chalkboards - $9. Dollar General
2 mini hay bales - $5 Hobby Lobby
Grand Total - $75
Tips - With the feather boas, start attaching a little below the actual neckline of the clothing or the kid will be eating feathers. The feathers will still need to be cut down/trimmed a little in the front around the face and over the shoulders to prevent fuzz and feathers from getting in their mouth. For a little extra protection from flying fuzzies from the boa, after I got it all attached to the onesies, I sprayed them heavily with a clear sealer...just be sure to do this well in advance of them wearing the costume so it has time to air out and not have any lingering fumes from the sealer. I let mine air outside for 2 weeks prior to wearing.
I also sprayed sealer over the hay on the wagon so we didn't leave a trail everywhere we went.
I was very happy with the way everything turn out. I hope someone finds this info useful in your future costume ventures!
Rating: 4.9 of 5. Votes: 7
|
7 votes
|