The Maitlands Couple Costume
Rate this costume:
|
27 votes
| 2 comments · add a comment |

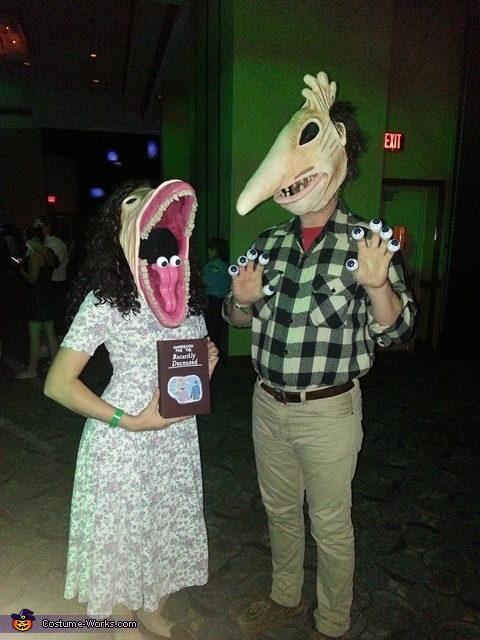
Introducing, the stretch-faced Maitlands!
| Costume type: | Costumes for Couples |
| Categories: |
This homemade costume for couples entered our 2013 Halloween Costume Contest.
A word from Sara, the 'The Maitlands' costume creator:
My boyfriend and I are wearing these homemade costumes! I got the idea from growing up watching Beetlejuice and seeing a few other Beetlejuice costumes on Pinterest!
98% of the masks were made out of: newspaper, masking tape, plaster wrap, spackle, plaster of paris, and model magic (an air dry moldable foam). The other 2% is accounted for by: 2 yellow foam children's "hard hats" from Michael's, two hairpin wire skewers from a s'mores kit my mom gave me, florists foam shaped like a cone from Michael's, modeling clay, plastic eyeballs from Party City, a rubber glove, a bald cap, rice, acrylic paint, wigs, and an old book.
Barbara Maitland:
I pretty much dove right in! I put the hat on my head, and ran through ideas of what I could use to form her jaws. AKA, what do I already own that I can sacrifice to make these jaws? Fortunately I found the perfect material which was the two hairpin skewers in the s'mores kit. I then used tape to guesstimate a good location of where I wanted her jaws, and started filling in the space with crumpled up newspaper and more masking tape. Once I formed a base, I put on a layer of plaster wrap, which comes out lumpy so I added the layer of spackle to try and smooth it out...In hindsight I'd skip the spackle and go straight to plaster of paris because the stuff is magic!! It saved me so many times. So after lots and LOTS of sanding, my boyfriend and I formed her teeth out of the modeling clay, and stuck a toothpick in them before baking to give it a base for when I wanted to stick em' in her face. I used the model magic to do all the detailing on her face and used it to make her tongue as well. I basically just drew in pencil where her features would be and went from there. I formed "snakes" out of the model magic and formed the wrinkles and used water to smooth out the edges to make the seamless transition into the flat parts of her face. I also used the model magic to create a gum line to sink her teeth into (ba dum tsh!). After the model magic dried, (but not really completely dried because we were running out of time and I had to finish those bad boys!) I filled in the cracks with the magic plaster of paris, which dries almost instantly and is sandable to keep the skin smooth. I painted everything, used toothpicks as anchors to stick her tongue in her mouth, hot glued her eyeballs on top of that, glued on her wig, and finally got to put the teeth in. I think they were my favorite part! Then the final touch was to use glossy Mod Podge on the "wet" parts of the mask; her gums and her tongue.
Adam Maitland:
I don't want to sound repetitive or like I'm skipping out on deets, but I made the base of Adam's mask the exact same way I made my own. Except it involved a lot more positioning on my boyfriend Matt's head. I started with the foam hat, built it up with newspaper and masking tape, and then used the florists foam cone for his long snout. It ended up having a bit of a furrow, so thank goodness for model magic because it allowed me to add a nice rounded top to Adam's nose that flowed much better into his hair. I also cut holes for the eyes for Matt to see through but he ended up not being able to use them . As for the hand sticking out of his head....that was an adventure! I took a rubber glove, filled it with rice, and dipped it in plaster of paris....It came out too bulky and shaped like a hand looking for a high five so I restarted, used plaster wrap, and shaped each individual figure how I wanted it and held it until it dried enough to hold its shape. Then I plaster wrapped the contraption right onto the back of the head and coated the entire thing while I was at it. From there I did the same thing and drew on where the facial details would be. I used model magic and dipped my fingers in water to create the wrinkles for the hand into the head, his cheek bones, and everything in between. I painted the mask, made more little teeth to stick into his mouth, and started gluing on the wig. This was tricky because the hole to the mask had to be big enough to fit Matt's dome into, but once he had it on you could see a lot of his hairline and some of his ear. SO to fix that, I got a bald cap and cut it so that it would extend the mask downward. I used hot glue and more plaster of paris to create a seamless edge into the face. The flexible latex allowed him to slip into the mask but also allowed me to cover up his ears and add more hair to cover up his own hair. Problem solved and crisis averted! :)
Eyeball Fingers:
Took the plastic eyeballs...drilled a hole in each, burned the hole to be wide enough to fit each of Matt's fingers, and drew the "finger letter" on the inside of each.
Handbook for the Recently Deceased:
I printed out a picture of the book for the picture on the front. I cut it out, then, I found a PERFECT sized book at my mom's house (which happened to be from 1936), painted on the white outline of the picture, then Mod Podged the picture onto the front. Lastly, I free-handed the writing on top with pencil and then filled it in used a white paint pen.
Similar costumes:
Rating: 4.5 of 5. Votes: 27
|
27 votes
|


