
by Molly


Rate this costume:
|
5 votes
| 1 comment · add a comment |
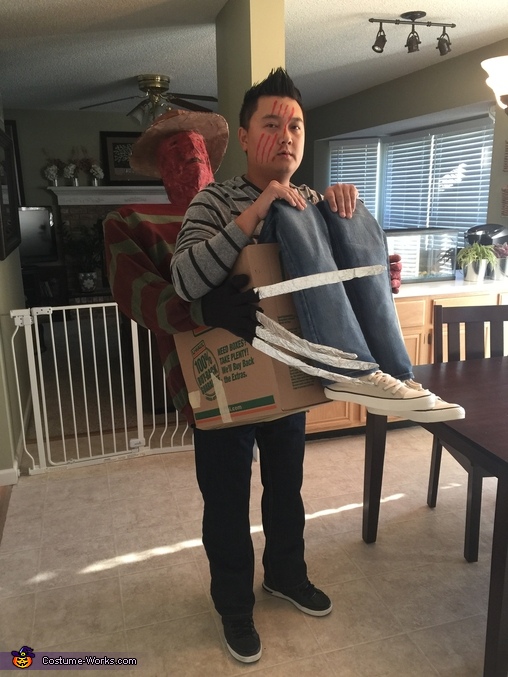
Freddy Krueger's Victim


| Costume type: | Costumes for Men |
| Category: |
This homemade costume for men entered our 2014 Halloween Costume Contest.
Hey everyone, I'm the creator of the costume and am wearing it as you all can see. I grew up watching "Nightmare On Elm Street" as well as the "Friday the 13th", "Halloween", and "Child's Play" movies, but Freddy Krueger stood out as the most gruesome of them all. The deception/illusion is credited towards those who have made the "carried in a box" before me. So I figured why not combine the two!These are the materials that I used to create the costume: cardboard(plentiful and free), children's school glue(use the cheap kind-$0.48 each), masking tape ($3.48 a roll), halloween colored face paint(red,black,brown @$0.99 each), a 2XL green sweater ($5.98 @ Wal-Mart), red spray paint ($1.49), plastic grocery bags for stuffing(free!), an empty plastic bottle (free!), a 1x1x6 long wooden stick ($2.49), a roll of bounty paper($0.99), zip ties($1.00), old shoes(free!), old pair of jeans(free!), foil(free!), a brown right handed glove(free!), pair of old socks(free!), two plastic gloves(free!), flour(free!) and imagination!
This is how I made the costume:
1. I made Freddy's head, hat, and neck with masking tape and cardboard.
2. Freddy's hands were made by stuffing two plastic gloves with grocery bags. I then taped the gloves for support.
3. I combined a half cup of flour, 2 bottles of glue, and brown paint, and a 1/4 cup of water to make the paper mache adhesive. This adhesive combined with strips of bounty paper towels were used to cover his hat. The same recipe combined with red and black paint were used to paint his face and hands. I darkened the adhesive with more black to give his facial features more depth. Black paint was used to contour his facial features as well as his eyes and mouth.
4. For Freddy's right hand I took cardboard and made a glove for his hand then made the knives for the four fingers. I cut the tips off the fingers of the glove, then slipped the glove over the hand. Foil was then used to wrap up the knives.
5. I took the masking tape and taped down stripes over a green sweater. Red Spray paint was used to spray the areas that were not covered with tape. After it has dried (overnight), remove the tape to reveal Freddy's sweater.
6. Take a moving box and cut half a circle at the bottom half of one side of the box. Measure once side of the box going from top to bottom. Then measure the top of the rim of the box going from left to right. Right down the measurements. Take your 1x1x6 wooden stick and measure out 2-of the top to bottom measurements, and 1-left to right measurement, then cut out them out. You should have three sticks to use as a bracket for your box. Use zip ties to secure the three sticks to the inside perimeter of the side of the box where you had cut your half circle.
7. Take Freddy's head and make shoulders for his upper body. Place his upperbody in the sweater.
8. I took cardboard and made a basket to fit a plastic bottle in. First secure the bottle to the top bracket of the box with zip ties. Take the plastic bottle and secure it to Freddy's shoulders using zip ties. Now take Freddy's head and place the bottle in the basket. Secure the bottle to the basket using zip ties.
9. Now that Freddy is coming to life. Zip tie Freddy's left hand at the cuff of the sleave. Secure one figure to the box using a zip tie. Do the same with Freddy's right hand. Now Zip tie, spacing every three inches of his sleeve to the box so that a straight line is used to form his forearm, and another straight line is zip tied to form his upper arm.
10. Now make your fake legs. I took old socks and stuffed them then placed them into the shoes. The socks were then placed inside the shoe. Make sure you tie the shoes tight so that they don't slip off. Now secure the socks to the jeans with zip ties. It will also help for support if you zip tied cardboard between the socks and jeans.
11. Take the remainder of the 1x1x6 and cut out two 5-inch pieces. Take these pieces and secure them to the front of the box for the support of your fake legs.
12. Now try the costume on and amaze everyone.
Alot of people were amazed and expressed how creative this costume was when I wore it out with the kids when they went trick or treating! Enjoy!!
Similar costumes:
Rating: 3.4 of 5. Votes: 5
|
5 votes
|

