
by Carrie


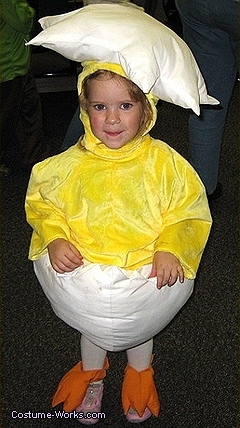
This is an idea for a HOMEMADE EASTER EGG COSTUME
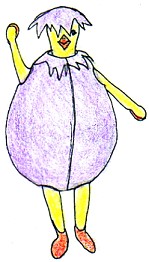
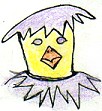
The drawing below is an example of what we are trying for. The Chickie inside the egg will be left mainly up to you. My Ideas would be: A pair of Yellow Tights and Orange shoes or slippers. A long-sleeved Yellow Shirt (tuck in fingers)... and you COULD sew a bit of material to the under side of the arm to give the suggestion of little wings :-). For the head... either a Chick Mask, or a Yellow (dyed?) Stocking Mask or Yellow Face Paint and some sort of Orange Beak (I will look for any ideas on this and add what I find). The topper which is actually supposed to be Egg Shell can be a piece of Cardboard with a jagged cut (or maybe even an old sun hat)... bent a bit... with some of the Egg Material stretched over it, sewn or glued and bobby pinned to the chickys lil head :-)
Let me say, before we dive into this effort, that I hope you have SOME skills, or a helper with some skills, in the sewing and/or crafting department, otherwise this may just seem too complicated to attempt. One reason I say this is because I have had to call upon very far reaching memories of my sewing and crafting days and my memory isn't as good as it once was. I am reasonably sure though, that if you've been around the sewing room, and you go over my plan and pattern, you will probably be able to say, "Oh Wow! I coulda thought of this all on my own!." and thenYOU will make any adjustments you see fit to what I have to present you. The other reason I say you will need some sewing know-how is because I am unable to provide things found in most store-bought patterns. I cannot provide "yardage" amounts, for example, and that is partly because I don't know what SIZE of a person you will be costuming. You will need to use your imagination, your eye, and your model, to decide "measurements" for things like "armholes", "legholes", neckhole" etc. It might be wise to buy a little bit extra of each item needed... just to make room for any mistakes. That said, I suppose I should start with a list of needed materials.
For the main item I would suggest that you measure your model from neck to knee, then add a few extra feet to allow for the fullness (roundness?) of the egg shape. Choose a fabric that is sturdy but not real heavy and in the colors and design you want the egg to be:
COLORED FABRIC ~~ WHITE FABRIC (for lining..yardage should be enough to cover the inside half of your egg... twice (see "lining" pic below)) ~~ MATCHING THREAD ~~ BATTING (or other "stuffing" material ~~ VELCRO (several yds.) or a preferred type of "fastener" ~~ 4 SNAPS(lg.) (Optional) ~~ PATIENCE (Several yds.) ~~
and here we GO:
Begin by cutting 4 EXACT pieces of your Egg Material (measure your model from base of neck to just above knee, then add extra feet or inches needed to consider the "fullness" you will want in your Egg and depending upon the size of your Costume wearer (model). Cut the pieces in an OVAL that is slighter larger across about 3 quarters down. (see pictures below for an Idea). Be sure to save enough of the egg material to make 2-4" by several feet strips of material a little later on.
Then take 2 pieces, call them the "front". Sew, with the "outside-in" (which maybe I don't need to say... to you older pros out there), the 2 front pieces together down one side, starting about 3-4 inches from top (neck opening), and sewing all the way down to the tip of the crotch area. (see pictures). For the sake of saving space I have shown only 2 ovals here. You will have 4.

Then, take the remaining 2 ovals, call them the "back". Sew, outside-in, down one side, the same as you've done for the pieces labeled "Front" above.
Now that you have a back panel and a front panel ( they should both be exactly the same :-), it's time to put on a lining(I thought of this as the only way to STUFF the egg and still allow for an easy getting on and off of the costume... without having to rearrange the stuffing or totally REstuff the egg with each wearing. You will need to cut a piece of your "lining" material to match the shape of an inside half of your egg. In other words... the shape of the outer oval of the unsewn portions of your front and/or back pieces. Looking at the picture might help since I'm sometimes not GREAT at explaining things. We are forming a half of an egg, the "lining" being the inside, cut surface. The white... without a yolk (well..the chicky is the yolk I suppose :-). Sew this piece of material to the UNsewn sides of your front section, and the same for the back section. BE SURE to sew these with the Outside IN. Sew all around the edges leaving the NECK portion unsewn. When sewing is completed turn pieces right-side-out. There will be some shaggy, unsewn pieces of material from the neck. Simply pull them out and let them hang for now. Or ..if you want to you can shape them (as seen in picture) now for a "broken egg" (we hope) effect.
Once lining is sewn to INSIDE of egg halves, put batting or stuffing of your choice into each half through the opening in the neck. Fill to desired fullness... trying to keep lining side from being overstuffed and bulging out too much. Also keep in mind that once a body is next to the lining... the stuffing will be forced outward.If you didn't earlier...NOW decide whether you want the broken-egg look around the neck. If you DO NOT..If you want a clean neckline... stuff all loose materials in with the stuffing before you close up the hole that you put the stuffing in through (boy THAT was a mouthful!). Sew up the neck opening in each side :-)
Now you will need to put both of the halves together... and therein lies a few decisions you need to make. What, for example, would you choose as fasteners to hold the egg together at the sides once the chicky is inside? I, liking "EASY", opted for VELCRO, with a possible exception of SNAPS in the crotch. Of course you may opt for Snaps or Zippers, or even Buttons all down the sides. Irregardless, it seems to me that there will be a need for a 4 inch wide, folded in half to make a 2 inch wide, strip of Egg Material to be sewn along the edge of the front half from the bottom of what will be an arm hole, to the outer edge of what will be a leg hole... on both sides of the FRONT half only. Then a short strip that will go in the crotch to be used with either Snaps or Velcro. Here is a picture that may help:
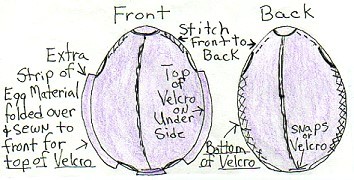
The rest is rather self explanitory I think but I will travel on for a minute just in case it can be of some help :-) It may have been better to sew the fastener strip on while doing the lining but I thought it would be less confusing to do it this way for those who aren't real EXPERTS at this stuff (like me:-). Once Strip of material is sewn in place on front half, apply your fasteners. If it is Velcro, Sew bottom of Velcro to OUTSIDE edge (colorful material) of back half from bottom of (what will be)arm hole to outer edge of leg hole...on both sides of back.(and a short length in crotch area (to match material strip on front half in crotch area) if using Velcro there). Then sew the top portion of Velcro (or other fasteners?) onto the Material Strip on the front half on the side facing toward the back ...including strip on crotch. With thread, Sew shoulder pieces together leaving plenty of room for the Chicky to stick his little (or big?) head through. If you haven't finished the neck..do that by simply cutting a ragged edge with the material left sticking out. You can tack them down if preferable.
Here's one more picture that might help you with the crotch area which STILL may confuse you but I tried!
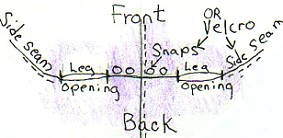
There is one problem with this picture: Where it reads "Side Seam" on both sides... it should say "Fastened" or "Velco Seam ". Please excuse the error. I hope the sketch helps anyway. Now it's time to put somebody inside and fasten all areas that should be fastened. Above, in the very beginning of this Easter Egg Costume portion is my ideas on how to create the Chicky. The person inside doesn't HAVE to dress up of course...it's just a thought. A fun thought. :-)
So there you go... Now you can get ready to compete at that Easter Parade that I keep hearing so much about. Be sure to add or subtract all of your own ideas. By the way, I would LOVE to hear how this went for anyone. What I'd TRUELY ADORE is some PICTURES of your completed costume! I'm NOT one to beg..but... pretty please? :-) :-) Well, Even if you don't send me a picture...I sure hope you have fun with this project and I hope somebody has a GRAND time wearing it too.
For more costume ideas, be sure to check out our Costume Photo Gallery

