
by Esther


Rate this costume:
|
2 votes
| add a comment |
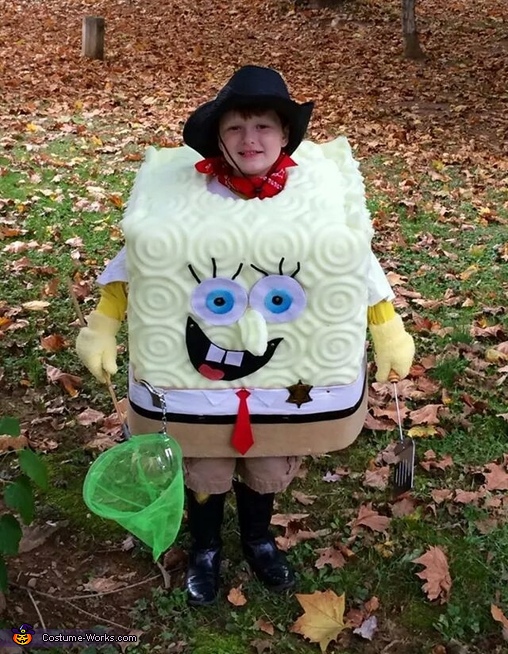
Lanndon as sheriff Spongebob! hard time standing still.


| Costume type: | Costumes for Boys |
| Categories: |
This homemade costume for boys entered our 2014 Halloween Costume Contest.
Lanndon is 6 years old and a huge fan of Spongebob. He was asked mopenedmes what he would like to be for Halloween. He replied quickly, "Spongebob". We decided to conquer the task and try to create a unique homemade up cycle. I am a sahm due to family illness and do not have a lot of funds to spare.
We went to the local stores and asked for some boxes to practice with in different sizes and shapes. We looked around for ideas that we could make out of something we already had or could get cheap or free. At first we were going to paint, however the cost of paint was more than I wanted to spend and i still had time. I wanted some kind of foam or bubble wrap but that to seemed costly. I ended up running across a foam mattress cover and it was yellow. $ 10.58 on clearance. Woo hoo, score!
The boxes were tried and shaped for a decent fit for a short body and short arms. I used a box cutter to carve the arm holes and the head area, then took scissors to neaten the cuts. I took some of our WV redneck ingenuity and grabbed the duct tape and started to reinforce the box and line the cardboard areas that could possibly cut.
The box was ready for designing and sturdy enough for crafting. I opened the mattress coverr and measured for the box before cutting. I eyeballed the measurements, it was much easier than dealing with a ruler. I made the cuts for the foam and began to think how was I going to attach this to the cardboard. We ended up trying staples and thought about glue, but we were worried the glue would melt the foam. We ended up finding some paper glasps in a junk drawer at home and they were perfect.
The foam was thick so i used a pointed tool that was skinny tipped to poke a hole through both materials as I held it securely to the box. I started at the back bottom and secured the piece with a gold metal clasp from bottom to top of box. My foam had texture so i had placed it a certain way to get the effects of 3d, I then wrapped the foam around box and pulled it snug without stretching it to much.I took some more of the clasp and pushed each one through the pre-poked hole and attached the other side of foam from.
At this point it looked like a piece of foam wrapped around a box but the foam looked as if it was to big at the top. I am right handed so I naturally used the left side as a starter point. I had a stable placement to measure where to attach the side together using only 3 clasp on each side to meet the ends around box which I would call the backside of Spongebob.
I decided later i would add more clasp as needed to tighten or adjust. After the foam was wrapped i flipped the box right side up with back side facing the wall away from me. This would be spongebob facing toward me. I pulled the top part of the foam cut out that was hanging over and folded it over the top of the box to measure where i needed to trim away. I cut the sides down and pulled the foam snug to meet at the back. I attached it with clasp again but started in each corner to make it easier to handle. Once it was covered on top i took scissors and trimmed any uneven foam at top where the meets occurs. I tucked the foam down on top if needed. Then i added more clasp to tighten .
the last step with attaching foam was the bottom part. We pulled the foam taut and slowly clasped all the way around.
It was time to embellishment and add features but how and what would i use? I ended up with scrap materials left over from past craft projects ;felt and fleece blanket materials. I made a pattern for each shape so they matched, i got empty boxes from frozen pizza and traced the pattern for each detail from eyes to lining the pants on the costume and cut shapes from the box. I used the homemade backing to trace the felt shape and then cut each piece out, i glued the felt onto the pattern made i out of the pizza box. So i had a sturdy set of eyes and mouth. I let the glue dry on the parts to give more firmness to attach the clasp through the thick layers. i measured the width around the bottom of box and then cut the fleece for the pants. I found a insert in the mattress bag and i used the cardboard insert to line the pants. I used a regular size staple gun to tack the fleece onto the cardboard. I used some white columns of material to make the shirt on too of the pants, i attache it with staples alao. I found some black scrap material and measured to piece a belt together and then attached belt with staples as well. The tie pattern i cut out of pizza box i used red felt for the tie. I took the pants after done and wrapped them around box just like foam, i wrapped from left around pulling taut and poking the hole through the layers of material with the sharp pointed tool. I then took the clasp and fished through the layers and clasped tight. I put a few in and added more once i knew there was no gaps i the pants. The tie was the attached to the costume by ooking a hole and adding one clasp in the knot of tie, the 2 side pieces to tie were just lined and glued on.
i chose position for eyes, cut the blue and black eye pieces out of scrap and used tacky glue to make eye look complete. I then poked holes and attached the entire eye with one clasp through the middle of the pupil. Make sure you get the hole through the layered eye before attaching to box. I took a piece of the trimmed foam and bent it to look like a nose and used one clasp to hold nose in place. I drew the mouth shape on the pizza box and tounge also. I used felt to trace the mouth and fleece for tounge. The teeth were also lined like other pieces and felt was used. The mouth was attached on each side with a clasp. The teeth and tounge were glued onto mouth. I figured out also that you can glue felt to fekt without making the backing. The glue will also set up eventually on the foam but no guarantee of sturdy . I did use glue on everything to secure the edges. The glue held down any flaps from the clasp. The eye lashes were made out of pipe cleaners and was simply glued on.
The sponge is ready at this time but we need accessories:)
I found a yellow long sleeve shirt, used an old white short sleeved shirt for on top on the yellow shirt to get the effect of yellow being the arms. I found white gloves at the goodwill and decided to dye them, white girls tights on clearance and i died them also. We decided on a theme for the sponge amd decided to go with the sheriff idea. It is drug awareness this month at the school and sherrif spongebob is making the children aware of drug free choices . The western hat was left over from a party many years ago, the bandanna wrapped around the neck was also a item that was laying aroun the cowboy boots were old shoes from last year. We used his old butterfly net as a jellyfishing net and a grill spatula from home added to belt line. The handcuffs were parts left over from a western toys set.
freckles are optional we were not to worried about that.
we had a lot of fun creating spongebob, it felt good to use all old stuff basically to make something look as good as it turned out. I have had so many people compliment the costume. They think its amazing and so real like compared to stuffed spongebob. He has not made a costume contest yet this is the first one but the local whagtv displayed Lanndon on their fb cover for a mo ster contest. Looking so forward to going out tomorrow night treating, so many more people to make smile. The small children were even running up and hugging the costume... hope you enjoy... thank you for the contest, this is neato and our first but will know nexet year.
Similar costumes:
Rating: 3.0 of 5. Votes: 2
|
2 votes
|

