

Projectionist from Bendy and the Ink Machine Costume
Rate this costume:
|
19 votes
| add a comment |
Follow me


| Costume type: | Costumes for Boys |
| Categories: |
This homemade costume for boys entered our 2019 Halloween Costume Contest.
A word from Jennifer, the 'Projectionist from Bendy and the Ink Machine' costume creator:
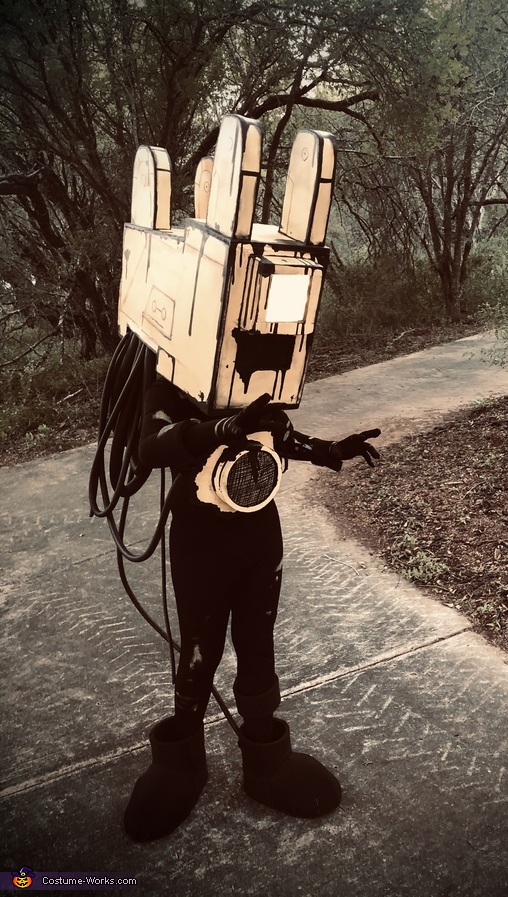
Every year I make my son’s Halloween costume. This year we decided to re-create a character from Bendy and the ink machine. The characters name is projectionist, he is the villain in the video game who chases after Bendy with a head that is a projector.
Step one: research, research. I’d like to put in a lot of research before I start any costume. I always like to make sure that the costume I make has as much accuracy and detail as possible. I measure my sons dimensions to make sure the costume is proportioned to his body. After that I gather all the materials that are needed for the costume production.
Materials: The materials that were used for this costume were EVA foam, cement glue, LED lights, spray paint, plasti dip, paint brush, box cutter,Dremel tool, heat gun, stretchy black fabric, Velcro, hot glue gun, black and yellow acrylic paint, Black morphe suite, elastic, cardboard, ventilation mask, quick seal, acrylic sealer, and black mesh.
Production: at the start of production I create a template out of cardboard to make sure measurements and fit is accurate. From here I use the template to cut all the pieces from EVA foam, once the pieces are cut they are assembled and glued with cement glue. once the pieces are glued together I fill in any cracks or gaps in the foam with quick seal and sand down any bumps. Once this step is complete I begin to seal all the pores in the foam with a heat gun. This preps the foam for painting. When the pieces are ready for painting I first apply a layer of plasty dip. This gives the foam a surface to receive any type of Paint. Once the plasty dip layer is dried the pieces are ready to receive any type of paint application. Once the headpiece was completed it was then ready for paint details lighting and a last layer of acrylic sealer.
Accessories: Once the headpiece was completed I was ready to move on and make the smaller pieces. The smaller pieces included arm bands, speaker, custom shoes, and EVA foam dowels as the wiring to the projector headpiece.Again using the same steps as the headpiece I cut out each individual piece with a box cutter, sealed, painted, and glued any Velcro,elastic, and fabrics. Moving on to the body suit, I used acrylic yellow paint to add Ink details. I glued heavy duty velcro to the ends of the foam wiring to attach to the shoes and arm bands.
Tryon and adjustments: Once the costume was complete there is always a Try on phase. This allows me to make any adjustments that are needed.
This costume took about three weeks to complete. Because of materials was about $200.
Rating: 4.6 of 5. Votes: 19
|
19 votes
|