
by Megan


Rate this costume:
|
11 votes
| 9 comments · add a comment |
LM and Son


| Costume type: | Costumes for Boys |
| Category: |
This homemade costume for boys entered our 2015 Halloween Costume Contest.
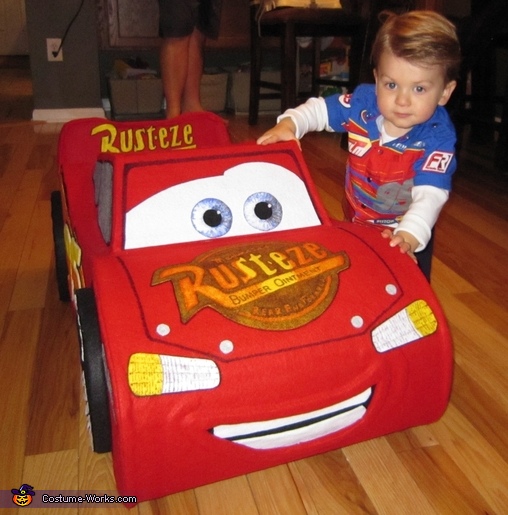
I wanted to make a costume for my 2 year old son this year, but needed to decide between Lightning McQueen and Thomas the Train. I decided to go with Lightning since it I thought it would be more fun for me to make.
I had an idea on how I was going to build it, but before I started I jumped on Pinterest to see how others went about it. I saw some absolutely fantastic costumes. The majority of the ones I saw used cardboard (yay!), but were spray painted and used printed decals (boo!). I was planning on using cardboard for the frame of the car, but instead of paint/decals, I wanted to use foam and felt to give more dimension and a more costume look and feel AND wanted to make all of Lightning's "stickers" by hand - no prints!
I got started by finding some good images of the front, side, back, and top of Lightning online and grabbed a few of my sons toys as a model.
For materials, I found some large cardboard boxes and foam in a dumpster behind the mall, and then bought a TON of super glue, a few cans of spray adhesive, large swaths of felt (to cover the card and for his “stickers”), various colors of sharpies, a few small radius dowel rods, and a few bags of hot glue sticks. My wife found a checkered flag decorated duct tape, which she thought we could use for the straps - great idea!!! That’s about it for materials. ***As a side note, I saw on Pinterest that some people used corrugated cardboard – I chose to go with thinner cardboard for two reasons: 1) I figured that the thinner cardboard would be more flexible, which was important because I wanted to ensure the car was curvy and 2) I was worried about the total weight of the car – My son is a bit on the small side, and wanted to make sure the costume was as light as possible***
For tools, I grabbed a hot glue gun, a few craft razors/box cutters, a tape measure and some straight edges/rules, and a variety of good scissors. Also grabbed my jig saw to cut out the Styrofoam wheels.
To build the car, I drew the side of the car on a large/long piece of cardboard. Once I liked how it looked, I cut it out and used it as a template for the other side. I then created 8 “supports” out of cardboard, cut to the length of my desired width of the car (plus of few extra inches so I could use them as tabs to glue to each side of the card). I put dowel rods in two of the bottom/middle supports to provide a little more side-to-side strength. I then took a long piece of cardboard, cut it to the width of the car (plus 2 inches) and rolled it around a 3” piece of scrap CPVC pipe to break it down a bit so it would curve. I used this as the “skin” of the car, and SLOWLY glued it to the top edge of each of the car sides. I cut out the top “cockpit” of the car, which included the windshield, roof, and back “glass” and glued it to the top (“skin”) of the car. I used the car itself as a template to cut out the sides of the cockpit and glued it all together. I then drew and cut out the spoiler and glued it to the back of the car. I then cut out the mouth and holes in the top of the roof and through the “skin” of the car large enough for my boy to stand in. I was FINALLY done with the cardboard. Now on to the felt…
I started with the mouth, specifically the lips. I wanted to add some depth to the mouth, so I cut out some small strips and glued them on top of each other to add that depth. I then moved on to felt the sides, and used the car itself as a template. I used spray adhesive to attach all the large pieces of felt to the car, and then rolled the edges and hot glued them down. This was pretty time consuming! Once I had the sides and the back side of the spoiler felted, I used a similar technique to felt the top as I did with the cardboard “skin”. It took quite a bit of time to make that look right, and cut around the cockpit. Once I got that done, I felted the cockpit and the front side of the spoiler. At this point, the entire car was covered with red felt!...and it looked amazing. I was starting to feel VERY good about the look of the costume, which was good because I was exhausted...
I moved on to the wheels. To do the wheels, I wanted to leverage the red felt on the side of the car for the red wheels so I cut out a Styrofoam ring for the tires, which I covered with black (outside) and red (inside) felt. I made some letter stencils by hand and used them to cut out (Thank you sweetheart!!!) the “LIGHTYEAR” felt letters for the tires. I then drew and cut out a cardboard stencil for the wheels which I used to shade out the wheel holes.
I then moved on to the “stickers”. All of Lightning’s “stickers” were hand drawn (looking at my online/toy models) and made from felt. I started with his eyes, headlights, and hood Rust-eze “decal”. I then made the side windows, back window, and Rust-eze letters for the spoiler. I used various-width black sharpies to draw in the hood/windshield outline, shade in the wheel wells, and outline each “sticker”. I then made and glued on the side lightning bolts and “95” numbers for each side. Once those were on, I glued on the tire rings and shaded in the wheel holes. I made small wheel caps (and hood caps) out of white felt and colored them in with a silver paint marker.
By this point, both my wife and I were running out of time and were EXHAUSTED. It was Halloween and we only had an hour or so ago before we needed to go trick or treating, so the pressure was on. We “finished” up the costume by adding some tail lights, bumper, and some spoiler brackets. The last step was creating some straps. This proved a bit difficult because my son was now having a minor meltdown as my wife was getting him dressed with his Lightning McQueen pit crew shirt (which she got from Disney). The boy does not like hair gel…
To make the straps, I used two long strips (one longer than the other) of the checkered-colored duct tape, and taped them to each other. I then taped them to two of the bottom “supports”, long enough to provide enough slack to fit over my son’s shoulders.
And that point, it was “done”!!! We presented the car to my son, who was in a full-rage temper tantrum - Awesome. We headed out to trick-or-treat, and ended up just putting the car on top of my stroller and pushed it around. About 30 mins in, my son came around and started enjoying being out. We put the car on the ground, and he climbed in it. I put the straps over him and it looked great…for about 3 secs, before he didn’t want it on any more. LOL.
At the end of the day, he LOVED the car, but wasn’t too sure about wearing it. Which leads me to believe, that he’s a bit young for it. I think that if I would have waited one more year, it would have gone over much better for him. I will say that as I walked around the neighborhood and people saw the car, they stopped me and asked me how I did it. They couldn’t believe it was home made. I received very good feedback, as people seemed truly taken back at the detail and quality of the car. And they couldn’t believe how light it actually was. Just about everyone that saw the costume told me the same thing - “It is Amazing!”
Looking back, the project was much more stressful than it should have been because it took about 3 times longer than we had projected, and we didn’t start until the week before Halloween. By not using any printed decals, and having to free-hand draw, cut, and color every “sticker”, it took a lot longer than I had thought. Even with my wife diligently cutting out the stickers and helping color/shade them along the way, we were immersed in this project for 10 days. Stress and exhaustion aside, I look at the car now and am very happy with the way it turned out. Pictures do not do it justice, and I think the wow factor that people get when seeing it in person has a lot to do with the decision to use felt instead of spray paint, which gave it a costume look and feel. At this point, I’m looking forward to next year, and have fingers crossed that my boy still likes Lightning 12 months for now. Hopefully, they’re making a Cars 3!!!!
Similar costumes:
Rating: 3.6 of 5. Votes: 11
|
11 votes
|

