
by Tracey


Rate this costume:
|
4 votes
| add a comment |
Exterminated! Costume


| Costume type: | Costumes for Kids |
| Category: |
This homemade costume for kids entered our 2014 Halloween Costume Contest.
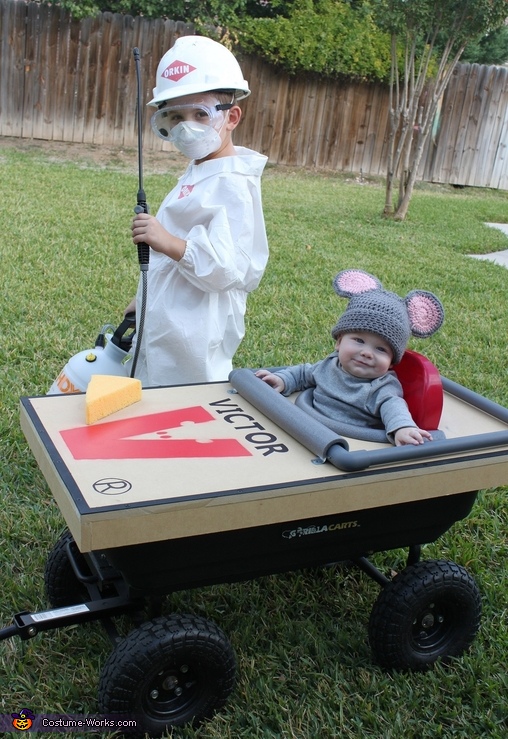
Our costume theme this year stemmed from wanting a way to incorporate the baby and not having to carry him all night. We knew we wanted to incorporate the stroller or Gorilla Cart into his costume. I searched online for some ideas. I saw a couple home-made mousetraps online, but wanted to build on that and make it our own. We also love doing themed costumes, so we decided to add an exterminator. All we had to do is buy our son the sprayer and he was sold! I looked for mouse costumes and didn't really like anything I found, so decided to improvise. I love doing home-made costumes because I think they are cuter and cheaper. So, I just decided that not only would we make the mousetrap, but we would also make all the costumes as well! We started with constructing the mousetrap, as we knew that would be the most time-consuming project. To build the mousetrap, we used MDF plywood, PVC Pipe, foam pipe insulation, galvanized pipe clamps, screws, hand tools, black, silver, and red spray paint, a Sharpie, home-made Stencils, poster board, brown painters paper, tape, a yellow sponge, baby booster seat, and a Gorilla Cart. We used the MDF plywood and screws to construct a box that would fit tightly over the Gorilla Cart (already owned). We cut a half circle from the center of the plywood for the back of the booster and the baby to fit into. We then measured and cut the PVC Pipe to make a square around half of the plywood box to make the "trap." The PVC pipe square was then spray painted silver. While the silver was drying, we used brown painters paper to tape off a straight line around the edge of the mousetrap and spray painted that black. The next day, we made a stencil for the V, taped it off, and spray painted that red. Then we secured the PVC pipe square to the box using the metal clamps. We cut the pipe insulation to cover the half circle cut-out and middle of the trap. Stencils and a Sharpie were used to write the word "Victor" and the registered trademark sign. The cheese was made out of a yellow sponge cut to shape. Next, the baby mouse's costume was made using a plain gray onesie and a hand-made crocheted mouse hat. My little exterminator's costume was made from: a men's coverall, white hard hat, dust mask, safety goggles, a new spray bottle, Orkin labels, and elastic. I used a men's small painter's coverall and had to make major adjustments to make it fit my seven year old. I first brought up the crotch area by bringing the lower half up the the waist and sewing it. This made only half the zipper functional, however, this had to be done because the torso was way too long. Then, I brought in the waist by adding elastic. I then cut off the appropriate length from the legs and arms. I added elastic to the arms to make it fitted. I used the computer and mailing labels to make Orkin labels to place on his suit and plain white hard hat. We then added the goggles, dust mask, and sprayer. Voila! Our mouse/exterminator theme was completed.
Similar costumes:
Rating: 4.0 of 5. Votes: 4
|
4 votes
|

