

Doctor Strange Costume
Rate this costume:
|
10 votes
| add a comment |
A little magic, and a lot of creativity; Doctor Strange


| Costume type: | Costumes for Adults |
| Category: |
This homemade costume for adults entered our 2019 Halloween Costume Contest.
A word from Prantik, the 'Doctor Strange' costume creator:
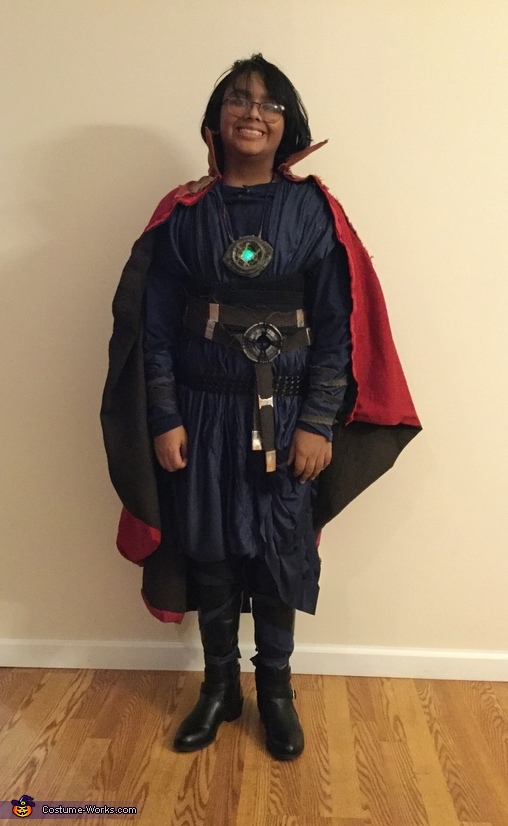
Overall I’m really happy with this Doctor Strange costume (MCU, not the comic book version) it’s perfect in every way I could make it with my budget, age/experience level (being 12 years old) In addition this was my first full costume, and even if it took a really long time to build, and it’s not the highest quality, I’m using it as a learning experience for my next costume which will be a full custom design (meaning I don’t want a replica, although I will use Apollo, mercury, fbfx costumes, and The Martian space suits as inspiration) for a full EVA suit, so it’ll be very complex and I’ll need all the expertise I can get. In total this costume cost approximately 20 dollars to build. Using fabric that was on clearance from Walmart cost 10 dollars, $4 dollars for 4 yards of the main blue fabric in the robe, and $2 for 2 yards of the light red( top and collar of the cape) and brown (interior of the cape), then a small piece of EVA foam (foam, not the spacesuit) for the Eye Of Agamotto (the necklace)which worked out to be less than a dollar for the quantity, the enamel paint I used on the gold parts above the clasps of the cape and used to paint the eye is immeasurable- as a result I can estimate cost-, I used a purchased secondhand belt (the bottom woven one, the one without the “metal” strips connected to the circle and other 3 belts) which cost $2.99, a five dollar shirt which is used as a base for the robe which I had sewn above, and a lot of other small things, like clasps which cover the rest of the cost, everything else I already owned. the first thing I made was the Eye of Agamoto, I took a small sheet of EVA foam (again, the foam, not the spacesuit) and used drinking glasses to mark out a circle, from there and using a to scale reference I marked out the other general shapes. I then cut them out and hot glued them together to add thickness and depth. I followed by using my rotary tool (with practice, proper safety equipment, parental supervision, and a very high maturity lever for my age- so in other words, safely) to bevel the edges. Then using super glue I attached a cut bangle to create the inner circle. Again using the rotary tool I added the inscriptions using references. I then cut a hole in the center, added electronics (an LED, switch, wire, and coin cell battery, all were either bought in bulk-meaning immeasurable in price for a single item, or I already owned them)to light it up and added a clear half marble (the ones you play mancala with) imbedded in the hole with super glue. Finally I painted and weathered (painting-enamel paint, weathering-watered down acrylic and thinned enamel). Next I worked on the cape. To begin I created a template with a sort of fabric-paper, adjusting as necessary, after that was perfect I created a rough moc up out of a old bedsheet, after some adjusting I was really happy with it, so happy in fact that it became part of the the final design- the cape is intentionally uneven, it’s the same in the actual movie costume- (the color next to the main red). I then made more paper patterns and used fabric I already had or purchased to add the more intricate details of the cape. I added clasps and plastic covers (old notebook cover cut, sanded to give it “teeth” or something to grip the paint with, and painted gold with enamel paints.) Finally I sewed it all together after countless pins, and then added a brown fabric to line the inside of it. To make the robe I used an blue full sleeve t-shirt I had purchased at my local Walmart and the layered and sewed on a blue silky fabric (also from Walmart) to the sides, front, and back of the shirt, sewing the sides of the added pieces- not going all the way up, leaving gaps for my arms to go through- this effectively created a robe that was attached to a shirt worn underneath, allowing me to increase the durability and decrease the amount of time I spent building and putting it on. The robe had very wide side pieces -in fact double the width of my shoulders, this allowed for the draping and flowing affect pictured in my costume and in the actual movie. As for the upper belts (the ones with the circle connecting the 4, and with the “metal” on them)I used the scraps from the cape lining to create strips, I then made large tassels from black yarn. Using embroidery thread I attached the tassels two of the strips and them cut them to length (two of them all the way around me with extra two, half of that, however folding a full length peice works better, shorter ones have the tassels. I made a circle out of Eva foam, added layers for thickness, painted with silver acrylic and weathered. The “metal” parts were cardboard wrapped tin foil and hot glued to the “belts” (because their fabric scraps in actuality, not belts) using embroidery thread I sewed through the ends (shorter ones, halfway points) and through the middle of the circle and back again over and over, hot glue was used for added support. The cuffs were made by patterning my arms (cling wrap and duct tape) then adding extra to the pattern width to accommodate for the thickness of the shirt underneath. I then cut out the pattern from a blue fabric added fabric strips and knots on the ends of those (not straight but angled like strips tied across) and a zipper cut to length and attached on either side. The boots were boots I already owned and were wrapped in fabric strips from excess robe material, they were tied at the back. I wore black pants and a navy blue shirt underneath the silky fabric. In the movies he wears a corset, however being on a tight budget I substituted for my dad’s back pain belt, overtop that I wore a secondhand belt and the DIYed belt, both worn backwards to hide clasps and knots. My hair was clipped back to simulate a combover, like Steven Strange has in the movies. Wearing this costume was honestly one of the best experiences I’ve ever had. I put so much effort and time into this costume (3 months on and off, 30-80 minutes a day) and I thought that it would all be for nothing. I was thinking “nobody has seen the movie, he’s a minor character in Endgame and in Infinity War, nobody will know who I am, this is all pointless, should I just stop and buy a costume” but I persevered and I kept trying. I wore the costume to school, and did so with confidence because I was thinking to myself “you know what, who cares what they think, who cares if they know who I am.” As soon as I walked into that building I was dumbfounded, I was being recognized right and left, those who didn’t know me said the same thing, going out of their way to say “wow, just wow. What an amazing costume” or “are you Doctor Strange?” Even people who didn’t know who I was they still said the same things, they noticed my attention to detail. They noticed my effort and all the intricacies I poured my heart and soul into for months. Countless teachers and students asked for my photo, I was asked by the yearbook committee if my photo could go into their yearbook, everyone I told that I had made my costume was absolutely awestruck, and overall it was the best day and one of the best experiences I have ever had in my 4483 days of living on this earth, and I think that it will remain so for a very long time to come.
Rating: 3.9 of 5. Votes: 10
|
10 votes
|