
by Eric


Rate this costume:
|
3 votes
| add a comment |
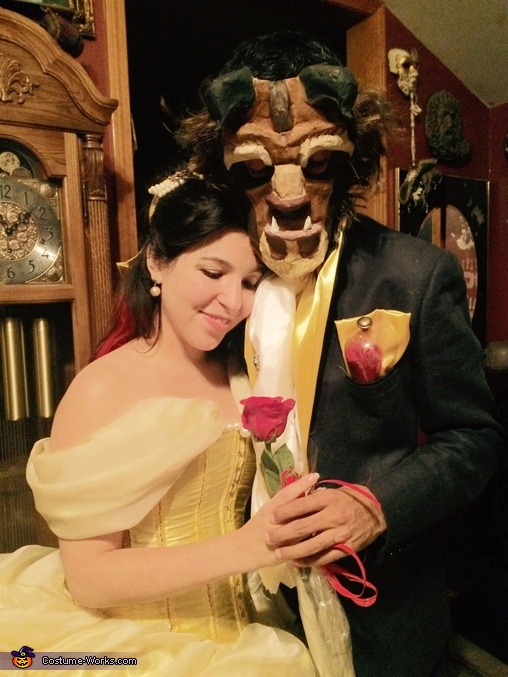
Classic Rose Pose (Beauty and the Beast)


| Costume type: | Costumes for Couples |
| Categories: |
This homemade costume for couples entered our 2015 Halloween Costume Contest.
Tale as Old as Time
Once Upon a Time, in New England, an artist met a handsome chemical engineer. And, they fell madly in love. Obviously! Otherwise, it wouldn't be a very good story. After many months of laughter, adventures, and lots of ice cream, Halloween was just around the corner, the artist’s FAVORITE holiday. The handsome engineer had never celebrated Halloween. You see, he was originally from the far, far away land of India, which has many colorful holidays and festivals but sadly, not Halloween. The artist was excited to introduce him to her holiday.
After comparing favorite characters from their childhoods, they realized that they both loved the story of Beauty and the Beast. The kind but stubborn nature of the characters and the magic of their romance well-suited the artist and engineer. After a movie night introducing him to Disney’s Beauty and the Beast, they decided that's who they’d be!
The Process
The artist set to work on the costumes using the materials below. Now, she was not a seamstress. She could sew a button or a hem in a pinch but had never sewn clothing of any kind before. Despite this very limited knowledge of fashion design, she was set on building Belle’s classic yellow ball gown and a princely suit to match.
On the first night of sewing, her sewing machine broke. However, that would not deter her! She was determined to make his first Halloween very special. After many long nights of hand- sewing, the entire dress was painstakingly done with the help of her wonderful mother and her handsome boyfriend.
They decided to build the Beast’s costume using an Indian-style suit the engineer already owned. The artist sewed a yellow collar and cummerbund to match her gown. Then, they built a mask made of a brown paper bag and white glue on a mold of modeling clay sculpted into a beastly form. To the artist’s surprise, the costumes looked magical!
What Beauty and the Beast Did for Halloween
Now transformed, Belle and the Beast went to Salem for the day. So many Monsters, Zombie Princesses, Villains, and little Halloween Ghouls wanted pictures with Disney royalty that the enchanted couple barely had time to sit down.
At one point, a parent came up to the couple with a little Chicken. Her little Chicken wanted a picture with them, the characters of her favorite movie but she was nervous. Belle knelt down to assure the child that she was a teacher in real life. The little Chicken stared at the princess for a moment before throwing her arms around her with a loud “Belle!” Belle and her Beast were very happy.
From Salem, they drove to a snuggery in Providence for dinner. Over tea and cupcakes, a girl heading out of the restaurant said to them, “You won Halloween.”
Yes, we had. ☺
Hopefully to live Happily Ever After.
The End.
Get Your Materials!
Materials: As an artist, I happen to have several strange materials around my house but improvising is half the fun. Please read through all of the instructions first before proceeding. Maybe you will have an even better idea for materials than I did.
-Mannequin - Yes, I happened to have access to a mannequin. Perhaps, you could find a really wonderful sewing buddy roughly your size you could use as a mannequin for a couple of hours.
-5 yards of yellow silk
-7 yards of sheer golden material
-Thread
-Pins
-Safety Pins
Hoop Skirt/Skirt:
-2 Hula Hoops
-Tons of Duct tape
-Masking tape
-Velcro
-Old tutu
Skirt:
-Elastic
-Air-dry clay
Corset:
-About 1 yd of the leftover silk (From original 5)
-1 yd of Inside corset material (I used part of an old dress. Needs to be sturdy like cotton)
-Cord- for corset back and skirt 2
- Industrial Zip ties
-Duct Tape
-Eyelets and hooks
-Grommets (You can get a grommet tool with the grommets)
-Grommet Tool
-Fake pearl necklace
- Yellow Baize tape
-Awl
-Hammer (preferably rubber)
Mask:
-Old plastic mask mold (I used a horse mask because it has a long face shape)
-Tons of modeling clay
-Brown paper bag
-White glue
-Hot glue gun
-Old wig
-String
-Paint
-Fur
Ascot
White Silk (I got a small piece of silk from the discount extra cloth rack at a fabric store)
Pin (Antique shop)
Collar/ Cummerbund:
-Leftover yellow silk
-Snaps
Corsage:
-Light bulb plastic packaging
-Drawer knob
-Glitter
-A rose
Beast Costume: Get Blue Blazer, white shirt, pants
Hoop Skirt
Hoop Skirt Materials: 2 Hula Hoops, Tons of Duct tape, Masking tape, Velcro
I was working on a very tight budget. I found that duct tape was sturdy and easily accessible. I started by making a waist belt by taping the duct tape, sticky side to sticky side. I sewed vecro onto the ends of the duct tape belt for easy opening.
I measured how far down I felt the hula hoops should be. Using the same tape on tape method, I taped the hula hoops in place, the higher one first, making sure they hung straight. I taped an infrastructure using masking tape to strengthen the form. In the back, I had a "V" of tape strips on either side of where the waist belt would open so it would easy to step in and out of.
Skirt:
Skirt Materials: Elastic, Thread, Pins, Safety Pins
I measured an elastic around my waist, and left it a little loose. I sewed the top of about 2 1/2 -3 yds of the yellow fabric around a cord. I pinned the fabric edge, folded for a seam around the elastic and then sewed. I pulled the fabric tight to bunch it BEFORE I took the fabric off the mannequin and cut off the extra fabric. (the extra fabric will be used for the corset, collar, cummerbund, handkerchief as well as the sash the goes around the dress)
When I had it the way I wanted, I turned the skirt inside out and sewed up the back.
Then, I put on the hoop skirt, tutu, and yellow skirt on. (the mannequin was a bit taller than me lol) Then my WONDERFUL mom pinned the skirt to fit me. Hopefully you will be able to find a dedicated friend or two if you would like to be Belle next year. We sewed the hem and cut off the excess.
Corset
Corset Materials: About 1 yd of the leftover silk, 1 yd of Inside corset material (I used part of an old dress. Needs to be sturdy like cotton), Cord- for corset back, Industrial Zip ties, Duct Tape, Eyelets and hooks, Grommets (You can get a grommet tool with the grommets), Grommet Tool, Fake pearl necklace, Yellow Baize tape, Awl, Hammer (preferably rubber)
Ok, corsets are a bit tricky to make. I have learned they require a lot of patience, especially when hand sewing. There is an inside (other material, B) and an outside layer (yellow silk, A) with the boning in between.
Before sewing the boning in, it is essentially a big pocket. I decided to have a front series of hooks. So I had two separate sides/pockets to sew individually.
I happened to have an old corset (the blue one pictured). I traced the old corset’s panels in pencil onto yellow silk and the corset’s inside material. When tracing, remember that panel B (the inside) should be the mirror opposite of panel A so when you sew them together, all of the edges will be on the inside. Leave extra room to sew them together. I used masking tape to mark the order of the panels.
I sewed A panels back to back and panels B back to back.
I placed A and B back to back and sewed the top together (for each side). I turned them right side out and pined the edges. I did NOT sew the edges in case sewing the boning in might change the shape.
Boning: I used zip ties. I cut the industrial zip ties to the right size. I then duct taped two zip ties together for extra strength.
I pinned in each bone and sewed on either side of each seam of the panels. Tip: Make sure the seams of A and B are aligned BEFORE you start sewing. This takes a while but it is SO worth it!
BEFORE, you sew the Edge Bones into place. I measured 2 yellow Biaze tape pieces to match the edge of the corset. I sewed the eyelets onto one and and the hooks onto the other, the same distance apart. I then inserted each Biaze strip into the edge of the corset as I sewed in the edge bone. It is important to have a bone on either side of the opening for strength.
With the back of the corset, I sewed the edge bone about a half an inch from the edge, and sewed the edge of the corset. With that space, I used the awl and hammer to put in the grommets, evenly spaced. I added a privacy panel on the inside front and back of the corset. After all, Belle is pretty modest!
I then cut a pearl necklace in half, tied the edges, and sewed it along the top of the corset.
Sleeves: I put on the corset and with some help pinned the extra golden sheer material into place. Then sewed it. Make sure there is enough give in the back where the corset is tied.
Skirt II:
Materials: About 5 out of the 7 yards of Sheer Golden Fabric, Some of the leftover yellow silk, Safety pins. Lots of Safety pins, Air- dry Clay. Cord or Elastic
I sewed another puffy skirt using the golden sheer material (see instructions for skirt I). Instead of hemming, I put the sheer skirt on top of the hoop skirt, tutu and yellow skirt on the dress form. I also put the finished corset on top.
Then, I started bunching the sheer material starting at the top, working around and down. I safety pinned the bunches to the yellow silk underneath. In case you don't watch Beauty and the Beast every day, Belle's dress has somewhat symmetrical bunches that go all the way down her dress. I choose to have them go a little more than half way down, three in the front and three in the back. I wanted it to be as light and flowy...as a huge ball gown can be.
Then you have a choice, you can re-safety pin the bunches on the inside of the dress. Or you can sew each bunch up. Either way, this is time consuming... be patient.
I then took some of my leftover yellow silk and made a sash. I cut a large strip of fabric, folded the edges under and pinned it onto the dress.
I also made rose beads out of air-dry clay, painted them white, and sewed three on each side of the front of the sash. But, don't mind me, I'm a perfectionist...
Mask
Materials: Old plastic mask mold, Tons of modeling clay, Brown paper bag, White glue, Hot glue gun, Old wig, String, Paint, Bits of Fur
I used a plastic mask mold and added modeling clay on top. As I said, I used a horse mask because it has a long face shape. I sculpted the mask based on picts of the front and side of the beast’s face. TIP: If you are new at sculpting, sculpt the general shapes and add details later. Take it slow and don't be too hard on yourself. I measured to make sure his nose fit comfortably.
I used small pieces of brown paper bag and layers of white glue. It's the same method as paper mache. Use at least 3 layers. I found it was easiest to pull out the clay after the second layer had dried and paper mache the third and perhaps fourth layer on the INSIDE of the mask.
I sculptured horns and teeth separately and brown paper mached them. I took out the modeling clay and then added them afterwards to the mask with masking tape, and more paper and glue.
I added a grommet on either side for the string to go through. Painted it. Hot-glued pieces from an old wig and made the ears out of fur from an old costume.
Beast Costume: Get Blue Blazer, white shirt, and pants.
My boyfriend happened to have a beautiful Indian- style blazer and jodhpurs. So unless you can afford a trip to Indian or an really good import store, I suggest looking through salvation army or a second hand store for a blue blazer. Use what you have.
Ascot: White Silk and Pin
We sewed around the edges and tied it into place with a blue pin. Some safety pins in back were helpful too.
Collar and Cummerbund:
Materials: Snaps, yellow silk, pins
For the collar, I sewed basically a tube of leftover fabric edge to edge, inside out after measuring it around the neck of the suit. In order to not ruin the blazer, we just pinned it on.
Cummerbund: Honestly for this one, I pinned a swatch of fabric around my boyfriend. I pinned it in the back, we left about an inch on each side. I bunched it on either side of his hips and pinned it in place. I took the fabric from my wonderful model and sewed a straight line near each line of pins where his hips where- so the folds would stay in place. I then hammered on the snaps on each end, folding the edges back to make a nice seam.
Embellishments
Corsage: Light bulb plastic packaging, Drawer knob, Glitter, A rose, silk
I cut out the shape of the light bulb and hot glued the knob on top. I glittered the inside and added some details. I folded some leftover silk behind the corsage so it would show up nicely. Put a Rose in it. Remember, it needs to be fresh- when it dies, the story ends!
Belle's hair: I parted the top and bottom of my hair. I created a sock bun using a bandana. I used a piece of yellow silk that I sewed the edges into a ribbon. I bobby pinned the ribbon into place and placed a rose- pearl bracelet on top as an embellishment. I then curled my hair.
Ta Da!
Have a Blast!
The day was so perfect. We spent so much time on the costumes that when it came to the actual day, we just went with the flow. We ended up going to Salem on a whim. Found amazing parking and enjoyed walking about for hours. Then we ended up at my favorite restaurant, complete with chandelier!
We had so much fun!
It was a Dream Come True!
Similar costumes:
Rating: 4.7 of 5. Votes: 3
|
3 votes
|

