
by Sahra


Rate this costume:
|
9 votes
| 3 comments · add a comment |
Homemade Black Swan Costume


| Costume type: | Costumes for Women |
| Categories: |
This homemade costume for women entered our 2012 Halloween Costume Contest.
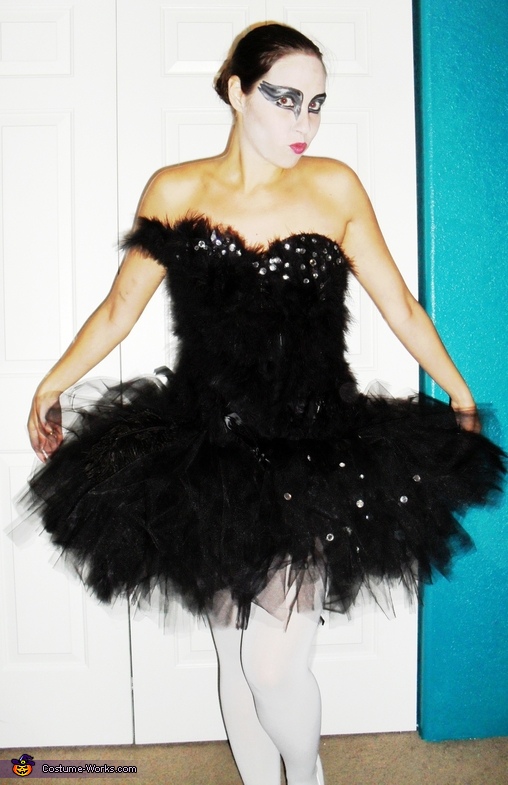
This is me in my homemade Black Swan Costume. This costume is basically made from scratch! The corset top is made of a black garbage bag, two rolls of black duct tape, lots of black feathers, rhinestones, black decorative beads, and pieced together with lots of glue. The tutu is made of black matte tulle, ribbon, rhinestones, black boas, and black feathers. I was going to create a Tierra to add to the costume, but my husband was tired of my craft making. I borrowed the Tierra from my sister. I spent many hours creating each individual piece. I did my makeup and the costume, but I will make this costume even greater this weekend at the costume contests.
I will give instructions on how to create the black swan corset top:
BLACK SWAN CORSET TOP
What you will need:
STEP 1 FOR TANK TOP
I chose to use a garbage bag instead of a long tight fitting tank top (cotton). If you have chosen to use a tight fitting tank top you will put this on and say "goodbye" because you will never see it again. So you should purchase a cheap tank top or use an old tank top. Skip to step 2.
STEP 1: FOR GARBAGE BAG: PREPARING YOUR GARBAGE BAG
First you will begin by grabbing your fancy black garbage bag. Grab your garbage bag, unfold it, and lay it flat on the ground with the open side at the bottom and the sealed side towards the top. Now you will create three holes in the bag for your arms and head with sharp scissors.
Next, put on that beautiful black dress (garbage bag). If you have a drawstring black garbage bag tighten the end so that the garbage bag is tightly on your body. So couture!
STEP 2: WRAPPING OF THE DUCT TAPE
Once you're in your fashionable black garbage bag or your tank top, have had plenty to drink, breathed normally for a while, and have plenty of time... grab your patient friend. Your friend will take a roll of duct tape and begin at your waste and start wrapping. There are a few ways to do this. They can wrap the duct tape without cutting the tape into strips or you can make a complete wrap around horizontally, cut the tape, and create several additional strips of tape. We chose to create several strips of duct tape. Wrap the duct tape, but stop just below the breasts and apply vertical strips over the breasts to add some shape. Add some horizontal strips as well. Continue wrapping the duct tape from the waist up to just below the armpit. You want to tape as high as you can without taping the skin under your arms. This will be shaped later. Once you have applied tape from the waste up... don't get too excited... this is only the first layer! Create three additional layers.
STEP 3: CUTTING OFF THE DUCT TAPE
Next, you decide where you want the opening of your corset to be. This is where you will lace it up. I chose to have my corset lace up the back. You can lace it up the side, back, or front. Once you have decided where you want the corset to open, grab a ruler and draw a straight line with your pencil where you want the opening to be. Note: you will not see the pencil marking very well. You will follow the indentation of the pencil marking to cut the duct tape off of your partner. Be very careful with the scissors (This is why you want to choose someone you trust)! Cut from the bottom up until the piece comes off! You are finally free!! Sweaty?
STEP 4: SHAPING YOUR CORSET TOP & COMPLETING DUCT TAPE PORTION
Once you are free, so is your partner! You will begin by cutting away the garbage bag excess at the bottom and in the inside of the corset. Next you will draw a straight line across the bottom of the corset and cut. You do not have to cut the corset straight. You could make it jagged or shape it how you want just make sure the sides match up. I decided to cut my corset straight across the bottom. Next, choose a corset style. A Sweetheart or Heart style neckline forms two cups, creating a heart shape over the chest. A straight line corset forms a straight line across the top. I chose the sweetheart corset. This fits with the Black Swan better in my opinion. You may add some additional pieces of duct tape to bumpy areas of the corset or where you think needs additional duct tape.
STEP 5: CREATING HOLES FOR LACING UP THE CORSET
Flip your duct tape corset over to the opened side. On both sides of the corset you will measure and mark at every one inch down the corset top with a 1/2 inch distance from the opening. Take a pencil and create an indentation. Take your hole puncher and punch holes in each indentation.
STEP 6: DECORATING THE CORSET TOP WITH FEATHERS
Now you will begin adding decorations to the duct tape. You will need your hot glue gun, lots of glue sticks, scissors, and feathers. If you would rather use fabric glue instead of hot glue you can do that. Grab your bags of black feathers and sort through the feathers. Choose the feathers you would like to use on the corset's first layer. I began applying feathers at the bottom of the corset. When applying feathers you need to add hot glue from the bottom of the stem up half way on the feather. The top of the feather will hang off the corset top. Add feathers from the bottom all the way to the top but do not cover the holes you created for lacing up the corset. Add the soft looking feathers over the top of the course feathers if you want a delicate look.
STEP 7: APPLYING THE FINISHING TOUCHES/DÉCOR
You will begin adding rhinestones, black beads, black lace, and more feathers. I started on the right breast side first. For the right breast I added different sized rhinestones by adding a drop of hot glue on the bottom and pressing it onto the corset firmly. Note: You may need to add some glue beneath the feathers in places you are adding rhinestones to secure the rhinestones. Otherwise, the rhinestones may be hanging off of the corset. Keep applying rhinestones to the right side and work your way over to the left side. On the left side I added more décor since the Black Swan Costume is decorated that way. Add black beads, rhinestones, and small strips of black lace or tulle to the left side. Add a trio of feathers to the left breast. When you are finished with the front you can lace the cord or ribbon throughout your corset top. Yay! You are finally finished with the beautiful black swan corset top!
PUTTING IT ALL TOGETHER
Pieces of the Black Swan Costume:
Total Spent: $91.02
The only reason the total came out to be this much is because of the Tutu and the Red contacts. The tutu was created with 4 boas which were 8.99 a piece. I used three 40% off coupons and one 50% off coupon at Michaels on them and it still came out to be 20.67 for the boas. The contacts were 25.00, so you can cut costs in half if you do not add a black swan tail or purchase the red contacts. Some of the items listed I already had at home, such as black garbage bag, measuring tape, ruler, pencils, scissors, hot glue gun, glue sticks, hole punching tool, fabric glue, and rhinestones. If you do not have all of these items I would add an additional 10.00 for materials.. I found out later that they sell boas at the Dollar Tree, but they did not have any black boas. Also, the boas were not as full. You could purchase cheap white boas from the Dollar Tree and dye them black for a cheaper option. I purchased white tights at Michaels with a 40% off coupon so I saved $2.40. I purchased white flats at Payless Shoes from the kids section. The Customer Service representative told me that sometimes adults can wear large kid size shoes. She told me to try out the size 6 in kids. I normally wear an 8 or 8.5 in women's shoes. The six was too big on me, so I tried on the 5.5 and just like Cinderella it was a perfect fit! Imagine that! I purchased red contacts online. I found black feathered wings at Joanne's marked 50% off and I used an additional 20% off coupon. I used black and white Halloween makeup that I picked up last year after Halloween for a huge discounted price. I was going to make the Tierra from clay, but my husband was tired of all of my projects, so I borrowed one from my sister. I used a butterfly crystal hair piece that I picked up many years ago. In the expense part of this, if you do not use any coupons you will spend twice as much. I went in to Michaels and Joannes every day for weeks and used one coupon on a single item. If you want to purchase a very nice Black Swan Costume with all of the feathers and gems, you will spend hundreds of dollars.
I hope you have enjoyed my Black Swan Costume Tutorial. This is a very time consuming project, but well worth it in the end.
Similar costumes:
Rating: 4.0 of 5. Votes: 9
|
9 votes
|

