
by Julie


Rate this costume:
|
4 votes
| add a comment |
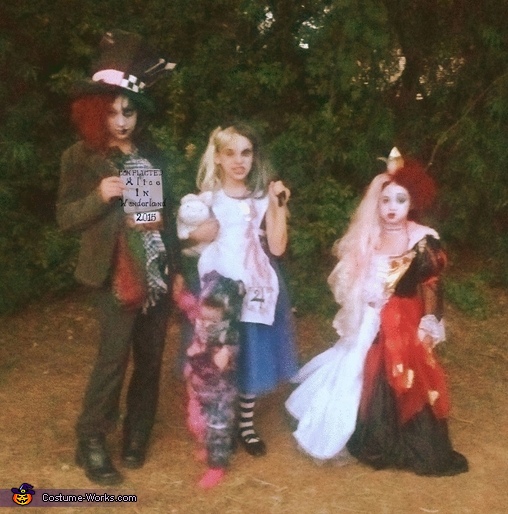
Alice in Wonderland the Conflicted Version


| Costume type: | Costumes for Groups |
| Category: |
This homemade costume for groups entered our 2015 Halloween Costume Contest.
Our Conflicting ALice in Wonderland consists of my four daughter named below:
1. Elizabeth Clark 12 years of age as our GOOD/DARK MAD HATTER
2. Arianna Clark 9 years of age as our Good/Dark ALICE
3. Kyra Blount 5 years of age as our Good Queen/Queen of Hearts
4. Esmae Clark 1 years of age as our Good/Dark Cheshire Cat
As for how we came up with the idea...My 12 year old Liz and I were trying to come up with ideas for our families costumes this year and came up with food puns. I was not satisfied with this idea so she (My Liz) suggested Alice in wonderland. Then I had the thought of doing an costume that would allow us to be both good and evil. Thus the concept of 2 costumes in one using our Alice in wonderland idea and also referring back to the Alice in Wonderland game from years back to which was very dark and evil.
Instructions of our process:
Our families version of Alice in Wonderland; The Conflicted version showing the dark half of Alice and the good half, Dark half of the Mad Hatter and Good Half, The Dark Half of Cheshire Cat and Good Half, as well as the Red Queen verses the Good queen half. We bought 90% of the items at a thrift store and turned them into our costumes as seen in our picture.
For the MAD HATTER we purchased two pants and Jackets in two kind of colors black and green for each to create the Mad Hatters outfit. We cut the Green Jacket in half and put the sleeve of the black through the green jackets arm; then added Velcro to attach the green half to the black jacket. We then did the same with the pants cutting the grayish/greenish pants in half and pulled the half cut pants over the black pair of pants leg and buttoned them to the black pants then added Velcro to hold the back waist area in place to the black pants. Wa Lah! we now had our Mad hatters pants and Jacket; half Dark (Black Side) and Half Good. For the mad hatters tie I tied 2 separate scarves together to make an big bow making it half bright colors for the good Mad Hatter and Black/White for the Dark Side. Used an green Irish hat from the goodwill store for the basis of the Mad hatter hat and glued left over green material from the green jacket on half and black leftover material from another costume onto the other half of the hat to create the dark side of the Mad Hatter hat. Then for the details of the hat, I bought some gems, a feather, and some little skeleton hands from Michaels craft store and cut a wire hanger into 4 to make the needles in mad hatters hat. Hot glued the items on the end of the hanger and the feather to the hat to create the actual feel and look of the mad hatter both dark side and good sides. Added to mismatched knee high socks and black boots to finish off the look. Last was makeup and hair. Wa Lah! We now had an Dark/Good Mad hatter.
QUEEN OF HEARTS verses GOOD QUEEN costume: We turned an Vampiress costume into the queen of hearts and added to the other half of the costume to make the good queen half. We bought white material, a Women’s Pedi Coat (used for under an wedding dress), and white and copper toned fake pearl necklaces for the Good Queen and Queen Hearts dress, snowflake appliques, and golden material all found at the thrift store.
Half of the Queen of Hearts side of the costume was used to sew white material over as well as I sewed the white material over the existing red lapel and bundle the white material for an poof sleeve that is seen in the pictures of the good queen. I cut half of the bottom of the existing vampiress dress from waist down horizontally and folded it under the Queen of hearts side of the dress. I added the pedi coat under the left over Queen of hearts part of the dress and sewed the left over folded edge of the Queen of Hearts dress to the PediCoat. I then sewed white material to the top half of the Pedicoat over the existing black/red Vampiress top of the dress to create the Good Queens side of the dress and bundled white material to the white material for the small shoulder sleeve of the GOOD QUEEN after I cut off the sheer black material of the arm off the Good Queens side of the dress. Then I sewed on sheer white material into the form of an long sleeve connecting it to the bundled up sleeve of the Good Queens Dress. At this point we now had one full dress half dark (Queen of Hearts) and half Good Queen.
Next I sewed on half an gold triangle over existing red triangle of the Vampiress dress (now Queen of Hearts side of the dress) and white lace over the Good Queens side of the dress to connect to Queen of hearts triangle making the Good Queens triangle of her dress.
Then I drew hearts on gold material , traced them in black marker, cut them out, adhered fabric glue to back of the hearts, and ironed them onto the Queen of Hearts bottom of her dress to the sheer red material. On the GOOD QUEENS side of the dress I ironed on the snowflake appliques I had bought at thrift store to the white Pedi coat for the Good Queens dress.
Last touches sewed on two different kinds/sizes of lace to the sleeves of both the Good Queen/Queen of Hearts sleeves. Cut two fake pearl necklaces to fit under the Queen of hearts decorative ribbon of her top of her bodice and across the top of the Good Queens dress across her bodice area gluing them down with hot glue. Then I glued on Red Beads in the form of 2 triangles to the bodice of the Queen of Hearts dress and an decorative ribbon above the red beads that I cut off an black bag. I also sewed half of the black bag onto the Queen of Hearts long sheer sleeve where her shoulder meets the sleeve as the poof part seen on the queens top of her sleeves. I also glued on a few red ribbon pieces to the poof sleeve . Last but not least I added some gold paint lines across the Good Queens middle of her triangle of her dress up top. Wa lah! We now have one dress that represents both the Queen of Hearts and the Good Queen.
Last item needed for the queens was their crown and we drew one on cardboard, cut it out, formed it, stapled it together, then we painted half silver (good queen) and half gold (queen of hearts).
Good verses Dark Alice costume:
Bought an light blue dress at thrift store. that had a lot of tulle at the bottom of the dress. I went to Michaels and purchased Dark Blue fabric paint and sprayed half of the dress a Darker Blue than it already was.
Then with white material we drew an apron shape on it and cut it out. We cut straps for around the neck of the apron and for tying the apron onto an person. We then folded the rough edges of the apron over and ironed them back wards to the back of the apron to form an straight edge in the front. We sewed the straps over each other into one strap per side of the apron and sewed them onto the apron. Wa Lah! We now have an Dark side of Alice Dress and Good, and a White apron for both the Dark/Good sides.
On the Dark side of the Alice Dress I sewed on an small pocket that is on the Dark Dress of the video game of Dark Alice in Wonderland and drew on the number 4 seen on her apron. After this we drizzled fake blood on the Dark Alice’s side of her Apron as if she had been killing people, things or creatures and it got all over her apron from her knife.
Final touches we added an fake knife to the dark Alice side of the costume, fake rabbit to the good Alice’s, mismatched black/white knee high socks and white knee high sock, plus pair of black dress shoes. Black Ribbon in Good Alice’s hair to which is a wig we bought at the spirit store and sprayed half black.
Good verses Dark Cheshire Cat Costume:
We bought an large woman's purple/white striped tank top from thrift store and drew an 12 month old onsie outline onto it. I cut the outline out from front to back of the shirt leaving the top still connected and then sewed them together leaving no sleeves but skinnier body and legs for my 1 year old legs. I left the middle of the bottom open and adhered snaps so I could put it on over her head and then snap the out fit closed onto her. I then cut fur into strips and glued it onto the white stripes of the now onesie. Last I taped tape over half of the fur and took it outside and sprayed the purple stripes on the dark side with an black fabric spray I bought at Michaels to make the dark sides colors of the onsie darker. When dry I took the tape off the fur and sprayed the fur with an darker green/teal color to add the smudge of differential color to the dark sides lines on the Cheshire cats body. Wa Lah! We have the body of the Good and Dark side of the Cheshire cat.
For the mask of the Cheshire cat I cut a face hole in one of my older children s old beanies they had. I then put it on my 1 year old to make sure it fit and then I sewed on white fake fur I bought to the front and back of the beanie leaving a hole where my 1 year olds face will go. I then formed ears out of left over fur and sewed them to the top of the now furry mask. I then used some left over pink material from my older daughters Mad Hatter costume and cut triangles for the inner sides of the ears. I glued them into the ears and then I cut an half smile of white and pink left over material to draw the Cheshire cats smile onto. Then I sewed it onto the lower part of the Cheshire cat mask making sure it fit under my 1 year olds nose and cut a hole for where her mouth is so she may be able to breathe. I made sure the teeth were painted white under the Good Cheshire cat’s side of his mouth so they would stand out and blackened between the sharp bad Cheshire cat’s teeth so they stood out but differently.
Last I formed some sleeves to slip on my 1 year old arms halfway with fur and painted them to match the colors of both Good Side of Cheshire and Dark side of the Cheshire. I also formed a tail out of fur and sewed it together and stuffed it with stuffing I had bought at goodwill. Added wire to the tail and tied it on to the outfit for the Cheshire’s tail after painting half of the tail the dark colors.
Similar costumes:
Rating: 4.0 of 5. Votes: 4
|
4 votes
|

