

Guardians of the Galaxy - Yondu & young Peter Quill Costume
Rate this costume:
|
9 votes
| add a comment |
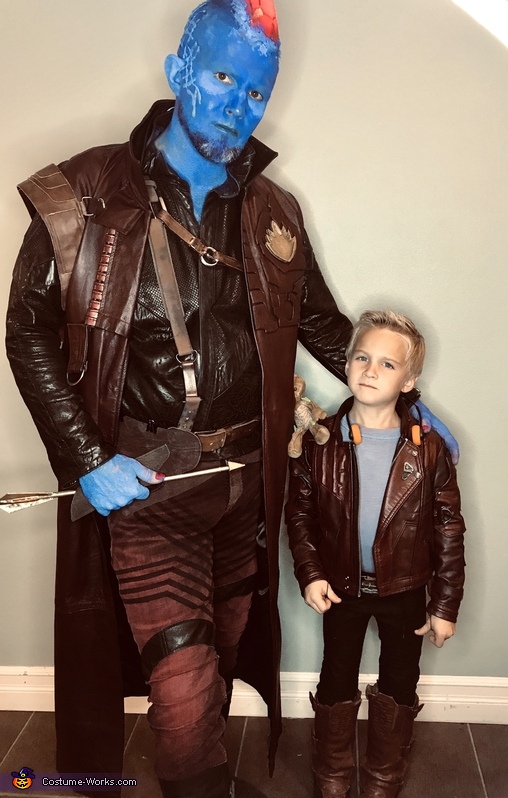
Yondu teaching young Star-Lord Intimidation


| Costume type: | Costumes for Families |
| Category: |
This homemade costume for families entered our 2019 Halloween Costume Contest.
A word from Jen, the 'Yondu & young Peter Quill' costume creator:
Every year I look forward to Halloween so I can let my creativity run wild with NO limits & am always so excited try new techniques and learn new things by experimenting. For the past 12 years we have always done a couple/ family theme where I make or piece together authentic costumes that are extremely detailed… our friends and family start asking months in advance what our theme will be and are always excited to see the end result! I always try to choose something that my kids will be excited about, as well as something unique that won't be overdone that year. Brainstorming, research on pinterest, and scouring the Internet happen months in advance and then the real work begins!
Last Year my 6 year-old son became absolutely OBSESSED with Star-Lord so I knew I had to make him the costume… Then my husband decided to be Yondu and to go all-out and design/develop the glowing head fin, the glowing arrow, and even made fake teeth! (all things he had never done before) Yay Youtube! As usual I focused on the costumes. This year Pretty much everything started from thrift store clothing, or stuff we already had & I disassembled, chopped, stitched, glued, painted, dyed, stenciled, trimmed and essentially repurposed everything to make it as authentic as possible.
Guess what! I made the Star-Lord costume for under $20! (woot woot!) That’s less money than the shoulder Groot alone! I started with a black girls biker jacket a size bigger than my son & chopped the length & arms, and used the extra fabric to make the shoulder & arm details. I added all the 3D designs with craft foam underneath & rope piping. I chopped up a pair of faux leather thrift store boots to make the boot covers & gun holsters & then used a soldering iron to add the cutout details & seal edges. Even the guns & walkman are homemade from paper, craft foam, and poster foam board! The pants I started with ladies pants and made them much smaller by chopping length in the torso, & hem, taking in the sides, and reattaching the waistband. I dyed the shirt to get the right shade (took 3 tries to get it right), and even made the lapel pin & belt buckle out of craft foam & paint during a lunch break ;-) The headphones & Groot were pretty much the only things I didn't make- The headphones were hard to find- I bought them for less than $2 but its a company in the UK. Groot was a souvenir from Disneyland.
For Yondu the cost was a little higher but still under $100 including all supplies used to make the special effects (fake teeth, fin, arrow), makeup, 2 real leather jackets (from thrift store) , leather belts, craft foam, leather paint. Everything from this was altered as well- I even dyed the jeans and added all the details- ( pin-tucking, stenciling, leather details, etc) for the 3D leather detailing on the jacket I took a different approach than on the Star-Lord jacket- instead of UNDER the leather I used craft foam with leather on top & added it to the TOP of the jacket hand wrapping the leather around the edges for a molded look- it was time consuming but I love the outcome ;-)
Most of the trims I already had & leather for the 3D details, tabs, etc, as well as on pants were from the sleeves I took off. I made the shoulder belt out of a pair of thrift store boots I chopped up... and the leather harness is made up of multiple belts connected by various d-rings, buckles, carabiners I already had. The leather shirt started out as a ladies batwing open front jacket (you know the kind from the 80s with the shoulder pads & webbed armpit lol) but the color & texture were perfect! I took in the armpit & added snaps to the front, removed the shoulder pads, and added the buckles to the sleeve (that were removed from the black Star-Lord Boots under the boot covers). Ravager patch is painted craft foam sheets in the 2mm & 5mm widths. Boots are an old pair of Motorcycle boots- I wanted them to look taller so I added leather to the pant to give it a taller look.
For Special effects that was my hubby's dept. and probably where most of the cost ended up since all supplies had to be purchased. There was a lot of trial and error, and things we'd do differently next time- but all-in-all I love the outcome! The Fin is made out of resin with red coloring and perfectly moulded to fit his head... It has an LED light strip under it to make it glow :) The Arrow, is made from scratch from hardware store supplies and a pointed fishing weight, then painted gold. It has LED lights in it, in the fin as well as parts of the shaft. The control button is hidden in the arrow holster made out of an old suede skirt. For the blue face makeup- he ordered real stage makeup which stayed on pretty well and had a powdery feel once dry- he said it breathes really well & was easy to remove with water. The Scar was made with hot glue on Wax paper & then attached with spirit gum. Ironically one of the hardest pants of the special effects was determining how to attach the fin...Wed definitely do this VERY differently next time...take it from us- caulking is NOT the way to go LOL!
This was definitely a learning process And a lot of late nights but we're really happy with how everything turned out! Hope you like our creations and get some ideas on how to create your own! We are hoping to start posting videos on how we did everything on our new blog we are starting wecanyoucan.com so check it out :)
For the finishing touch and to set the mood- we had Star-lords “awesome mix” tape playing on a small portable Bluetooth speaker hidden underneath the Jacket! (I just made a playlist on spotify) It was fun to see how excited people would get when they saw both of them! I think my favorite part was when my son busted out doing the Macarena at a Fall festival! I didn’t even know he knew that dance- and so glad I got video! AND when he did a little dance-off for some strangers while trick or treating resulting in a king sized candy bar as well as some life advice that going the extra mile in life pays off ;-)
The pure Joy of seeing how happy you can make your child when they become something they love- and the joy it brings to others is why I do this every year- we can all use a little extra joy in our lives ;-)
Xoxo
Rating: 4.2 of 5. Votes: 9
|
9 votes
|