

The Camo Family Costume
Rate this costume:
|
3 votes
| 1 comment · add a comment |
The Camo Family


| Costume type: | Costumes for Families |
| Categories: |
This homemade costume for families entered our 2013 Halloween Costume Contest.
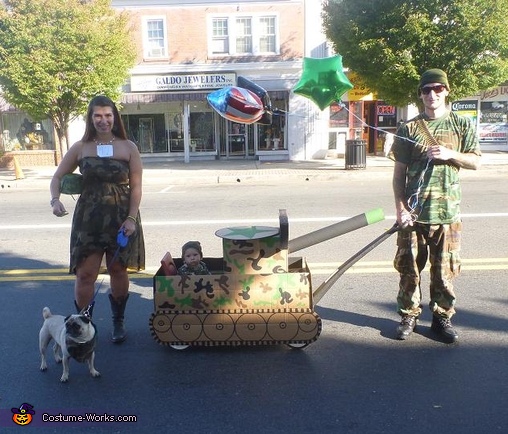
A word from Victoria, the 'The Camo Family' costume creator:
We are the Camo Family because we all love camouflage. None of us are in the Army we just enjoy the print and style. We came up with the idea to turn our 1 year old son's wagon into an Army Tank when we found out about a baby parade in our town. Grand prize winner won a Kindle. We won Grand prize. The rules were to decorate your stroller or wagon any theme that you wanted. I had suggested that we just decorate the wagon in camouflage streamers since my son's 1st birthday party was camouflage theme and we had only 3 days to decorate his wagon. He turned 1 September 23rd, 2013. My boyfriend said that wouldn't get us to win and that he wanted to build a tank instead. We happened to have a bunch of cardboard boxes in our garage and after we agreed on how we would build the tank we went to Wal-Mart and got a hot glue gun, extra hot glue gun sticks, black, green, and brown paint, pencils, erasers, and a pack of paint brushes and we went to work on the tank. My boyfriend, Andrew, did the building and I did the painting. Since we had only 3 days to get the tank completed we worked on the tank every time our son napped or went to bed for the night. Our son takes two naps a day; each nap is about an hour to an hour and a half long. That time flew by faster than it ever has when working on the tank. It takes a lot of patience, creativity, and focus to not only build the tank but to paint every camo spot and make it look neat. When our son went to bed for the night at 7:30pm we continued to work on the tank and didn't go to bed anywhere from midnight to 2am in the morning. I am normally in bed by 8pm so that was extremely late for me. I was very sleep deprived by the time we finished the tank!!
Building the tank was easy, it was the painting that was the hardest since I wanted to make sure that the spots didn't all look the same, weren't to cluttered, and there weren't too many green spots next to each other or too many brown or black spots next to each other. I wanted it to be spaced out perfectly. I also wanted the camo spots to be painted very smoothly and not look like I just dabbed my brush in paint and smeared it onto the box. It took anywhere from an hour to 3 just to draw on and paint one side of the tank.
When the tank was almost finished we decided to go to the dollar store and get a green start balloon, a black star balloon, and an American flag star balloon to add to the handle of the wagon army tank for a final touch. After a bunch of erasing, redrawing camouflage spots, very slow and careful painting, and loss of a lot of sleep the tank was finally done!
Our dog which is a 4 year old pug is a service dog and we decided to include him as well and put a camouflage bandana on him.
Since we weren't sure what to have our son be for Halloween we decided to keep the tank and make him a little army man for Halloween and continue to all be the "Camo Family" for Halloween.
Here is a step by step of how we made the tank.
1. Get a picture of an army tank off Google images
2. Gather cardboard boxes
3. Measure the wagon and then measure the main box that goes over the wagon
4. Make sure the main box that goes over the wagon is a little bit bigger than the wagon to insure it fits
5. Get a second box and find the perfect spot on the top of the main/bottom box and mark it
6. Get two pieces of cardboard and make sure that they are a little bit longer then the main bottom box so that you can use them as the “tracks” of the tank
7. Cut the pieces of cardboard that are being used for the tracks and cut them so that they have rounded edges
8. Find the perfect object to make circles on the track and the circle piece on the top of the box where the star is
9. Place the circle item on the track and trace them
10. Once you have the boxes cut to size and marked where they will be glued, start drawing on the camo spots and other markings
11. Use a ruler to make the star on the top circle piece and the lines on the track
12. Once the camo spots are on make sure they are not all the same shape or to cluttered
13. Mark the camo spots with what color they will be, G= Green, Bl= Black, Br= Brown
14. Pour paint onto a paper plate and find the perfect paint brush size to use
15. Dip the paint brush in the color you want and before you paint the camo spot that color, erase the letter mark
16. After very carefully painting the camo spots the colors you want let dry
17. Once everything is dry hot glue everything together
18. Make sure everything is glued down well
19. Enjoy!!!!
Rating: 4.7 of 5. Votes: 3
|
3 votes
|