

Rose DeWitt Bukater Costume
Rate this costume:
|
6 votes
| add a comment |
Rose DeWitt Bukater Costume


| Costume type: | Costumes for Women |
| Category: |
This homemade costume for women entered our 2019 Halloween Costume Contest.
A word from Jasper, the 'Rose DeWitt Bukater' costume creator:
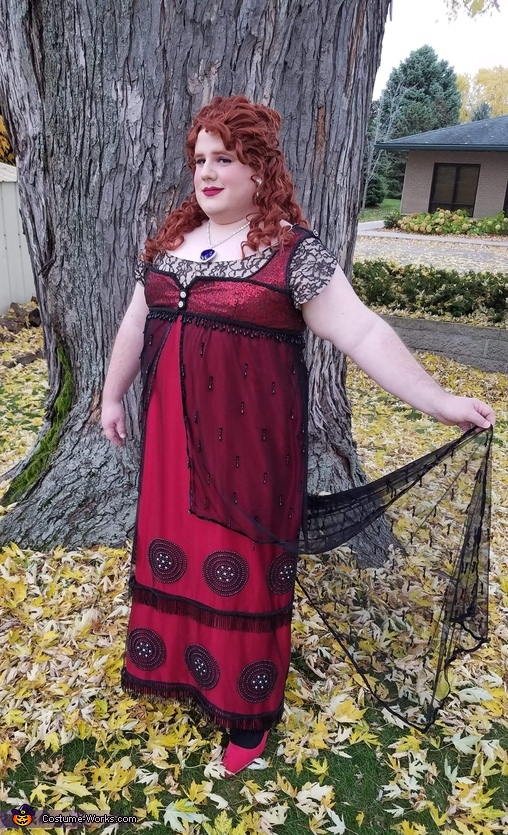
Rose Dewitt Bukater Costume From the 1997 Blockbuster Movie TITANIC
Description:
The gown consists of two parts. First, there's an under-dress featuring a black lace & nude bodice. There is also a skirt that consists of a red crape backed satin tubular shaped under-layer, covered by a layer of fine black netting. The netting goes to calf length, has rhinestone circles sewn to it, and is embellished with beaded fringe and trim. We also have a second layer of netting sewn to the red satin, this seam is hidden by the fringe on the layer above it. This layer goes to the floor and has a second row of rhinestone circles and fringe on it. Each of the skirts have eight rhinestone circles (16 total). Inside the bottom of the skirt is an attached two layer petticoat that helps support the bottom layer of beaded circles and keeps the dress from collapsing in on itself from the knees on down.
Over the dress is a vest made of red sequin and a fine black netting with a black glitter rose pattern. Attached to the vest is a beaded over-skirt/train. The edges of the vest and train are finished with black beaded trim.
Pattern Used:
Vogue Pattern #9936 (vintage) Woman's Evening Gown with Over-skirt. This Pattern included sizes 18, 20, 22.
I found this pattern uncut in a thrift store for 25 cents. It immediately reminded me of the evening gown that we see the character "Rose Dewitt Bukater" wearing as she attempts to take her own life by jumping off the back of the Titanic.
I used this Pattern as a springboard to launch off of for this costume.
The Model wearing the costume in the photos is me, a MAN!
Materials Used:
Red Crape Backed Satin - 5 yards
Fine Black Mesh - 5 yards
Fine Black Mesh With Velvet Polka Dots - 5 yards
Fine Black Mesh With Glitter Rose Pattern - 2 yards
Black Lace - 2 yards
Nude Tone Cotton - 2 yards
Red Sequin Fabric - 1.5 Yards
Canvas - 1.5 yards
Black Beaded Fringe - 8 yards
Black Beaded Trim - 8 yards
Black Glitter Trim - 9 yards
Black Rhinestones - 3,500+
Clear Rhinestones - 112
Black, Red, and Nude colored Thread.
Hooks & Eyes
Buttons
Pattern alterations or any design changes you made:
Lets Start from the Beginning...
The Bodice
This pattern's largest size is a 22. To most that would seem adequate enough, but being a guy who now luxuriates in the comfort and security of no longer being judged out on the dating scene since saying "I do" to my darling husband, I now require a Woman's size 34! I ended up grading the pattern up six sizes, which I'll admit was a challenge on its own. I made 6 mock-ups of the bodice; fixing little fit issues with each one. Eventually I altered the Bodice Pattern enough to the point that it fit like a glove!
I tried making the short version of the sleeves that came with this pattern, but the look of them made my shoulders look like a linebacker. I knew I needed something that made my shoulders look more feminine, so i decided to self draft a tulip style sleeve. I fell in love with the look of this, and decided to stick with it.
At this point I cut my bodice and sleeves out of back floral lace and a nude cotton, layering the floral lace over the nude, and then proceeded to sew the bodice and sleeves together.
Under Skirt
The skirt in this pattern actually tapers inwards toward the ankles and features a slit up the back, but I wanted more of the tubular shape that the original had. I ended up using the top of the skirt pattern to get the alignment needed to match up to the bodice. However, I kept my skirt almost completely tubular. This was achieved by sewing a large rectangular tube that was eight inches larger than the waist measurement of the bodice. I then took the eight inches out of the waist by creating twelve inch long darts on each side seam. I then finished the red satin skirt by encasing horsehair braid into a two inch rolled hem. Next I used the same measurements for the fine black netting layer that hangs down to calf length. After attaching the red satin base layer and black netting layer to the bodice, a second piece of fine black netting was attached to the satin at calf level that hangs down to the hem of the skirt.
Beads & Trim
As depicted in the pattern, I attached two inch beaded fringe to the bottom of each layer of black netting. After allowing the weight of the fringe to stretch the black netting, I ended up having to raise each layer by 1 inch to accommodate for the stretch. At this point I attached the black beaded trim over the ribbon of the beaded fringe. Luckily the added weight didn't cause the netting to stretch any further than it already had. Even though I had used the same beaded fringe on both layers, the bottom layer looked almost non-existent at first. To correct this, I stitched a second row of fringe to the hem of the red satin layer.
Rhinestone Circles
The 16 rhinestone circle appliques each contain roughly 220 black rhinestones, and 7 clear rhinestones. I created them by placing fine black netting into an embroidery hoop over the top of my self drafted pattern. Then, one by one I attached each rhinestone to the netting using E6000 craft glue. On the embroidery hoop I created the first four rows of rhinestones on each applique. The circles were then sewn to the black netting of the skirt. The stitching was placed where the 5th outer row of rhinestones would have been. Once sewn on, the 5th row of rhinestones were attached over the top of the stitching with craft glue to hide the seam.
Lining
I created a lining for this costume using the nude cotton to line the bodice, and the red satin to line the skirt. This is when i noticed that the weight of all the bead work was causing the bottom of the dress to fall inwards. To fix this i created a two layer ruffled petticoat that attached to the lining at knee level. Making this alteration gave the dress exactly what it needed to support the weight of the beaded fringe and rhinestones.
Train
The over-skirt/train was created out of fine black netting with small velvet polka dots. I used the pattern piece for this, but lengthened the train by little over a yard. I then hand beaded the train using the polka dot pattern on the netting as my guide for placing the beads. I feel like this was definitely a time saver since i didn't have to mark out a pattern on the fabric.
Vest
The vest was self drafted from the pattern used to make the bodice. The Vest on the original gown from the movie was completely covered in red and black seed beads. Knowing that I wouldn't have the time to complete such a task in 30 days, I created my vest by using layers of the following: fine black netting with black glitter rose pattern, red sequin fabric, red satin, and a canvas layer for stability. The train was then attached to the vest, and the vest was lined with a black polyester. the vest has four hooks and eyes which are used for the closure on the front of the vest. The plan was to trim the vest and train with the same black beaded trim that was used on the underskirt, however, I only received half of my trim order, and the rest was placed on back order. Unfortunately I have yet to receive the rest of the trim, so I had to make due by filling in with a black glitter trim instead. I then completed the vest and train by attaching two buttons to each shoulder, two buttons to the front closure (a cosmetic preference), and two buttons to the front of the train.
Additional Information
Wig:
The wig that I used is a synthetic lace front wig. when it arrived it had a slight curl to it, but it was nothing like the curls that Rose had. I ended up putting the wig up in curlers, dipping it in boiling water to melt the hair fibers a little, and allowed the entire wig to air dry before removing the curlers. This created the beautiful curls that are shown. I then styled the wig into one of Rose's iconic hairstyles from the movie, and even included a similar style butterfly hair comb. The wig still had a Plastic looking shine to it after all of the work that i had put into it, so I sprayed it with a little dry shampoo to dull the shine and give it a more realistic look.
Makeup:
After doing a bit of research online, I came across a wonderful makeup tutorial on YouTube. It actually featured the makeup artist that did Kate Winslet's makeup for the film. In the video, she flawlessly recreated the iconic look, and gave great detail about the products and colors used. This video became a big help to me in the end.
Jewelry:
Being a huge fan of the film, I actually already had a full size replica of the heart of the ocean necklace on display in our home theater.
Conclusion:
This was by far the most time consuming, tedious, and challenging costume I have ever made. I'm not a fan of hand sewing, and this costume required a lot of it. If you are still reading this review, I thank you for sticking in there with me!
Rating: 3.8 of 5. Votes: 6
|
6 votes
|