

Purple Glitter Dragon Costume
Rate this costume:
|
29 votes
| 4 comments · add a comment |
Purple Glitter Dragon


| Costume type: | Costumes for Girls |
| Category: |
This homemade costume for girls entered our 2013 Halloween Costume Contest.
A word from Kevin, the 'Purple Glitter Dragon' costume creator:
Allouette and I take frequent runs together (albeit she is in the running stroller). On one such run I asked her what she wanted to be for Halloween. In years past this has always been something like a "princess" or maybe a "fairy princess". This year though she was very explicit in telling me she wanted to be a "Purple Dragon". First, this was an AWESOME sounding costume and second, I knew no store bought item would do it justice. There was no way I was going to make her first unique costume idea something out of a box, trouble is I had no clue where to start!
I do have to say that to this day I cannot suss out where she got the idea for this costume. I do play Dungeons and Dragons, and my wife and I recently attended Gencon so maybe she was inspired by some of the pictures from that.
The only portion I didn't craft myself on this costume was the base layer of clothing, and some old slippers. It was really simple to just take an old jacket and pair of pants to use as a base layer here. Other than that though, it was all me.
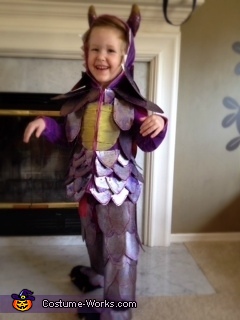
The Scales - I wanted to emphasize recycling in the entire design, my initial thought was to use crushed soda cans for the scales but I figured that would become too heavy. Instead every scale on the costume was cut from a soda or beer cardboard box, tough but light. These scales were each individually sewn onto the jacket (so they would hang a bit loose) and hot glued to the pants. The same cardboard was used for the chest plate. I then used a glittery, metallic purple spray-paint for the scales and a yellow paint for the chest plate. I topped the scales off with some glue and brighter purple glitter. She wanted to sparkle and I couldn't see how sparkling when headlights from a car shining on you could be a bad thing!
On her head - For the horns I made a headband of sorts out of cardboard and used a piece of wire from a hanger as a base for fabric and stuffing to shape a horn that sticks through the top of the hood. This way the headband actually helps keep it on her head too! I cut some tooth shapes out of cardboard and sewed them onto the side of the hood and painted them white. Thought it would be fun for her to have some Dragon Teeth too!
Her Tail - Some fabric sewed around some stuffing and sewed to her pants in the back.
Her Dragon Feet - I used the old pair of slippers as a base item, chose fuzzy ones for warmth and once they were spray painted the fuzz actually took on a hardened look that makes her feet look scaly instead of fluffy. I made small talons out of cardboard once again and painted them yellow to match with the two color scheme I had for the entire costume. Added a few cardboard scales for further decoration and it came out great! Both warm for cold Fall weather and very Dragony.
Her Wings - Other than the scale this came out the best. I knew she needed wings but once again I worried about making something too heavy for her to move around in. Then I realized they didn't need to be anything huge at all! I took the same wire clothes hanger used for the horns and bent it in half. Then I took those two halves and made the shape I wanted the wings to take. Once I had the shape I simply drapped some yellow fabric (ahem, two color scheme) and suddenly she had a pair of wings. I hot glued the wings directly to the jacket beneath the scales, which provided a great way to hid the ends of the wings glued on too.
So there you have it. Practically the entire thing is made of leftover cardboard from soda boxes!
NOTES:
• I used a med thick thread to sew on the cardboard. Has good strength and won't tear the cardboard as easily.
• When making the legs I initially hot glued all the scales together from top to bottom, this ended up restricting the bend of the knee. It was an easy fix to ensure the scales below the knee were not glued to the ones on top.
Rating: 4.9 of 5. Votes: 29
|
29 votes
|