

Princess Aurora and Prince Philip Costume
Rate this costume:
|
12 votes
| 1 comment · add a comment |
Princess Aurora and Prince Philip


| Costume type: | Costumes for Kids |
| Category: |
This homemade costume for kids entered our 2018 Halloween Costume Contest.
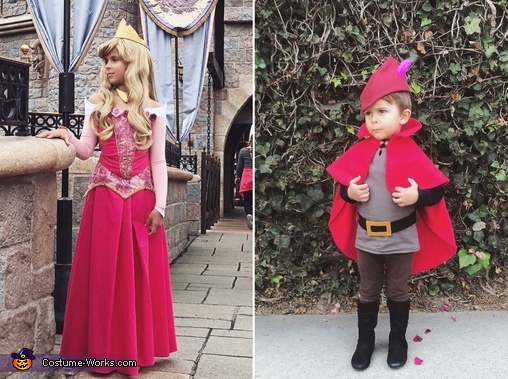
A word from Elle, the 'Princess Aurora and Prince Philip' costume creator:
This is my daughter, Riley(8) as Princess Aurora and my son, Hendrix(3) as Prince Philip. We started planning these costumes last year actually(2017) and were hoping to complete them for last Halloween, but ran out of time. So, this year, since I already had most of the materials in hand from last year I decided to make these costumes for my little ones to wear to Disneyland. I made both of these costumes completely from scratch and self-drafted all of my patterns. The only pieces I did not make were both of their shoes, the black turtle neck worn under Prince Philip’s tunic and the Aurora wig, however, I did style the wig.
✨🗡🛡🤴🏼Prince Philip🤴🏼🛡🗡✨
•Undershirt/tunic/leggings/boots/hat/cape•
I had previously purchased a simple black turtle neck(Old Navy, I believe) for my son to wear as the black undershirt Prince Philip wears underneath his tunic just to save some time and keep things relatively simple.
For the tunic, I was confused as to what color Prince Philip’s tunic actually was, because in some scenes of the movie it looks tan/beige colored and in other scenes it looks like a light gray. I opted for the light gray because I already had the material in hand leftover from another project. The fabric is a gray flannel material which I thought was perfect because it is so soft and cozy. I drafted the tunic pattern piece using my son’s measurements and added in extra ease and seam allowance while keeping in mind that the tunic needed to be rather fitted. Prince Philip’s tunic actually has a little keyhole cut-out detail in the neckline of his tunic so I decided to line the tunic with the same fabric to hide the interfacing and to make it look nice and neat. I drew out the cut-out and added interfacing just around the key-hole(on the wrong side) so that it would hold its shape when turned the right way. I thought it would’ve been trickier to make the key-hole cut-out work the way I had envisioned it, especially with how small it was, but I managed to get it right on the first try which was pretty cool. I added belt loops in the side seam for the belt.
The belt is about 1.5” wide and I made it out of black felt. I added a simple belt buckle detail using some yellow felt and then glued it onto the belt and then added an easy velcro closure underneath.
For the leggings, I just used brown jersey fabric and threw together a simple pair of leggings.
The boots I bought used but they are black toddler slouchy boots from Arizona jean co?
For the hat, I used a darker red felt and I used pretty much the entire width of a 14” felt sheet(at least I think it was 14”, it’s the $1 felt squares from JoAnn’s) to draft my pattern for the hat and it was still a bit smaller than I would’ve liked it to be. For a bigger child you will definitely need a bigger sheet of felt. I made the first hat a little too small so I adjusted my pattern and made it a little bigger and then sewed it up and turned it right side. I used a hot glue gun to try to manipulate the felt a little bit and tweak certain areas to achieve the shape and look I wanted. I added a fuchsia colored feather detail like Prince Philip has in his hat.
The red cape was fairly easy and I used a red flannel fabric because it was cheap, soft and warm, however, I wished I had used a lighter-weight cotton fabric instead because it would’ve lessened some of the bulk and allowed the cape to have a nicer drape. I manipulated a circle skirt pattern for the upper/shorter cape piece that wraps around the shoulders and a longer cape piece underneath it. Both the longer and shorter cape pieces are lined with the same flannel fabric. For the collar, I drafted an extra tall collar piece and added stiff interfacing so that it would stand upright like Prince Philip’s. Lastly, I sewed on a gold clasp hook and eye closure that I had laying around and that completed the Prince Philip costume!
✨🌹👸🏼Princess Aurora👸🏼🌹✨
•bodice, peplum, skirt, shoes, crown, necklace and wig•
For Princess Aurora’s bodice, I started by drafting a simple sweetheart bodice using my daughter’s measurements + ease/seam allowance and then manipulated the neckline a little to mimic Princess Aurora’s bodice neckline. I had to make 4 separate pattern pieces for the front bodice in order to add the corset-style seams Aurora’s bodice has. I decided to add some flare to the center front panels, so I sandwiched a hot pink iridescent organza fabric and a beautiful rose pink sequined mesh fabric with rose detailing and overlaid it onto a rose pink cotton base that I used for both the bodice and the skirt. I added a gold piping trim for the center front seams. I decided to close up the back with eyelets instead of a zipper so that It could be loosened and/or tightened if needed. I then drafted some off the shoulder sleeves to attach to the bodice and I used a light pink 4-way stretch lycra fabric so that they would be fitted but still comfortable. The pointed neckline that Princess Aurora’s bodice has was probably one of the trickier pieces to make. It took me a few different attempts to find the fit that I wanted. I ended up making two separate collar pieces, a right and left side. The two pieces overlap in the front and meet at the back. I had fed stiff interfacing to the shoulders to give it the structure it needed to sit upright and sewed the collar to the bodice. Lastly, I decided to add a little more flare to my bodice by gluing some beautiful little roses I found at a local craft store to the front and back seam of the collar and neckline.
The skirt was by far the most complicated part of this costume. Mostly because I was exhausted by the time I got to the skirt and wasn’t entirely sure how I wanted to make it and whether I wanted it to be technically correct according to Aurora’s skirt with pleats or a fuller, twirly full circle skirt with lots of layers. In the end, I was running out of time, so I took my cotton fabric and started draping it onto my daughter to see how it would look with the traditional pleats at the center, sides and back of the skirt. I ended up liking the pleated skirt look so I drafted my pattern for the skirt. I really wanted the skirt to have a certain fluidity and move beautiful, so I wanted to sandwich the same iridescent organza fabric I used for the center front pieces of the bodice underneath a beautiful rose pink sheet chiffon, but the two fabrics together are nightmarish to work without and I ended up taking them out of the equation just to simplify things and because I just didn’t have the time to try to make the layers work. The skirt ended up being a single layer of the same rose pink cotton fabric that I used in the bodice. I added in the pleats and fitted everything to my daughter, sewed the pleats down and added a zipper. The skirt ended up working out just fine and I like the simplicity of it.
The peplum is the last piece I made the day before our Disneyland trip. I originally wanted to incorporate the peplum to the bodice so that it would be a simple one piece, but I was running out of time so I just made the peplum a separate layer with a velcro closure in the back. I used a light pink broadcloth fabric as the base and then overlaid the same rose pink sequined mesh fabric that I used in the bodice just to add an additional flare to the dress. When I was drafting my peplum, I did not take into account how visible my turned in seams would be underneath the sheer mesh fabric(d’oh!), so after I had sewed the peplum, I decided to add a gold trim to try to hide the seams as best as I could. Lastly, I added some gorgeous pink rhinestone embellishments to the peplums just to give it some extra sparkle.
For the crown and necklace, I used brown craft foam I bought at Michaels. I measured my daughter’s head and neck and drafted patterns for Aurora’s crown and necklace pieces and traced the patterns onto the foam. I used an exacto knife and ruler to cut the pieces out of the foam. I then used a dremel to clean up some of the edges and then I used barge cement glue to close up the back of the crown. Next I used a heat gun to shape and manipulate the crown and necklace pieces a bit. After they were shaped, I sprayed three coats of clear plastidip to seal them for painting. When they were cured, I painted the crown and tiara gold(I think it took about 5-6 coats of paint; I used a hairdryer to speed up the drying process between coats).
I purchased the shoes on eBay. I believe I just searched for girls pink glitter heels(I honestly didn’t care too much about the shoes because I knew they wouldn’t be seen while she was wearing the dress but the ones I found were so pretty and matched her dress perfectly).
I also purchased the wig on eBay. I just searched for blonde wig with bangs and happened upon a wig that was affordable and looked perfect for Aurora, so bought it and styled it. Luckily I didn’t have to make an additional adjustments to the wig to make it fit my daughter’s head and it truly completed the entire look and brought the costume to life.
My daughter felt like Princess Aurora while wearing her costume and she was absolutely beaming with pride by the reactions and compliments both kiddos got from Disneyland cast members, employees, and guests while wearing them at Disney. It was a labor of love but the end result was so worth it. 💗🌹
Rating: 4.2 of 5. Votes: 12
|
12 votes
|