

Pincushions Costume
Rate this costume:
|
7 votes
| add a comment |
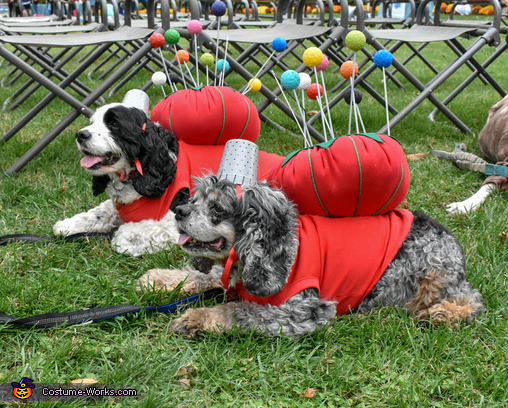
Sew Adorable Homemade Pincushion (dog costume)


| Costume type: | Costumes for Pets |
| Category: |
This homemade costume for pets entered our 2019 Halloween Costume Contest.
A word from Mariah, the 'Pincushions' costume creator:
This is my 5th year creating a homemade costume for my dogs. In all prior years, my dogs' costumes have been food related, but this year I decided to do something different. I recently started sewing and decided the perfect costume would be pincushions for the dogs with me being a pile a of scrap fabric (anyone who sews knows that you hold on to the scraps of fabric swearing you are going to do something with them and then you wind up with this huge bag of scraps you never use :) ).
Here's what you need for the dog costumes:
-dog shirt (red)
-matching red fabric - I used sweatshirt fabric -- it was the perfect weight. You don't want to use something too light / see through or something that will fray when cut. But, I'd avoid use fleece because of its tendency to stretch. I bought 1.5 yards.
-needle and red thread (there is a small amount of hand sewing)
-small wooden skewers (in kitchen section of stores)
-small foam balls (I used 1.5 inch and the size worked perfect)
-various colors of paint for the top of the pins
-silver paint for the skewers and thimble hat
-a child size plastic cup (I got mine from Target and it was perfect)
-red or black ribbon for the hat
-a black marker
-a large upholstery needle (I bought a pack with 4 large needles - for one dog I used the 8 inch, one dog the 10 inch, and I used the 12 inch on my costume)
-stiff green felt
-thick black cross stitch thread
-thick green cross stitch thread (preferably the same color as your felt) or you can also use yarn
-a large foam ball (I used a 4 inch one)
-foam block you can cut in small chunks
-poly fil
-glue gun
-gloss mod podge
Here's what you need for the human costume:
-black shirt
-tons of scrap fabric
-glue (I used Aleene's Original Tacky Glue)
-larger wooden skewers
-foam balls (I used the same size I used for my dogs even though I used larger skewers for my costume)
-a large upholstery needle (I used the 12 inch for my costume)
-glue gun
-gloss mod podge
First I started making my pins. I picked out 11 colors of paint for the pins tops and I painted three foam balls in each color. For the final costume, each dog had anywhere from 9 to 12 pins but you need several extras because they do snap easily when the dog is wearing the costume (especially if you have two dogs). Plus several of these were going to be used on my costume. I then painted 7 large skewers for me and 26 small skewers silver. Once my foam balls and skewers were completely covered in paint (took 2 to 3 coats), I painted them all with glossy mod podge. For the foam balls, be sure to spread it very thin or it will not dry clear. If you have some places on the foam balls that the mod podge did not dry clear, go back over them with a thin layer of paint (the gloss should still shine through). Then I put the pins together -- I put a spot of Aleene's original tacky glue where the foam ball and skewer connected to make sure it was would stay together.
Next I worked on the pincushions. Warning - you need to cut your fabric much larger than you think. I have small to medium size dogs (22lb / 30lbs) and I cut out a 20 to 21 inch circumfrance circle (I used the top of a laundry basic as my template). Once you've got your circle cut out, take your needle and red thread and make a running stitch all around the edge. When you get to the end, pull the thread tight to gather the fabric leaving a medium size opening at the top for stuffing and then knot your thread (do not pull the thread so tight the fabric is all the way closed). Note - I actually did two complete sets of running stitches because I was afraid if would break while wearing the costume.
I was concerned about the skewers coming out during the contests so I put foam in the tomato so the skewers would have something to anchor to. I put my foam ball through the opening in the fabric (placing it in the middle) and then start putting poly fil around it. Once I had poly fil all the way around it, I cut slices of the foam board and added those. I then put more poly fil in front of the foam board so the final product was red fabric, layer of poly fil, layer of foam board slices, layer of poly fil, and foam ball. Just keep adding poly fil until you are happy with the shape making sure to smooth out as many puckers / creases in the fabric as you can. For my senior dog, I used a lot less poly fil because even though the final costume was not going to be heavy, I wanted his to be smaller and more manageable.
Once you are happy with tomato shape, cut 3 to 4 pieces of green thick thread or yarn. Put your tomato on top of the first piece, wrap it around the tomato and tie the ends at the top of your tomato. Do not pull your thread tight -- you are making a tomato not a pumpkin. Do this with the other pieces of thread so you have either 6 or 8 sections to your tomato. Next measure the hole at the top of your tomato not covered with red fabric and using your stiff green felt, cut out a leaf top that is about 1/4 of an inch bigger than your hole on all sides. Glue your leaf top down with a glue gun. I also put a spot of glue on the bottom of the tomato where all the green thread / yarn pieces intersected to keep them in place.
Next cut out your tiny strawberry. I made a cone shape, hand stitched up the side, stuffed it with poly fil, and stitched the top closed shaping it until it formed as strawberry. Then cut a leaf top out of stiff green felt. Thread a needle with your thick green thread (or yarn) and poke through your leaf from the underside. You want your thick green thread / yarn to be long enough that when you glue it to the tomato, it hangs down to the side. Then glue your leaf down to your tomato and hot glue the other end of the string to your tomato so the strawberry is attached.
Next put your red shirt on your pup and mark on the shirt where the curve of their sides start. Then take the shirt off your pup and put a piece of card board between the layers of the shirt. Hot glue your tomato on to the shirt (I put the glue on the shirt using my marks as a guide). The first time I started gluing the tomato down, I made sure to leave a gap between my glue and the marked lines. I then tried the shirt on again and determined how much further I could put glue out on the sides. Note, you can glue out further on the front and back of the tomato then you can on the sides. Make sure it is glued down really good.
Then I painted child's plastic cup silver (took several coats). Once I was happy with the coverage, I took a black maker and drew dots and lines on the cup so it looked like a thimble. I then put glossy mod podge over the whole thing to make it shiny. Once it was dry, I turned the cup right side up and also mod podge the top lip to try and prevent chipping. Then I glued two pieces of red ribbon to each side so I could tie it in front of and behind my dogs ears (over the years I've found this really helps a hat or head band stay on).
Finally, you need to poke holes in the tomato to put your skewers. It was tough to poke the holes - the skewers are not strong enough to go through the fabric or felt. I used a meat thermometer that was about the same size as the skewers, but I also could have used the largest upholstery needle. Once you have the holes, put your skewers in making sure the skewers go into some foam so the stay put. I also put them in at varying heights. The last touch was to take my thick black cross stitch thread, thread an upholstery needle, and add it to to the tomato.
For the human costume, I took my scrap fabric and glued it down to the shirt bunching spots of it up and folding spots so it looked more like a pile of fabric. I then took the 5 larger skewer pins and glue them to the shirt - I glued the foam part down with Aleene's (same thing I used to glue the fabric down) and I put the pins on the shirt in such a way that the end of the skewers was under a folder of fabric so I could hot glue it. I then took the largest upholstery needle and threaded it with thick black cross stitch fabric. I carried the needle in my one hand but you could also glue it down to the shirt.
Word of caution -- these costumes held up well and were a HUGE hit winning 3 of the 4 contests we entered winning some great prizes (at one contest I won at $400 DSLR camera for the most creative costume). But, it is very easy for the pins to get tangled with each other, around objects, and around their leashes. I left my dogs harnesses on under the shirts so their leashes came out the back under the shirt. That worked better than having the leash on the collar, but the leashes still got tangled. I snapped several skewers during the various contests so I was happy to have spares with that I could just pop a new one in. I only took one dog to one of the contests -- it worked better only having one pup, but the pins still hit things.
Rating: 4.7 of 5. Votes: 7
|
7 votes
|