
by Lindsey


Rate this costume:
|
6 votes
| add a comment |
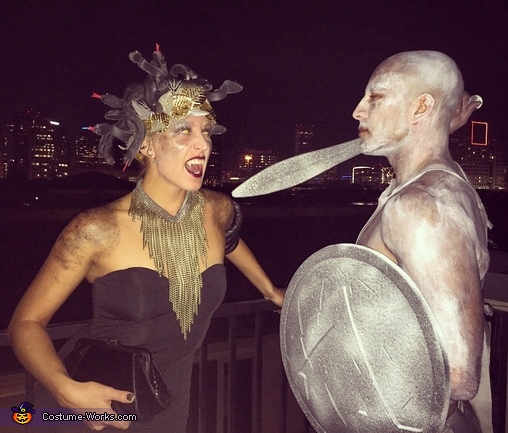
Don't mess with me, I will turn you to stone!


| Costume type: | Costumes for Couples |
| Category: |
This homemade costume for couples entered our 2016 Halloween Costume Contest,
I have always been a big fan of DIY costumes, particularly the costumes that take it to the "next level" (because that is what Halloween is all about, right?). I enjoy the entire creative process, from inception to execution to reaction. Last year really got me going as I was Mystique, made my costume by hand (which took, what seemed like, forever) and ended up winning a very large costume contest with cash and prizes. Needless to say, I was encouraged to continue the trend for the following year.
As I am brainstorming, I try to think of costumes that will be fairly well-known, yet a bit challenging to make. With that being said, my main goal is for the costume to look as realistic as possible; I don't like to cut corners. So late this summer, after seeing some movie that had a Centaur in it, I was convinced I had my costume idea set. I was pondering the best way to create the costume, doing my research on the anatomy of a Centaur and Greek mythology, when I remember the story of Medusa. I figured the idea of Medusa might be a bit more plausible for going out to the planned parties. Therefore, I started researching Medusa and Medusa costumes, and persuaded myself that I could make a costume that looked better (no offense) than about 90% of what I had found online. So I ordered a dress I found online that day, and the rest I started to piece together when I could.
The final concept of Medusa and her victim, the stone statue, came together when I was talking to Eric, the fellow in the pictures with me (who I am dating). We thought it would be fun to include him as either a stone statue, or Perseus (who beheads Medusa). We went with the stone statue because it seemed a bit more recognizable and fun.
For Medusa, the most important component was the headpiece. I contemplated what to use to attach the snakes on my head, and decided an adjustable baseball cap (with the bill removed) would probably be my best bet. I knew I would have to have quite a few snakes to cover my head and be able to adjust them to make it look as realistic as possible. After searching high and low in stores for the right kind of rubber snakes I needed, and failed to find them. So I started looking into making the snakes. I had worked with silicone before (I had made silicone suspenders for my Leeloo from The Fifth Element costume) and knew it would feel pretty lifelike. So I looked up places in town that sold silicone and bought what I needed to make black, silicone rubber snakes. Then the real fun began...
The entire process of the headpiece started with making snake molds. I made some play dough, formed them in the shape of (half of) a snake, some with their mouth closed and some with open mouths, and then placed the doughy snakes in large aluminum cooking containers. Once I laid out 5 skinnier snakes in one container, and 4 thicker snakes in the other container, I sprayed the snakes with cooking oil, then mixed up and poured Plaster of Paris in each container to cover the dough. I let the plaster harden, removed the play dough, and my snake molds were formed! I coated the plaster molds with a “Ease Release” sealant so that I would be able to remove the silicone from the plaster easily. Then I cut thin, pliable wire to place inside the snakes (slightly longer than each mold so that I had some extra wire to attach them to the hat and adjust accordingly). I then mixed up what I needed of the silicone ingredients to fill up half of each, individual mold. Once I poured the silicone halfway in each mold, I let it sit and harden for about an hour, then placed the cut wire in the mold, mixed and then poured the remainder of the silicone needed on top of the wire to fill the rest of the mold. Finally, I let the molds cure for hours before removing the rubbery snakes from their molds and baking them on a cookie sheet for another few hours (per instructions). Then I started to attach and adjust the snakes to the baseball cap via the wires. I made sure it was pretty fairly balanced. To add the final touches, I used black spray paint and some wiry, patterned material that I found in the gift-wrap closet to add a scaly textured look. The beaded eyes and foam tongues would not stick with glue, so I took staples and adjusted them accordingly to fasten the tongues and each eye to the rubbery snakes. I took a cheap, gold, leafy headband that I had purchased and completely embellished it with grey spray painted, hand-glittered leaves and such. I wanted to camouflage where the hat hit on my head and add a little extra pop to the headpiece and entire outfit. Little touches here and there also contributed to the outfit, like the colored contacts, the fangs, a snake earring (looked like it was weaving in and out of my ear), the snake twisted around my arm, etc. It was a long and tedious process, but I enjoyed seeing it come together. It turned out better than expected!
For Medusa’s victim, the stone statue, we had to purchase a couple items like the sword and shield, sandals and body paint. But everything else was handmade. We went to the store and purchased grey cotton fabric and grey vinyl, some jute string and a sewing kit. I used the cotton fabric to form a skirt/sheath that tied around his waist. Then I cut two sets of armor from the grey vinyl to go over the skirt (front and back), using little slits to weave some cotton fabric through for tying where necessary. I made a vinyl set of armor for his chest and back, which tied together and also had a metal loop on the back plate for placing his sword when he didn’t want to carry it. I even made a small grey vinyl pouch that attached to his waste for carrying his phone and wallet. Once we had all the pieces sewn together/assembled, Eric spray painted the sword, shield and sandals with a stone-looking spray paint, adding dabs on the clothing and accessories for better blending purposes. Once everything was dry, we started to put the body paint on him whilst tying on the other pieces of the costume. It all came together very nicely, and we were really proud of ourselves.
The reactions we got were of amazement. People could not believe that we had put together our costumes by hand, particularly the making of my entire headpiece and of Eric’s stone soldier outfit. We had several people ask for pictures with us. Had we gone to a different costume contest than we did, I think we could have easily won (and we were being told such by many people). But we were in a crowd that was voting on the “sexiest” costume, so it was a bunch of girls in underwear. Either way, we had a great time and received too many compliments to count. I love hearing the praise and excitement around my costumes each year, especially because I put a lot of time, money and effort into them, and I feel very accomplished when they turn out better than anticipated. So I will continue to push myself for many Halloweens to come!
Similar costumes:
Rating: 5.0 of 5. Votes: 6
|
6 votes
|

