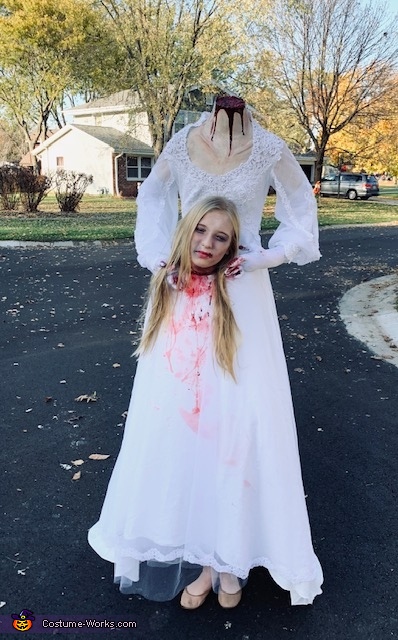
Headless Bride Costume
Rate this costume:
|
19 votes
| add a comment |

Headless bride
| Costume type: | Costumes for Girls |
| Category: |
This homemade costume for girls entered our 2019 Halloween Costume Contest.
A word from Ceridon, the 'Headless Bride' costume creator:
Each year we enjoy making homemade costumes. Now our children are older we were able to move away from Disney and work on costumes that involve paper mache, makeup and liquid skin with fake blood. It was very important that our costumes must look as authentic as possible.
This costume took just over three weeks to make and required my daughter to sit in makeup for three hours.
Costume Stages:
1) We used a t-shirt for protection on her skin. We applied duct tape over the torso and 3/4 down the arms. We worked in a V shape configuration and applied the tape to cover the chest, back, and neck. After we covered the body in duct tape we cut off the tape by cutting through the tape on the back and lifting the torso off of my daughter.
2) Stabilize the torse by stuffing it with newspaper. Cut off any remnants of your t-shirt and duct tape the edges of your arms, neck, and bottom of the torso.
3) You will need a newspaper cut into strips, modge podge, water, and a paintbrush. Apply paper mache, making sure to smooth over the paper mache with water and fingers before it sets completely. The drying process for this part can take up to three days. Make sure the torso is completely dry before the next step is applied.
4) Plaster & Celluclay time
Apply the mixture over the paper mache in strips, smooth with fingers and massage the bubbles out. Allow this to set before painting. Let your plaster layer completely dry (I suggest overnight) prior to the celluclay phase…
5) Apply the celluclay layer you’re going to want this to feel like a very thick paste consistency- as this is what you’ll want to use to build up a collar bone, spinal bones on the back, overall dead skin texture, and the gory texture inside of your severed neck. be patient with this material, and know it will take a lot of time to dry (my neck gore took about two days to totally dry).
6) Paint the torso and add blood to the dress. Attach long white gloves (after filling the arms and fingers) to the torso using white duct tape and wire coat hangers. Position the arms by bending them.
7) For the torso to stand above the head you will need a backpack and two poles. Insert the poles into the backpack and attach the poles into the shoulder part of the torso using a foam filler, hot glue, and tape. A lot of tape around the poles when you attach them to the bag.
8) We attached the backpack with poles under the dress and had our daughter stand up with the backpack on so we could adjust the torso to correct height and add stuffing to the back of the dress to even out where the torso ended. Cut a hole for the head.
9) Make liquid skin using a tissue and liquid skin solution. Add fake blood and apply to the skin making sure each layer dried before adding the next layer of liquid skin and tissue
10) Apply makeup and add dress you are ready to go!
Rating: 3.7 of 5. Votes: 19
|
19 votes
|


