
by Alexander


Rate this costume:
|
9 votes
| 1 comment · add a comment |
The Scarecrow Costume


| Costume type: | Costumes for Men |
| Category: |
This homemade costume for men entered our 2016 Halloween Costume Contest.
- How did you come up with the idea for this costume?
- What items did you use to make this costume including accessories used? How did you make it? Step by step details are encourage
- What reactions did you get when wearing this costume?
- Is there anything else you'd like to share with us about this costume? This question is optional.
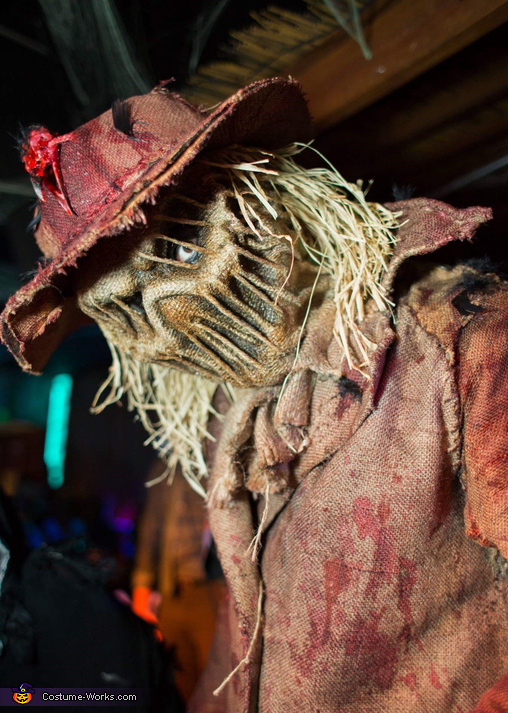
The Scarecrow
- How did you come up with the idea for this costume?
The initial idea behind this costume was to create an evil horror related scarecrow. After many hours of searching and researching I found a good mask that I could base the rest of my costume on, this mask came from grim stitch factory. I did not base my character on any specific character that I had seen from a movie or any other source, it was of my own imagination, sketches and creation. The idea was to add traditional scarecrow elements to a horror type scarecrow creature, and possibly a way to create smoke out of the eyes or mouth. A flannel shirt and blue jeans would not cut it for this field reaper!
- What items did you use to make this costume including accessories used? How did you make it?
The Trench Coat
I scoured goodwill for an appropriate trench coat for the jackets base and purchased old used burlap sacks from a local farmers market. I had sketched out many drawings and concepts on how the coat and overall costume would look. After cutting and measuring the burlap sacks, I began to layer them from the bottom of the coat up, painstakingly spray gluing, hot gluing and hand sewing with jute twine, many times resorting to pliers to puncture the thick material. As I moved my way to the top of the coats back portion I moved onto the collar. Taking fairly heavy gauge wire, I inserted it into all the edges of the collar to give it stiff and poseable attributes. Using the corner edge of one of the sacks, I cut and hand sewed the entire collar in place and included decorative cross stiching at the base. After finishing the collar I wrapped up the back of the coat finishing the flap over the shoulderblades. Next, I measured and glued the arms onto the coat leaving extra length at the cuff and trimming in all edges to match the underlying coat. There were many buttons on the trench coat that I pulled through the burlap for decorative and practical purposes. I then proceeded to completely outline all the previously mentioned burlap panels with jute stitching, up both sleeves and across the back, attaching all the sections together. Moving on to the front panels, I glued them on and trimmed them in, pulling all buttons through and connecting all edges with more intricate stitching. At this point, the coat was completely covered with burlap and I began to sew in all the button holes and reinforcing with more jute twine so they could be used without being destroyed. After all the panels and sewing was complete I began adding patches of burlap and created a stitched a pocket onto the front left side of the coat. After trying the coat on, I took in the sides for a custom fit that contoured to my body. I used cross stitching of jute to taper in the sides of the jacket. Having the coat complete, I began distressing the entire coat by ripping sections, burning, cutting, shredding, wearing edges giving it an old worn look. I hot glued straw on sections of the coat bringing in traditional scarecrow elements, pulling straw through tears and also in overlapping sections of the coat. I then brought the entire coat outside and use green, and brown rit dye in spray bottles to die the coat in strategic locations giving it a dirty look. To finish the coat, I began the custom blood work using red rit die spray and my special mixture of ingredients (clear Elmer’s glue, fake blood, special k with strawberries) to give an old bloody appearance that included chunks of gore and wet looking elements. Paying special attention to areas that would realistically be gorier than others. Lastly, I attached bird feathers to the coat in locations that gave the appearance that birds had been resting on the scarecrow in the fields before it came to life.
The Hat
A scarecrow must traditionally have a hat!! I started with a base hat that I found in the womens section of Burlington coat factory. Due to the size of the mask, I had to cut the hat and expand it to be much larger, filling in the empty sections with cardboard to give it rigidity. I layered different patches of burlap onto the hat with spray glue and trimmed in all sections, including the inside of the hat. I took a factory edge section of one of the sacks and wrapped it and glued I around the inside rim of the hat for asthetics. I had the idea to have a crow skull on the hat and had ordered a real carrion crow skull from a seller on etsy. After receiving the skull from England I hot glued the jaw together and gave It the shape I was looking for. Using my above mentioned custom gore mixture, I coated the skull and added small feathers to specific areas of the skull giving it a nasty realistic appearance. The skull dried shiny and maintained its wet appearance. This is one of my favorite portions of the costume that I believe is overlooked by many people. I then sewed the crow skull as a decoration to the front of the hat throught its eyes and used hot glue to add additional hold and stability. I then completed all the distressing, dying and blood work on the hat as I did for the coat above paying special attention to where the crow skull was attached. I finished it off with bird feathers like I did with the coat to give it a used field appearance.
The Scythe
Naturally, the weapon that a scarecrow would use is a scythe. I had found a genuine antique scythe at a massive yard sale event. I completed my custom blood work on the scythe with the above gore mixture, trying to maintain a realistic effect, not just slabbing on gore without considering how actually it would flow and dry on the weapon.
The Gloves
I purchased leather gloves from goodwill and spray glued layers of burlap onto the gloves and distressed, died and completed the blood work on them as I did to all the other elements of the costume, paying special attention to the glove that would be wielding the weapon…..it would naturally be much nastier than the other glove.
Special Smoke Effect
For a few years I have thought about creating a costume that used a fog machine or some sort of fog effect. This proved to be very difficult considering fog machines are not the most portable or practical of things to use for a costume. Although I do not smoke or vape, I came up with the idea of using a Vape smoking device to create large amounts of fog/vapor to give the costume a special effect. I had not ever seen this effect used in a costume and I thought it would be a great original idea to add a spectacular effect and depth to the character. I went to a local Vape shop and talked with them for a bit about which vape would be best to create my desired effect. I actually brought the mask in and asked the salesperson to try it on so I could see what the effect would look like. I was grateful that he agreed to test out my wacky idea and the effect was so promising that I purchased a vape right then. Unfortunately, my mask did not allow any access to my mouth, and to use the vape you had to push a button every time I wanted to create a smoke effect. To bypass these problems I added a small hole in the pocket that gave me the ability push the vape button in my pocket while a line of surgical tubing ran up the jacket, into the bottom of my mask and next to my mouth. This allowed me to create fog effect out of the eyes on demand, all without observers being able to figure out how it was being done. The density, velocity and amount of fog that would come out of the mask could be regulated through my breathing and how long I held and inhaled the vapor. This effect was by far, in my opinion what pulled the whole costume together to a movie quality costume that struck fear and amazement into all the people who I encountered.
- What reactions did you get when wearing this costume?
I received more compliments and amazing reactions to this costume than I have received for my previous 4 handmade costumes. The reactions ranged from terror to amazement. I could hardly take a few steps without someone grabbing me and asking to take pictures. I would pose with other party goers and put my scythe around their neck and blow the smoke out of my eyes for countless numbers of pictures. I never turned down a picture and took time to let everyone look and ask questions about my costume. I received questions ranging from “where did I buy a costume like that”, “how does the smoke come out of my eyes”, “How much did the costume cost” and “how long has that crow skull been on there? Cause its beginning to stink!” . I absolutely remained in character for the entirety of every event that I attended. I would sneak around the bars and startle and scare people, some women ran from me, smashing through groups of people to get away as I stalked them, and groups of individuals would approach me commenting that it was the best costume they had ever seen. The comments and reactions made the hard work and effort that I had put into the costume completely worth it.
I love scaring people and it was so much fun to be ‘The Scarecrow’ this Halloween. I will definitely use this costume in the future and was absolutely amazed on how it all came together perfectly with what I had initially imagined and drawn on a little piece of paper at work. It’s nice to be able to do a writeup here because a lot of the effort and small details that I put into the costume get lost in the overall appearance.
Similar costumes:
Rating: 4.3 of 5. Votes: 9
|
9 votes
|

