
by Alexander


Rate this costume:
|
3 votes
| add a comment |
at the party


| Costume type: | Costumes for Women |
| Category: |
This homemade costume for women entered our 2014 Halloween Costume Contest.
I am wearing the costume.
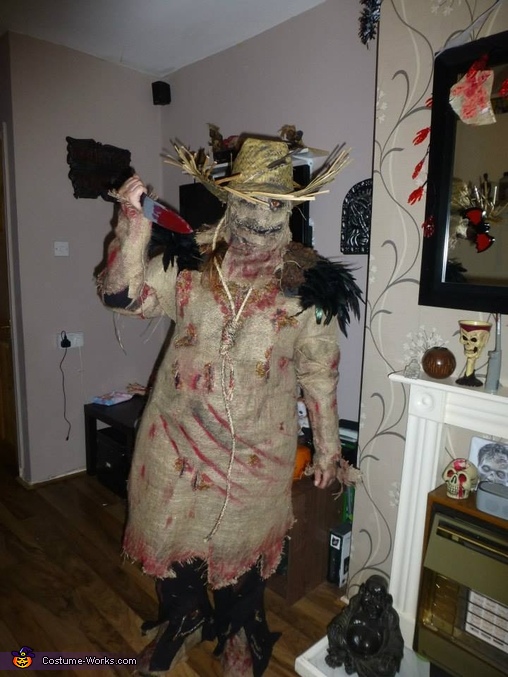
I decided to go for a full body costume. Which included face, body, arms, legs, and feet. I finished the look off with orange contact lenses, a straw hat and a painted cardboard knife daubed in blood mwhahaha...
I originally wanted to do smiley from the film, but thought it would be a little too scary for the kids. Plus the Halloween party was an hour after getting back from a holiday in Benidorm (I'm in the UK). So I needed something that I could make before hand and just put on in 5 minutes and head to the party.
Smiley would have meant at least 3 hours with masking tape....liquid latex etc so it would have been impossible.
I knew I wanted something with a gruesome mouth and eyes. I also wanted the mouth to move as I spoke. So I ended up coming up with a scarecrow idea.
I did some research on the best materials to use etc and then set about creating my work of art :).
I ordered 4 metres of burlap, a metre of black lining, 1.2 metres of feather fringing, got some dead leaves from the garden, a bag of meal worms, hot glue, red and black paint, a black long sleeved jumper, a balaclava, black walking boots (some old ones I had in the cupboard), orange contact lenses, black face paint, straw hat, sisal rope, cardboard and fake blood.
The first thing I made was the face.
I got a balaclava with no mouth hole only eye holes. and started to cut up the burlap into small triangular pieces.
I then put the balaclava on and started to hot glue the burlap into place, all over.
I glued burlap around the eye holes of the balaclava ensuring good visibility. I layered the burlap and teased the edges to make it look ragged and worn.
To create the mouth area I just glued the burlap up to the area that I wanted to be the mouth, as the black of the balaclava made the mouth shape perfectly. I did it this way rather than glue burlap all over the balaclava and then use scissors to cut the mouth out. You could do it that way but I preferred my method.
I glued longer pieces of burlap towards the neck area. I then made the face look weathered, worn and dirty by applying black paint lightly with a paint brush all over and added some red paint and blood.
I also had the idea of gluing maggots onto the costume, because with being a scarecrow and living outside. I am sure the odd maggot would be present. So I put a few of these on the head also.
The thing to remember with the head is to not glue the pieces too tight or else you wont get it off hehe. I checked to make sure the mask would come off and on easily. Which it did.
The next thing I did was the body. I got 2 metres worth of burlap. Put a hole in the middle of the 2 metres and then just slipped it over my head. So I had a burlap tunic pretty much. I then sewed some sisal rope to each side of the burlap so I would be able to wrap the burlap around me and tie it into place. I did this for both the back and the front. This meant it didn't flap about and it was comfortable.
I then slashed the burlap, added blood, black paint etc to age it. I then glued hundreds of maggots onto the chest area and also in any of the gashes I had made. To make it look like they were coming out of my wounds. I did this to the front and back.
I wanted to spruce up the neck area so I added black feathers to the shoulders. I got 1.2 meter's worth of feather fringing and cut it into 8 equal pieces. I then put the tunic on, tied it and started gluing the feathers onto my shoulders with hot glue.
I layered the feather on top of each other to give depth. I did this for each shoulder.
To finish it off I got the black lining and cut it into strips and glued it around the neck and shoulder area. Mainly to make it black to match the black feathers.
I then had to hide the smooth line of the fringing and lining, so I then added a few dead leaves around the neck line.
For the legs I just got an old pair of black trousers, shredded them, added blood and maggots.
The arms were a black jumper with burlap glued to the jumper's arms, and then painted with the black to age it, blood added and maggots.
The feet were boots with burlap glued onto them, blood and maggots added for effect.
I then came up with the idea of getting a hat. I decided a straw hat would be the best option. I placed a crows feather in the hat and aged it with black paint.
I toyed with the idea of a cape of some sort but decided against it.
I made a knife out of cardboard. I drew around a kitchen knife. Cut it out. Double layered it for sturdiness, stuck it together with glue. Painted the blade silver, the handle was black parcel tape and I then added red paint and blood.
On the night I wore the costume; I added orange contact lenses. I dirtied my hands with soil, black paint and blood; even under the finger nails.
I applied black face paint around my eyes and mouth area. So once the mask was on you wouldn't be able to see any skin.
I then cut a slit into the balaclava mouth area and tested it to see if it moved as I spoke and it did :) I thought I would have to glue it with spirit gum but I didn't have to in the end.
I was so pleased with the end result. It took me 2 weeks to make the costume and it cost about £25. Id on't know how I am going to top it next year. I hope you like the pictures.
Similar costumes:
Rating: 4.7 of 5. Votes: 3
|
3 votes
|

