
by Melissa


Rate this costume:
|
6 votes
| add a comment |
Groot.


| Costume type: | Costumes for Men |
| Category: |
This homemade costume for men entered our 2016 Halloween Costume Contest.
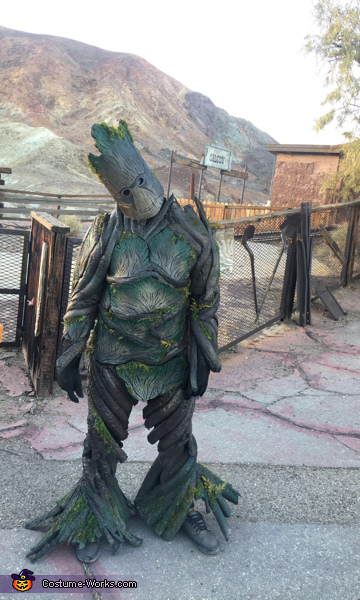
My boy friend is the one wearing the costume I created, Guardians of the Galaxy is one of our favorite movies. I wanted to WOW all the people attending a halloween event we went to. I wanted to go above and beyond this year, and feel I did just that!
How I made Groot:
This costume is about 99% hand made. The only item that is costume wear is the base that I built everything on, which is a morph suit.
First and foremost, I needed to make a manikin. To make the manikin I used paper towels, duct tape and scissors. I wrapped my model (the boyfriend), with paper towels from the neck down to the ankles. Also to his wrists. After doing so, I proceeded to wrap my model with duck take making the outer “skin” for the manikin. After about 50 min I finished the taping. Then proceeded to cut him out. I cut from the side of the neck across the shoulders and down the outer arm. Continued under the arms and down the sides all the way down to the ankles. Once the model was out of the shell, I taped it all back up again and stuffed it with newspaper. Voila! A handmade manikin to the exact form of the model. Total time: 2hours give or take.
Second is building the base of the body. The materials I used: Morph suit, 6ft long pipe insulation tubes (about 15 of them), Hot glue guns (1 big one (broke) and 2 small glue guns, scissors, a Dremel, EVA foam floor mats for the chest plates, and a EVA foam roll out floor mat for the mask. I started by putting the morph suit on the manikin. Then spent several days cutting, gluing, resizing the pipe insulation to look like tree roots throughout the body. I sized up and cut out the chest pieces from the EVA foam connectable floor mats. Then I used a Dremel (first time ever!) and sketched the tree like grooves into the foam. I chose to incorporate the chest pieces in the suit connecting to the pipes and the base (morph suit). I could have just attached the chest pieces on top of the pipes but I felt that would look to bulky. Since they imbedded into the suit they look more natural and gives a nice form in the chest area. All in all, the base of the costume took about 3 weeks to build. Lots of glue gun burns later and it was finally time to seal and prime.
I chose to use a black liquid mask latex to seal the costume and give it a literal skin over everything. I bought a gallon bucket of that stuff. I used some cheap painters brushed from Walmart, painting plastic to lay on my warehouse floor, masking tape to tape it down and LOTS of ventilation! This latex is smelly! I just slathered the black goop all over the costume. From head to toe. It gave a perfect unified base to pain on. Also, the latex made the costume look and feel like a real latex costume you would have bought at a store. (Doesn’t feel or look like a bunch of floor mats and pipe insulation anymore!). It sealed in to all the texture and crevasses. Drying time took 20-60 min depending on how thick the layers were. NOTE: The liquid latex I used takes about 4 hours to cure! I found I was running out of time and patience and painted about an hour after it was all dry. Didn’t seem to negatively affect the seal.
Now for the fun stuff! Decorating! I used Rust-Oleum painter’s touch Ultra cover paint+primer spray paint (Hunter Green, Nutmeg, Dark Walnut, and Expresso.), a mixture of different colors of acrylic paints, used multiple sizes of paint brushes to detail, more hot glue, and moss from Michael’s. This was by far my favorite part. First I sprayed the Expresso color as a base throughout the whole costume. Then used the nutmeg to highlight. Hunter green to add dimension and color. Lastly the dark walnut to shade the darkest areas. Spray painted the chest pieces, mask, and flap (the only plate, located on the lower torso, not fully attached to the suit. Easy access for restroom use). Let dry overnight. Last day, hand painted with acrylics details to the mask and chest pieces. Hot glue gunned moss throughout body and mask for texture. Velcroed the flap on as well. I would say it took about 5 hours or maybe more to focus in on all the details.
Overall cost was between $200-$250.
Similar costumes:
Rating: 4.0 of 5. Votes: 6
|
6 votes
|

