

Half Zombie Half Beauty Costume
Rate this costume:
|
6 votes
| add a comment |
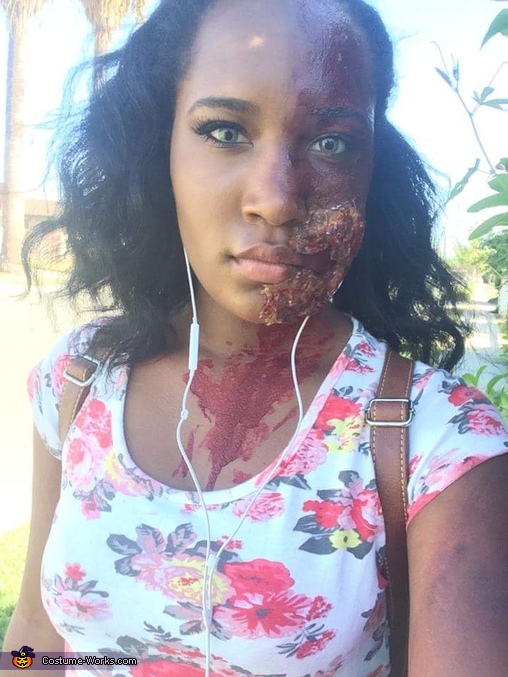
Half Zombie Half Beauty


| Costume type: | Costumes for Women |
| Category: |
This homemade costume for women entered our 2015 Halloween Costume Contest.
A word from Faith, the 'Half Zombie Half Beauty' costume creator:
My name is Faith Nichelle Lewis. I decided to do something different from everyone else but still be pretty traditional. The Half Zombie makeup products used were, Red, black, white and gray face paint quad, Cinema FX face blood, Tissue, Eyelash glue by Ardell, Dark brown, black and purple eyelashes, Gray contacts, Zombie spray blood, Maybelline Fit Me foundation in 340 and 360, City color contour effects palette (used contour shade), Maybelline pump up mascara in black, Mac eyeshadow in twinks, Fake eyelashes by E.L.F, Avon eyeshadow quad in sandy coral and femme fatale, E.L.F eyeshadow quad in smokey, E.L.F tone correcting powder in cool, Wet n Wild kohl eyeliner in calling your bluff, Jordana eyeliner pencil in black, Starry gel liner in black, E.L.F. eyelid primer, LA Girl pro concealer in toffee, LA color powder in tan Mac dazzleglass lip gloss in desire, Mac lip liner in chestnut.
The process of the Half-Zombie: I used Mac lip liner in chestnut to outline where I want to make “fake skin” and to separate my pretty face from my zombie face. I decided to put my fake skin by my mouth and outline that spot. I used the eyelash glue and tissue paper where I placed my outline, which was place by my mouth.I began by putting the glue on first hen the tissue paper.I continued this process for about 5 layers.While the eyelash glue and tissue paper was drying, I started working on my pretty face. With my pretty face side, I used gold bond lotion to moisturize my face. Then I used Maybelline’s fit me foundation in 340 and 360 to create my own unique shade to match my skin tone. I used a random stippling brush to create a flawless effect. I used LA girl pro concealer in toffee to highlight my face. I then blended that out with a powder brush for a smooth effect. I put the concealer under my eyes, down my nose and jawline. I set the concealer with LA color’s powder in toffee.Then I set the entire face with E.L.F tone correcting powder to further mattify my face with the same powder brush I used earlier. I used city color contour effects palette and used the contour shade to contour the hollows of my cheeks to create a slim face. For the eyes, I used a Mac eyeshadow in twinks with a flat shader brush. Then with a crease brush, I used the dark brown from the Avon quad in sandy corals and used that color in my crease.Then I used E.L.F quad in smokey and use the black eyeshadow and I put that in the outer V of my eye to create a smokey eye effect. Then I used the E.L.F fake eyelashes and the same eyelash we used for the “fake” skin, I applied my eyelash to my eye. Then I used starry gel liner in black and winged out my liner. I applied the mascara (Maybelline pumped up mascara). I lined my waterline with Jordana’s pencil eyeliner in black. I then put the Wet n Wild kohl eyeliner in my inner corner (tear duct) to make my eyes appear brighter. I filled in my brows with the black eyeshadow from the E.L.F eyeshadow quad in smokey. For the lips I use the Mac dazzleglass in desire. Back to my zombie face; the flue was pretty dry but not dry enough, so I began to apply the eyelash glue on the outer edges of the tissue to blend into my skin to make it look realistic. While that was further drying, I began to put in my gray contacts. After that, I started doing the zombie makeup, so I began with the purple eyeshadow from the Avon quad in femme fatale and started applying it all on my forehead, and all on my entire zombie face. Then I began with the dark brown and applying that the same way I did with the purple. The same goes for the black eyeshadow but not as much but just enough to add depth. Then finally the glue was dry. So I started to take the scissors and cut a hole on the side of my mouth to create a “basin” for the blood to drip from that part of my mouth. Then I started pulling random pieces of the tissue paper. The more you peel, the better the mouth will be. So I pulled the tissue as much as I wanted. Then I went with the same stippling brush that I used earlier for the foundation. I began to apply the Maybelline foundation in 340 and 360 on the tissue paper “fake skin” so that it blends with my actual skin. Then I began to fill in those holes and tears that we made earlier with red and black paint to make it look bloody with a detail brush. After that I began to use the red, black and gray paint on the rest of my face where the eyeshadow was applied earlier to add more depth. The more red and black I added the more realistic it started to appear. After applying as much red, black and gray paint as I wanted, I started applying the blood. I used Cinema FX fake blood to bring the whole look together. For the face paint, I used a foundation brush and filled in those holes and tears earlier with the paint and filled them with blood. Especially the “hole” by my mouth. After that, I began to put the blood on my forehead so that it drips down my face. Then I also began to notice that the more blood I added, the better the look came together. Then I started to add the blood down the neck to create an effect that looks even “gorier”. Once I was finished with the blood, I noticed that my eyes were quite “simple” and I needed my eyes to be a little darker. So I added Maybelline’s mascara pump ups to my eyelashes to further bring the whole look together.
Rating: 3.5 of 5. Votes: 6
|
6 votes
|