

7 Up Cool Spot Costume
Rate this costume:
|
7 votes
| add a comment |
7-Up Cool Spot


| Costume type: | Costumes for Women |
| Category: |
This homemade costume for women entered our 2013 Halloween Costume Contest.
A word from Kristen, the '7 Up Cool Spot' costume creator:
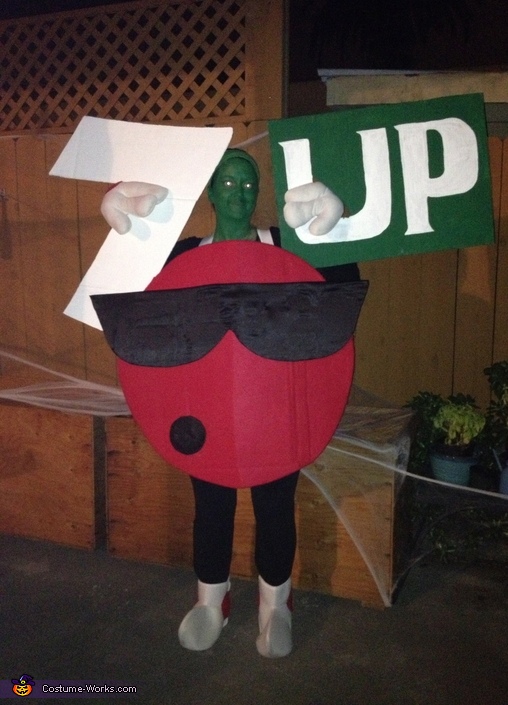
This year I went as the 7-Up Cool Spot. It was one of my favorite costumes to make and one of the easiest. I have been hand making my costumes for the past 10 years. After the last Halloween party of the year, ideas for the following year are already flowing through my head. When the 7-Up Cool Spot came to mind, I thought what a creative unique idea that would bring my friend’s childhood memories back to the 90’s. It was an easy costume to make with limited difficulty.
The costume was a huge hit at the Halloween Costume Party I attended and also in a Facebook Costume Contest. I won free pizza for a year from a local pizzeria’s Facebook contest and everyone at the party knew exactly what I was and constantly asked me to get them a 7-Up.
Step 1: Items Needed:
3 Large Cardboard Boxes
4 USPS Priority Mail Medium Flat Rate Boxes
3 Yards of Red Felt Fabric
1 Yard of Black Satin Fabric
1 Can of Spray Adhesive
Scissors
Suspenders
Green & White Paint
Paint Brushes
Large Hot Glue Gun
Tons & Tons of Hot Glue Sticks
Red Thread and Needle
Velcro
Step 2: Red Circle
- Start by unfolding the cardboard boxes at the seams.
- Cut two large circles (use two boxes) that will be fit to your body. I started with a large hula-hoop to outline the circle and then cut down from there to fit it to my body. (Make sure both circles are the same size)
- Take a yard of fabric and cover the front of each circle. I used spray adhesive to spray the front of the cardboard and then placed the cardboard (glue side) onto the fabric. Pull the fabric taught at each end and the cut to shape the circle. Fold the extra fabric over the edges of the circle (make sure to cover all edges) and use the spray adhesive to glue it to the backside of the circle.
- Optional: I added strips of plastic to the back of the circles to make them sturdier. (The plastic strips were from the coffee packets at work)
Step 3: Sides
- Unfold all 4 USPS Priority Mail Medium Flat Rate Boxes (these are great boxes to use since the spade very easily to the circles)
- Shape them to the sides of the circles (make sure to leave enough room for your head, arms and legs)
- Once shaped glue on each side to 1 of the circles using a hot glue gun. (I layered two on each side to make the costume a bit bigger so I could move better in it)
- From the fabric cut strips to cover the sides and the glue with hot glue gun
- Do not glue the top on just yet
Step 4: Suspenders & Velcro
- To keep the costume on my body I use a pair of suspender
- Cut three small piece of cardboard and glue them to the snaps of the suspenders with hot glue
- Once glue dries, take the back end of the suspenders/cardboard and glue it to the inside of the back circle. Leave the two front ends of the suspenders for now.
Step 5: Sunglasses & Mouth & 7-Up Sign & Gloves & Boots & Front
- The sunglasses were made out of the third cardboard box. Cut box in half. Draw sunglasses shape onto the cardboard and then cut. Cover the cardboard with the black satin and use the spray adhesive to glue the satin to the cardboard.
- Once the sun glasses are made, glue the with hot glue to the front of the front circle directly onto the red felt fabric
- For the mouth, cut a small circle from the extra cardboard and cover it with black satin. The glue directly onto the front of the front circle directly onto the red felt fabric
- Once everything on the front is dried, glue the front ends of the suspender/cardboard to the back side of the Front Circle
- To attach the Front Circle to the Back Circle glue Velcro strips to the back side of the Front Circle and to the top part of the sides on the Back Circle (this make it easy to put on and take off the costume)
- The 7-Up sign- Take the other unused half of the 3rd cardboard box and cut in half. Cut a 7 out of the first half and paint it white. On the other half draw the word UP and paint it white and then paint the outside of it green (use the 7-Up signs as props
- The gloves are reused Super Mario Brother gloves and the boots are reused Smurf Boots that I sewed on both red circles from the extra fabric
- Wear Black pants and black long sleeve shirt to complete the costume
Rating: 4.4 of 5. Votes: 7
|
7 votes
|