

Elite Malfatto from Assassins Creed Costume
Rate this costume:
|
109 votes
| 10 comments · add a comment |
Elite Malfatto from Assassins Creed


| Costume type: | Costumes for Men |
| Categories: |
This homemade costume for men entered our 2012 Halloween Costume Contest.
A word from Alex, the 'Elite Malfatto' costume creator:
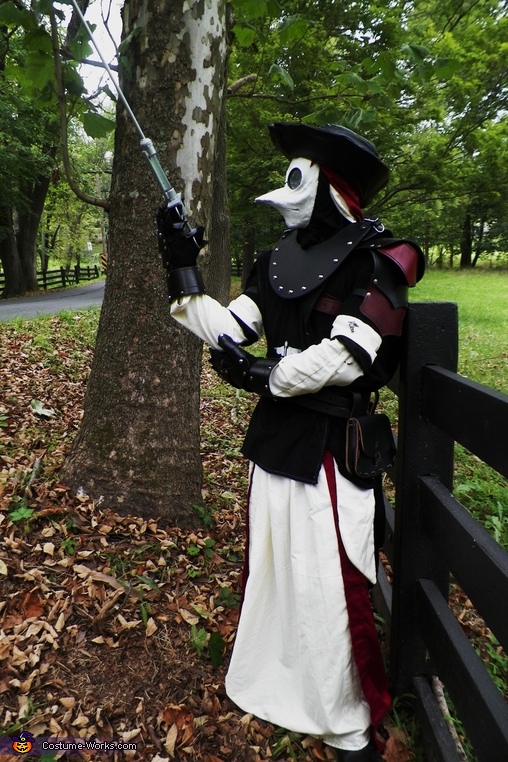
I am the one wearing the costume and it is entirely hand made. The costume is based on original art for the elite form of malfatto/plague doctor from the hit game assassins creed. I've included the picture I used as my reference for designing the costume.
The Mask - this was made from a basic plain plastic craft mask I bought for a few bucks at the craft store. I used a xacto knife to cut the eye holes a little wider and the nose off. I shaped the basic form of the mask with hard styrofoam and the xacto knife. I hot glued it all together, then coated the whole thing in plaster. Once the plaster was dry, I layered the mask in paperclay( aka fiberclay, NOT paper mache') paperclay is easy to mold, sandable, paintable, and most importantly lightweight! Once the clay was dry, I added the eyes. The eyes are made of painted steel rings, which I superglued to a trimmed piece of clear plastic. Then I superglued the current eye piece to a black chiffron fabric. This way I can see out of the mask but people can't see in. Once I set the eyes in, I added about 8-10 layers of gesso. I mixed some black metallic paint with some gesso, coated the mask, and lightly sanded it to give the mask a weathered effect. I added two more layers of gesso to blend it all and then superglued an elastic headstrap.
Syringe - this is made out of mostly wood and some pvc. I carved the wood with a dremel and some woodworking tools. The "tube" is a cut piece of plastic vinyl and I filled it with green rubbing alcohol. I didn't want to use water with green food dye because of the bacteria in water, it would eventually get moldy inside. yuck. It's all held together with some JB weld. Amazing stuff! It's a two part epoxy that combines steel filings and a hardener and makes a really sturdy bond.
Hat - this was by farrrrr the hardest piece. The hat is made out of a fake leather fabric I found at the craft store. It's shaped with cardboard I cut from some boxes and there were only two small parts I could hit with the sewing machine. the rest was all handstiched and it was definitely a challenge.
Tabard - the tabard is made out of this black fabric I found at the craft store I found in the "tribal section" It is very dense and is a really nice quality, it looks amazing in person. the downside was that the material was really tough on the sewing machine. I kept breaking threads and had frequent jams. This material was probably the only thing I would have changed in this costume. The staff and snake medical icon was easy. I found a basic image online, printed it out on plain computer paper, traced it with a xacto knife to make a stencil, then found a white fabric spray paint.
Skirt - the skirt is two separate skirts sewed together, overlapping. At the top I foleded them over by about two inches so I could feed a belt through. This way it fit snug. I'm a guy and this was the first time I ever wore a skirt, much easier than trying to sew a pair of pants though.
Overcoat - a lot of the visible fabric comes from an overcoat with several other peices all sewn toegther. First I made a long sleeve shirt and cut the neck out a little wider than normal. I rolled up the sleeves and sewed them in place. I made a pair of white sleeves and attached them inside the arms so it looks like two shirts, but really just one. It was important because the costume does get warm. I made some coat tails together and attached them to the bottom of the shirt. The medical armbands are attached as well. I took some of my white fabric and made them into strips and sewed them into place. Just like the tabard I used the same screen printing method. some computer paper to make the stencil with some fabric paint.
Leather - the leather pieces (belt, gorget, shoulder pads and gloves) were all made with veg tan leather and dyed black. Shoulders had two pieces each dyed a burgundy red to accent the whole black, red, and white theme. Just some hole punches and studs to make them fit.
I made everything WITHOUT any patterns. I made it all based on the character reference and on the fly. I can try and answer any questions about how I sewed something but I'm sorry, I don't have any patterns to show anyone. Feel free to ask any questions in the comments and I'll do my best to answer them :)
Rating: 4.8 of 5. Votes: 109
|
109 votes
|