
by Marianne


Rate this costume:
|
3 votes
| add a comment |
Pumpkin Patch Scarecrow


| Costume type: | Costumes for Boys |
| Category: |
This homemade costume for boys entered our 2014 Halloween Costume Contest.
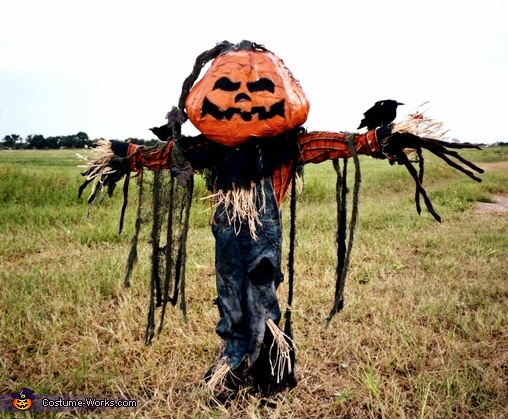
I made this costume for my five year old son Reid Garcia. My husband has a scarecrow costume from a previous year, and he plans to wear it again this year. Reid is so passionate about Halloween that we decided we would all be scarecrows. To create my sons costume I began with four key pieces that I bought from the Thrift store, overalls, plaid long sleeve shirt, brown boots and a plastic pumpkin Halloween decoration.
The first step was to put together the main piece, the overalls. I began by distressing the overalls by sponge painting them with black acrylic paint and adding orange and green twine stitching through the overalls. I then cut slits at the bottom of the overalls to create a worn and ripped look. I then used black burlap to fill the spaces made by the slits. I also, used the burlap to create the collar for the neck area and cuffs for the wrists. After I made the burlap pieces I cut into the edging to create a ripped worn look. I then used a fabric stiffener on all the edging to prevent any further unwanted fraying. I also stitched the orange and green twine through out these pieces as well. After, I completed the burlap pieces I glued raffia to the top of the wrist pieces and to the front and back of the neck piece. When the pieces were completed I sewed them to the shirt. Next, I wanted to create the look of vines and wanted to use a material that was flexible and textured. I chose to use creepy cloth in green and black that is used for Halloween decor. I cut strips out of it and sewed them on to the sleeves of the shirt. For the final details I added two black bird props to each arm, moss to the brown boots and bottom of the overalls, and burlap patches on the front and back of the legs.
The Second step was to create the pumpkin head. I used the plastic pumpkin I purchased at the thrift store as my mold. I used the paper mache technique to make the head. I used news paper water, salt and flour. I must have put about six layers of paper for the head and I made one vine at the top of the pumpkins stem. Allowed to dry for about two days. When dried I took the mold apart, cut a hole at the bottom and cut out the face. To cover the cut outs from the face I used black burlap that I completely coated in the fabric stiffener. When dried I glued the burlap to the inside of the pumpkin covering the cut outs made for the face. Next step I used Valspar orange and green spray paint. Green was for the vine and stem and orange was for the pumpkin. After the paint had completely dried I used black acrylic paint water down to add dimension and a distressed look. As soon as all the painting was dried I add a last layer of Valspar clear spray paint to seal the pumpkin and to protect it from the elements. I then painted and ripped faux leaves to add to the vine and draped it with green creepy cloth as well. The last steps to complete the pumpkin was to add orange mini lights in the inside to add a glowing effect that will be visible at night. I used a car wash sponge to create protective padding at the inside top of the pumpkin and last I added some green twine stitching to the pumpkin.
The Third and final step was to create the branch like hands. I purchased child’s sized black gloves. I then used brown felt cut into three inch strips. I rolled and twisted each piece and glued one piece to each finger. I then coated the pieces with fabric stiffener to hold the branch like shape.
Over all this project costs me under $25 dollars and total time to make 4 weeks.
List of materials purchased
Overalls
Boots
Shirt
plastic pumpkin head
green and orange spray paint
green and orange twine
black burlap
faux leaves
sponge
black gloves
List of materials already on hand
black acrylic paint
brown felt
fabric stiffener
newspaper
flour and salt
raffia
creepy cloth
orange mini lights
clear spray paint
I had a chance to see how people responded to the costume by taking my son to a local fall festival. There were request after request to take photos with him. Kids, teens and adults were quite spooked by him. Many people also though the costume was cute yet creepy and were amazed that I had made it. One person even thought he was some type of mechanical Halloween prop! Overall, the reactions we received were great. This is why as long as I am able to I will construct my sons costume every Halloween.
I love that fact that my son asks me to make his costume. This costume took some time but, to me it was time well spent.
Similar costumes:
Rating: 3.7 of 5. Votes: 3
|
3 votes
|

