
by Katy


Rate this costume:
|
8 votes
| 1 comment · add a comment |
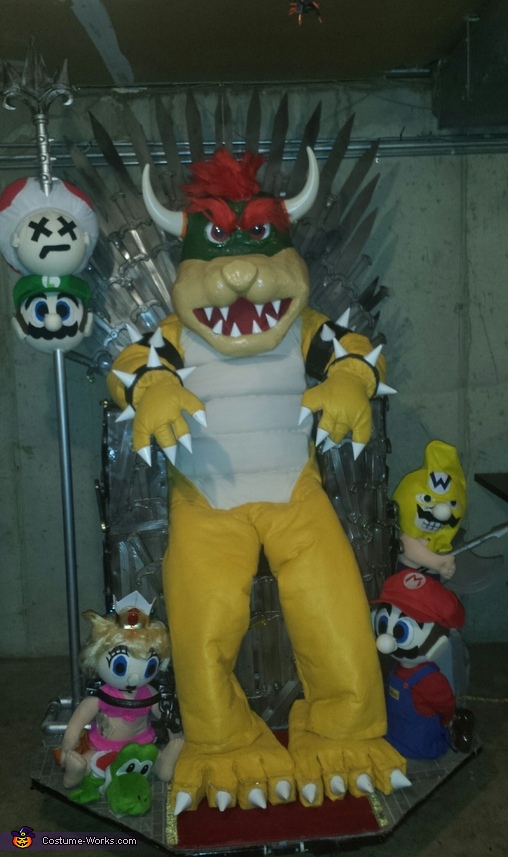
King Bowser with his court!


| Costume type: | Costumes for Adults |
| Category: |
This homemade costume for adults entered our 2016 Halloween Costume Contest.
Featuring: King Bowser, Wario the Executioner, Mario the Hero, Princess the Damsel in distress, Luigi, Toad, and last but not least a stuffed Yoshi rug!
I spend weeks every year trying to brainstorm new costumes ideas! I am a kid from the 80’s, so many of my costumes ideas are inspired by that era. This year I came up with an idea to do a “Mash-Up” and combine two era’s into one costume!
Some of my favorite Nintendo games growing up all had to do with Mario Bros, and the never ending struggle to defeat their greatest villain Bowser! I decided this year’s costume would combine one of my favorite memories from the 80’s with one of my favorite television shows from today “Game of Thrones”!
I knew right away how I would combine the two together! I would create a little twist on the Mario world, and instead of Mario beating Bowser, maybe Bowser was victorious for once. The best way to create this vision would be to make the Game of Thrones chair to show Bowser has beaten everyone and is now the king! For added effect I incorporated the whole Nintendo Mario Bros cast.
Creating a costume to this scale would take all of my skills I’ve learned over the years, and even force me to learn a few new ones! My sewing skills consist of just looping string through fabric, and doing my best to make sure it stays together and looks good, LOL. I constructed the throne chair out of PVC pipe, 1/8 foam, and costume swords. After months of hard work it was finally time for the “Age of Bowser” to begin!
I first tested out the costume on Halloween during trick or treating hours. Due to the rain I was forced to keep the costume mainly in my garage. Is it just me or does it always seem to rain on Halloween? In any case many of the children seemed very excited when they saw the costume. A few of the parents even asked if their child could sit on my lap for pictures. Once on my lap I would move the whole costume toward the parents and actually give them a scare! They didn’t realize that the costume was on wheels, and that Bowser’s legs are fake and that I could actually can walk in it.
The day was a huge success and I couldn’t wait to bring out the costume to a Halloween party. If you are from the Chicago land area you know the best Halloween parties are in the city. I live in the suburbs and even thought it was raining all Halloween I made the journey to the city!
Once the costume was in the bar (some assembly required) it was an immediate crowd pleaser! I had multiple people dressed up and Mario, Luigi, and Princess come up to take pictures of me grabbing them. At times there was even a small line forming to take pictures. Just like the parents earlier everyone was shocked/scared once they realized I could move!
The costume contest at the bar paid $1000 cash for first place and smaller prizes for 2nd and 3rd. I wanted to see if Bowser could be the King of costume contests!
Finally around midnight the costume contest was set to begin. I took a scan of the room to see what my competition was and immediately identified a well done Optimum Prime transformer, a scary Saw puppet riding a tricycle(I included the picture I took with the Saw puppet), and a very unique Jack in the box costume as tall as the ceiling in the bar. Flash forward to the final round and the showdown is somehow between Game of Thrones Bowser and your run of the mill Zombie. I think we all know where this is going. After a quick last round of cheering the DJ announces the winner is the Zombie!
I was immediately heartbroken! At one point I could hear two out of the three judges saying to give it to Bowser, but the DJ had the final say. The fact that the zombie could dance swayed the crowd to his side in the end I guess? Second place still netted me a little money and overall the smiles and compliments I got from the costume made it all definitely worth it!
Regardless of the costume contest, I love to post my costumes to this website because the people here are truly my people .They appreciate Halloween and the excitement of Costumes! Please let me know if you have any questions about the costume, and I love seeing everyone’s feedback on the costume!
King Bowser Suit and Spikes
Since I am an amateur when it comes to sewing, I like to start with a set pattern for the main suit. In this case I started with an XL Janitors coverall. This allows me to get the exact shape I need and ultimately saves me a ton of time when it comes to sewing!
Cut the back of the suit open down the middle. This will allow for the suit to slide on and off once completed.
Since Bower is a bigger figure I started by adding two layers of 1” batting to the back, legs, arms, and part of the chest. To save time I secured the batting with hot glue.
For the front chest of Bowser I used pool noodles cut in half to get the desired bumpy look.
Once everything was secured I sewed yellow and tan felt fabric over the batting to the suit for the desired look.
Velcro was sewn on to the outer back edges of the back and legs where it was cut down the middle. This would allow me to slip in and out of the suit with ease.
For the bracelets and arm bands I started with cardboard cement tubes. I cut them down to the desired length and attached the ends using zip ties. Then I stretched and glued leather like fabric to the cardboard. The bands were hot glued into position on each of the arms.
The spikes were made from party hats from the $1 store. Each spike is the top 3 inches from two party hats painted white and hot glued together. I used the same spike process for the fingernails, toenails, and teeth of Bowser.
The feet and toes are made from 6 layers of batting. I basically formed batting around my feet and used masking tape to achieve the overall form. I then hot glued/sewed yellow fabric to the feet and toes.
King Bowser’s Head
Begin with a 10” cement tube. Start by measuring the tube from your shoulders to about 2 inches above the top of your head.
Using the same tube cut another 5” section off for the mouth. Secure tub to the front using zip ties.
I added a battery fan for comfort to the mouth to keep me cool as I wore the head. I made sure to leave an opening on the inside of the head so the fan could be turned on and off.
For the main shape of the face I used multiple layers of batting. The main nose area shape is from a small foam ball cut in half.
Once you have the general shape cover the head in masking tape and add 5-7 layers of paper mache. Continue to add layers as needed until the head is hard and paint.
The rectangular eye area is covered by a thin metal mesh to hide your eyes.
The horns for Bowser are from a Viking hat that I found at a goodwill store.
I covered the back of the mouth with a very sheer red fabric, so when the fan was operating it could still blow air with ease.
The teeth are made from party hats as described earlier.
To achieve realistic eyes I used clear ornament balls that split into two pieces. The inside iris is made from 1/16” foam.
Since Bowser’s hair is very jagged I found a Dragon Ball Z red wig on eBay and cut it down to the shaped I needed. The hair and eyebrows were attached by hot glue.
Game of Thrones Chair
The skeleton of the chair was made using ¾” PVC pipe. Each section was combined using zip ties instead of PVC glue. I designed it so that I could enter the chair from behind and operate it standing. I am 6’2 so the height of the seat is as tall as the top of my legs. Bowser legs are fake, so it created the illusion that Bowser was sitting in the chair. This allowed me to easily move the chair around since my legs are hidden in the inside of the chair.
For mobility I used eight 4” caster wheels. To secure the wheels I used 1/8” plywood and screwed/glued them into the PVC. The caster wheels were attached using zip ties.
The base of the floor is 1/8” pressed cardboard covered in 1/16” linoleum stick tiles. At .33 cents a tile it gave the area surrounding the throne a very finished look.
In an effort to keep the costume as light as possible I used 1/8” floor foam underlayment to cover the chair.
The base of the back headboard is 1/8” pressed cardboard. I used 1/8” plywood to make the shape of the swords for the background of the chair.
The most time consuming part of the chair was adding the toy swords. In total there are over 100 toy swords attached to the chair. I used 12” swords and 18” swords. The swords were screwed into the PVC skeleton of the chair. I used a heat gun to melt and mold the swords around the chair edges. Even though I got a great bulk price discount on the swords they were the most expensive part of the costume. I wanted to make the chair look as real as possible and trying to save a few bucks making them out of wood would not have done the job.
To achieve the final forged metal look of the chair I actually found a spray paint called forged metal!
No throne is right unless there is a red carpet leading up to the throne! I was able to find some nice red velvet fabric and some gold lace to get the final look!
The last obstacle of the chair and I know many of you are wondering, how do you transport something that size??? From the beginning I knew the costume would be on the larger size, so I designed the chair to split into two pieces right down the middle. Now the chair would fit through any standard door way!
Supporting Cast
No king is complete without his court! To create a full scene I decided to incorporate a few of the classic Nintendo characters from the game. I setup the scene to look like Mario has been captured and is about to be executed by Wario (who is standing on a Thwomp). You can tell from the scene that Luigi and Toad have already been executed, and their heads are on Bowser’s spike. Finally Princess is chained to Bowser’s chair sitting on a stuffed Yoshi rug.
For the bodies of Mario, Wario, and Peach I used old “My Buddy” dolls from the 80’s.
Their heads are Styrofoam balls used for displaying flowers. Their eyes, ears, noses, mustaches, and skin are all made from felt. Wario’s executioner mask is hand made using felt.
Mario and Luigi’s hats are store bought, and so is princess’s wig and crown. Princess’s outfit is an 18 month old girl’s bathing suit.
The Yoshi rug was originally a backpack.
Bowser’s spike is 1” PVC pipe combine with a costume trident and painted metallic aluminum.
Similar costumes:
Rating: 4.0 of 5. Votes: 8
|
8 votes
|

