
by Taya


Rate this costume:
|
53 votes
| add a comment |
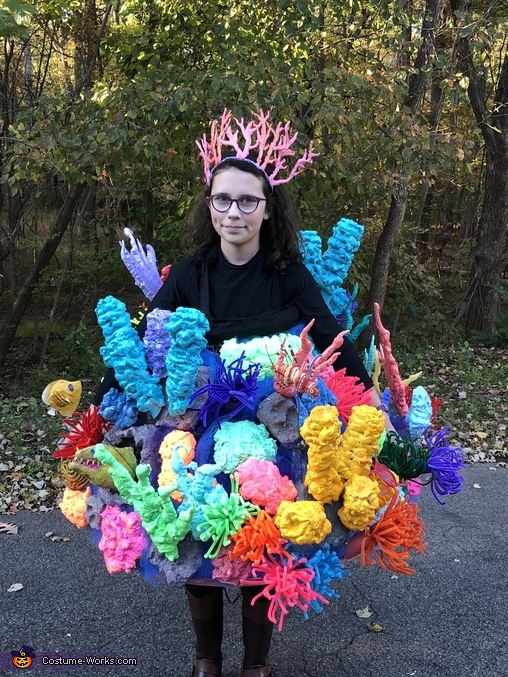
Coral Reef - front


| Costume type: | Costumes for Girls |
| Category: |
This homemade costume for girls entered our 2018 Halloween Costume Contest.
Coral Reef Costume
My daughter decided she’d like to be a Coral Reef for Halloween. Okay, challenge accepted!
Supplies:
Hula hoop
Plumbing insulation tube (like a pool noodle but slit down the length)
Chicken wire – 10 feet by 2 feet
3 cans spray foam insulation “Great Stuff”
Pipe cleaners – approx. 500? in different colors (Try to have a bunch of 3 dozen in the same color per anemone)
Toilet paper tubes
Paper towel tubes
2 x Plastic ball
Stretchy cording used for decorating/gift wraps (couple packs)
Bottles of cheap latex paint in various ‘coral reef’ colors - Approx. 15 bottles. Make sure to have extras for ‘rock’ colors – grays, greens, browns
Spray paint in bright ‘coral’ colors
Styrofoam chunks – free (we had an old ‘disposable’ cooler I broke into pieces)
3 sets of small battery-powered blue lights (AA batteries)
Florist wire – spool of thin gauge
Thick florist wire – heavy gauge
Wood skewers
Hot glue sticks (lots of glue sticks!)
Wax paper
Wire coat hanger (for the crown)
Plastic zip ties
Black felt – already had, but you’ll need approx 1/3 yard
4 yards of blue tulle (fabric netting)
You’ll need a glue gun as well, wire cutters, a heat gun, paint brushes, foam ‘brushes’ applicators.
Estimated total price: $85
*Note on prices and supplies. We bought a lot of items at the dollar store, used 50% coupons at craft stores, and also had a lot of things at home. Since I was buying supplies for two costumes, along with other Halloween projects, I’ve guesstimated on how much this costume’s portion of the cost would be.
Step 1 – Make the Frame:
Using the hula hoop as the base, stretch the chicken wire out and around the outer edge of the hoop. (see picture 1) Make sure to calculate the circumference of your hoop before you buy the chicken wire, so you’re sure you’ll have enough. I noticed as I unrolled the chicken wire, there was thin gauge wire already with the chicken wire that was used to hold the roll together, it worked perfectly to secure the wire to the hoop. The freebie wire wasn’t enough to go all the way around the hoop, so as I worked the chicken wire around the hoop, I used plastic zip ties to attach the rest. You’ll have a rough cylinder shape with the hula hoop on the bottom.
Measure your Trick-or-Treater to see how much room will be needed to fit over the head/shoulders, and wear just across the chest.
Then take the upper edge of the chicken wire, and fold over parts of it (crimp) so that the top part of the cylinder is narrower than the hula hoop and sized to the wearer’s chest. Take the insulation tube, and trim it down to the circumference you need, and then work it over the upper edge of the chicken wire. What’s handy about the insulation tube is the slit that works perfectly to cover up any rough edges of the wire. Zip ties worked great to hold it tightly in place.
It doesn’t have to be perfectly smooth – remember you’re trying to simulate a natural setting, but try to have the top ring be mostly centered above the hula hoop.
Step 2 – Make the Coral:
Sea Anemones: toilet paper tubes worked perfectly for the base of each anemone. I painted the paper tubes to match the various colors of pipe cleaners. I had approximately 6-8 different colors of anemones. For each anemone, I did this: Gathering approximately 3 dozen pipe cleaners in one color, I cut them in half, to have the length be approximately 6 inches. I gathered them tightly at one end and used a spare piece of pipe cleaner (or thin florist wire) and tied them together. To make sure they held tightly, I secured the wrapping wire with a dollop of glue stick. Once the paper tube’s paint was dry, I wrapped the tied end of the pipe cleaners in a little bit of aluminum foil (or any other handy ‘filler’ you have handy) and used that to provide a little extra thickness to the pipe cleaners bundle so I could glue gun it inside the toilet paper tube. When all finished, I hot glued two short pieces of leftover pipe cleaner to use as twist ties to attach the anemone to the chicken wire. Don’t attach anything yet!
Brain Coral: I hot glued the stretchy springy cording all over a couple plastic balls. I made sure to glue it in patterns so it looked like brain coral. The next step was to paint all of it (trying to get into nooks and crannies) with a darker color. (Note, lesson learned, it would have worked better if I had coated the whole thing with a couple coats of mod podge to seal it up and make a better painting surface, but it still worked out to create the illusion.) After the dark paint color dried, I sponged on a couple layers of light color to help highlight the curves and ridges of the ‘brain’ coral. Hot glue worked great to attach a couple twist ties to one side of the ball for attachment later.
Working with spray foam is tricky, remember that it’s supposed to expand, so I chose the kind for smaller cracks, as I wanted a little more control. Also remember – this stuff is STICKY and does not wash off easily. My hands were covered for days… Cover your work surface with wax paper!! The next few kinds of coral were made with spray foam.
Tube Sponge Coral: Using paper towel rolls or rolled up card stock into tubes as a base, I hot glued wooden skewers into the bottom of the tube and stuck the tubes into the lid of my old Styrofoam cooler.
First, I partially filled the tube at the top with a little bit of paper towel so I wouldn’t waste spray foam, leaving about an inch free at the top. I sprayed a little bit of foam, just until it started to come out. I waited about 7-10 min and then wrapping my finger with wax paper, I tried to push in the top part to create an indent/hole in the top of the coral’s tube. Once that was set, I covered the rest of the tube. Holding the end of one of the tubes, I sprayed a continuous stream around the tube, turning the tube quickly so that the tube was covered. Having the Styrofoam lid made it handy to stick the skewered end in for easy drying.
Spray paint worked well for getting into the nooks and crannies of the tube coral. Once they dried, the wooden skewers allowed for placement onto ‘rocks.’ More on the rocks coming up.
“Branching Coral: We just called this ‘generic’ coral at our house. I carefully sprayed the foam onto sheets of wax paper, and used quick light ‘strokes’ of application to simulate the shape of coral ‘stalks.’ While the spray foam was still wet, I inserted a wooden skewer into the bottom of each piece of coral.
Misc coral ‘blobs’: Like the branching coral, I made other general blobs of coral with spray foam. For these, I just sprayed a much larger randomly shaped blob of the foam. I general, I didn’t use wooden skewers on those.
Cheap latex paint worked well for covering the miscellaneous coral, and I used all sorts of colors. The brighter, the better. The surface of the spray foam, is a bit slippery so I had to use a couple coats for everything. Anything without a skewer had short pieces of pipe cleaner hot glued to the back to use to attach to the chicken wire.
Rocks: Styrofoam worked perfectly to create rocks. Once I was finished with the coral, I broke up the Styrofoam cooler into chunks. Using a pocket knife, I trimmed the edges, gouged the surface and tried to make it look more natural. Then using a heat gun, I ran it over the surface of the Styrofoam and it melted down the surface to look even more random. Painting with latex pain in various colors completed the effect. On the back of the rocks, I hot glued short pieces of leftover pipe cleaners.
Fish: I recruited my son to make some fish to swim around in the reef. He made a lion fish, a puffer fish, angel fish and a moray eel. I fashioned one of the rocks to look like the entrance of a cave for the moral eel’s head to ‘pop out.’ My son used paper mâché and paint to create the fish, and we attached them to the thick straight pieces of wire – stick the end into a foam rock, and they ‘swam’ around beautifully! If you don’t have a handy artist at home to make you fish, you can print out images of fish from your computer. Use mirror images of the fish, cut them out, glue them together (over the end of a piece of wire), mod podge them and voila, fish.
Step 3 - Assemble the Reef:
The Harness: Important - choose the front of your costume at this stage. Use the contours of the chicken wire to help you decide how it’ll look best. Measure your Trick-or-Treater, chest height, over the shoulder, crossing the back to the same height on the back. You want to fashion a harness that goes over the shoulders and crosses in the back to help keep everything in place (and not slip off). Using the black felt, cut two long strips, approx. 2-3 inches wide and about 6 inches longer than your harness straps need to be. Remember you can always shorten, it’s much harder to extend! I used a little bit of hot glue to attach the end to the plumbing foam ring, (on inside of the ring) and then attached to the opposite corner. Imagine a clock where Noon is the very front of the costume. The ends of the straps go at 2 o’clock, leading to 7 o’clock, and 10 o’clock to 5 o’clock. This is very approximate and depends on the size of your child. I cut a tiny hole in the strap (next to foam ring) and threaded a zip tie to hold the straps securely where they attached to the tube. Try it on your child to make sure all fits well, and double check the height works too. I also attached pieces of foam covered in the black felt to provide some cushioning on the straps.
Once all okay, then cut extra wide strips and pieces of the black felt and hot glue to cover the plumbing foam tube. (You’ll have your child wearing black so it’ll all blend in.) Over her chest, my daughter wore an old string bag which was dark navy blue, and it worked perfectly to hold her candy.
Attach the Coral: Using the wooden skewers, stick the miscellaneous coral into the rocks. Remember to group the tube coral together (by complementary colors) to simulate how it grows in bunches. I attached all coral and rocks to the chicken wire using the twist ties I’d hot glued to the backs of the rocks. REMEMBER where the front of the costume is, and be sure to have lower profile coral at the sections where the arms will hang. Constantly knocking into coral while trick-or-treating would be annoying.
After the coral on rocks (including tubes and branches of coral) has been attached, attach the brain coral, coral blobs and other miscellaneous coral. Once that’s all been attached, use the sea anemones to fill in the rest of the area. NOTE: you will need much more pieces of coral than you think you will to cover the chicken wire completely.
Walk around the costume as you attach the coral, look at it from various angles to make sure it’s evenly distributed. It’s fun to have something neat to see from every side.
Final touches: Once everything was attached, using zip ties, I attached the battery packs of the blue string lights to the inside of the hula hoop. The I ran the lights throughout the coral to help give everything a blue glow. Then I cut the tulle into long 6-inch wide strips, and tucked it all into the exposed areas of chicken wire. It was subtle, but helped soften the look of whatever chicken wire was still exposed, and also helped diffuse the blue light.
Step 4 – The Crown:
On wax paper, I piped hot glue into organic coral shapes. I put on some pieces of florist wires (with ends sticking out), and layered on additional hot glue to enclose the wire in glue. Once the glue was completely hardened, I peeled off the wax paper and painted the coral. I used various shades of coral pink to help give it a more natural look.
Taking a wire coat hanger, I straightened it out, and cut a length long enough to fit over my daughter’s head like a headband. I put blobs of hot blue on the ends (to protect from the sharp edges, and then used the wire ends of the coral to attach them to the wire frame. It took a little bit of extra glue, along with gluing some pieces of coral together to get everything to stand up together. Once everything was secured, I used a bit of glitter spray to give it a final touch.
We had a wonderful time Trick-or-Treating, the costume was a hit!
Similar costumes:
Rating: 4.2 of 5. Votes: 53
|
53 votes
|

