

Katana and Harley Quinn Costume
Rate this costume:
|
2 votes
| add a comment |
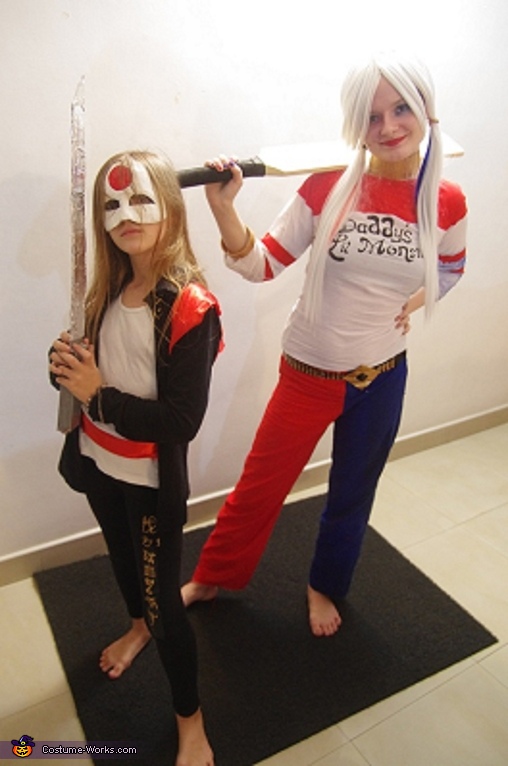
Katana and Harley Quinn Costume


| Costume type: | Costumes for Couples |
| Category: |
This homemade costume for couples entered our 2016 Halloween Costume Contest.
A word from Kat, the 'Katana and Harley Quinn' costume creator:
My Harley Quinn costume was made by and worn by me, Kat, and the Katana costume was made by me and worn by my little sister Arwen!
When I heard about the movie Suicide Squad I immediately started thinking about making a costume of one of the characters in it. As soon as I could, I found the character list to find out who I could make a costume of. Out of everyone in the movie, there were two people I saw that I could pull off the most convincingly: Harley Quinn and Katana. There was no question as to who I would do though, because I liked the character Harley Quinn and was quite excited to find out she was finally going to be in a DC movie. After that I went looking for pictures of her so I could start my designs for the costume. But since this was before there were tons of pictures of her on the internet the only ones I could find were of similar angles so I didn't get all of the information I wanted on what Harley's costume looked like. I got enough to start planning though. It didn't take me long to lay out plans for how to make all of the pieces of the costume. I liked everything about her costume except for one thing. I didn't like how short her shorts were because they were immodest. I decided I would change them because of that. There were two options I had to consider; I could make the shorts longer and leave them as shorts, or I could make pants. I ended up deciding on pants for a few reasons. One of the main reasons was that pants reminded me of Harley's old costumes in the comics, and I liked the idea of using part of one of her old costumes. Another of the reasons was that it would make life easier if I used body paint (which I was planing on doing at the moment). I also changed her shirt slightly by not adding rips to it so that I could wear it out by itself after I wore the costume. The idea the Suicide Squad Katana costume came while I was making the Harley Quinn costume for myself. My little sister Arwen saw the costume and decided she wanted a Suicide Squad costume too. I looked at the character list again and, as I suspected would happen, found that Katana would be the best costume for Arwen, because she looks more like Katana than any other characters (aside from Harley Quinn). We probably would have done Katana anyway because we liked her costume. When we decided on Katana I started putting together the design for making it too.
I'll tell you about the Harley Quinn costume first. I made almost everything in the Harley Quinn costume but if I didn't make it, I at least made changes to it. I'll explain how I did everything starting with the shirt. I made the shirt with a soft non-stretch cotton fabric and acrylic paint. I used an Aero T-shirt as a pattern, but made changes to the pieces that I cut out so the shirt would fit the same way Harley's does. The changes I made were taking in the sides, adding length to the sleeves, making the sleeves longer, and reshaping the shoulders. After cutting everything out and sewing it together I had a plain white baseball style shirt, so I moved on to paint. I started by painting the top part of the shirt that is red. I measured the proportions of the red on Harley's shirt and marked them out at the same scale on my shirt with masking tape. Then I painted the part that needed to be red red with acrylic paint. Because I didn't push the masking tape down onto the shirt too hard, when I pulled it off the paint lines weren't completely even. That was good though, because that is how the shirt is in the movie. When I finished that part of painting, I moved on to the lines on the sleeves. I basically did them the same way. Scale, mark with tape, paint. When that was done I moved on to the black lettering on the shirt that says "Daddy's Little Monster." It took me a while to piece together what the words were from pictures I found, but I figured it out eventually, as is evidenced by the fact that those words are painted on the shirt. I wanted to make sure that the lettering was identical in font, placement, and scale to the lettering on the shirt in the movie, so I spent a few hours marking the outline of the letters on the shirt with pencil. I had to erase everything (not easy on that fabric) and start over again a few times but the end result was worth it. I had the lettering exactly the way I wanted it. When I started paint I traced the pencil outline of the letters with black acrylic paint, then filled them in. This took me a while because I was being very careful to not mess up, which I thankfully didn't. After that there was only one thing left to do with the shirt, add the blue on one of the sleeves. I added the blue by getting a little bit of blue paint on the end of a big paint brush and rubbing it on the sleeve. That finished the shirt. Here's how I made the pants. I made the pants out of a slightly stiff, non-stretch, cotton fabric. I used a pair of running pants as a pattern, and like I did with the shirt, I changed the pieces so that they looked more like what I wanted them to. I made the pants longer, the leg shape straighter, and everything slightly tighter so I wouldn't have to add a tie or elastic. I had to be careful with the last part because if I wasn't careful the pants would be too tight to put on. I was a bit too careful though, because when I sewed them together the pants were too loose. I fixed it by sewing darts in the sides that eased into the old seam so they wouldn't look weird. When I finished sewing them, the pants were done. Next I'll tell you about the wig. When I was figuring out the wig I had two options; I could buy a wig that was already in pigtails and had the ends dyed like Harley Quinn's hair, or I could buy a plain white wig and fix it myself. Due to my budget I chose the latter of the two. Even if I did have the money though, I probably wouldn't have chosen the first because the wigs that are like that usually are blonde instead of white, which drives me nuts, and If I bought a plain white wig I could use it for later costumes. The best wig I could find in my price range was a longish white one with long bangs and no part. I started working on the wig by putting blue and red hair extensions that my aunt gave me into it. Then I started on the pigtails. Sadly, because of the way the wig was built, I couldn't do high pigtails like Harley's, so I fixed the wig in low pigtails. The pigtails were challenging because the wig didn't have a part, which meant that when I parted it, you could see the places where the hair was sewn into the wig. I had to get a strand of hair and position it with some clear rubber band ponytails and a lot of hairspray over the part to cover it. (Unfortunately I don't have a picture of the back of the wig.) Another difficult part of fixing the wig was the bangs. The bangs were very long and thick and covered my entire face down to my chin. I had to part those too and once again had to find a way to cover the part. I did it like I did the back of the wig. When they were parted though, they were too thick. I put part of the bangs into the pigtails to solve that problem. I ended up leaving a bit more of bangs out than I had to though. I thought it looked something like the way Margot Robbie usually has her hair when her bangs are down and liked it that way. Once I finished arranging the wig I covered it in hairspray and it was done. I'll tell you about the "Puddin" choker and gold bracelet next. I made the choker out of duct tape, gold acrylic paint, thread, velcro, and paper. To start, I got a strip of duct tape long enough to go around my neck twice, then folded it over so it's length was half that and the sticky sides were touching. Then I traced the outline of the letters in the word "Puddin" on paper, once again trying to keep them identical with what is in the movie costume. When I finished that I cut the letters out and painted them and the duct tape gold. Before the paint could dry I put the letters on the duct tape so they would stick to it (they have stayed on surprisingly well.) When everything dried I tried to attach the velcro to the duct tape. I tried a ton of different glues to stick it on, but none of them worked so I ended up hand sewing it on. When the velcro was put on, the choker was finished. As I was cleaning up I was thinking about what to do for Harley's other jewelry and came across a masking tape roll with all of the masking tape gone from when I painted the shirt. I still had some gold acrylic paint left so I painted it gold, to wear as a bracelet. I'll talk about the belt next. The belt was originally just a black belt with a silver buckle, but I changed it with black duct tape and more gold acrylic paint. I covered the belt in black duct tape (I didn't want to paint on the belt because I could use it for something else later) before I painted little gold rectangles all over it. When I had paint on the belt I made a diamond shape that was a good size to cover the buckle, out of duct tape, duct taped it onto the buckle, and painted it gold. When everything dried I tried it on and was happy with it, so I didn't change it. Aside from that, all that's left to tell about is the shoes and bat. (I know, there's no shoes in the picture, I'm getting to that). The bat is just a plain cricket bat. I wanted to get a baseball bat and paint it, but I didn't have access to one, so I went with a cricket bat. I couldn't buy one though, because of my budget, so I borrowed one, and since it was borrowed I couldn't paint it. Now, along the lines of shoes, I did have a pair I was going to wear. They were black heels. I forgot to put them on for pictures though, and haven't had another opportunity to take pictures. That's why you don't see them.
I was going to put on face/body paint with the costume, but I didn't have any. Before wearing the costume I experimented with ways to make the paint and figured out how to make it, but I forgot how I made it and couldn't figure it out again, so I went without it and just wore make up.
When I was working on the wig I needed to see the back of it. I wanted to put it on a wig head so I could see. The only problem with that was that I didn't have one and they don't sell them anywhere near where I live so I decided to make one. I did it by making a sort of 2 piece mould of my head by covering it in aluminum foil, sticking the mould together into one piece, covering it in a mixture of silicone and baking soda, stuffing it with plastic shopping bags, and putting it on a cardboard tube. There was one problem with that though. The baking soda was supposed to be corn starch and I got them mixed up. I got a good laugh out of that when I found out that that was why the surface of the wig head was all bumpy. The wig head still looks like a head though. I named it Roosevelt and it is now living on top of my wardrobe wearing a green wig, baseball hat, and sunglasses.
Because I stuck to my budget the costume cost about 1-4 USD not including the wig. The wig was about 23 dollars, but I will probably use it for other costumes too.
I'll tell you about the Katana costume next. I didn't get to make as much of the Katana costume as I wanted to because I've had a lot to do for school, but I tried to make as much of it as possible. Here is how I made/acquired each piece of the costume. The white shirt is just a white tank top we got from a store. We knew that in the original costume was a white crop top, but we didn't want to do a crop top, so we did the tank top. The Jacket started out as a black turtleneck. We couldn't find a black jacket but I figured it would work just as well to convert the turtleneck. "Convert" really just meant "cut a straight line down the front" though. Thankfully, we didn't have to hem anything because the turtleneck was made of fabric that doesn't fray. After I cut it, I was just left with a plain jacket, so I painted on the flowers with gold acrylic paint. Before painting them on I searched the internet for pictures of Katana's jacket until I was sure I knew exactly what it looked like. To paint them on, I scaled the flowers with the picture, then marked the ends of the flower petals and the radiai of the circles. I tried using masking tape to mark out the lines on the big flower, but gave up after a while because it was easier to freehand. I freehanded everything after that. Painting the jacket was fun, but it took a while. After I painted the jacket I moved on to the leggings. The leggings started out as a plain pair of black leggings. I painted the symbols on with the same paint as the flowers. It was difficult to find a good picture of the symbols, and I ended up using pieces of two pictures. It was also dificult to scale them. Once I figured out the scale I freehand painted them on. But before I painted them on, I painted the part of the leggings that would be behind them with black acrylic paint so it would look more like the movie costume. I used a few paintbrushes to paint them on because I wanted the symbols to look exactly the way they're supposed to. Now I'll move on to my favourite part of the costume, the mask. When I was figuring out how to put together the costume I knew that I wanted the mask to be able to stay on without being tied on. After researching ways to make masks and thinking about it, I decided on paper mache. Because I wanted the mask to stick to Arwen's face, I knew it had to be moulded to her face. Because of that I made the first layer of the mask by sticking the paper mache on her face and letting it dry. We forgot to put oil or vasaline on her eyebrows before I put the paper mache on her face though, so it stuck to her eyebrows when we tried to pull it off. Because it stuck, she lost a few eyebrow hairs when we pulled it off. We got a laugh out of it though! After I had the first layer, I covered it in an uncounted number of other layers of paper mache. When it was as hard as I wanted it, I covered it in a layer of paper towel paper mache to smooth it out, and moved on to painting the mask. To start with, I covered the mask in white acrylic paint. Then I figured out the scale of the red dot. To do the red dot in as perfect a circle as I could, I marked one out on paper, cut it out, and used it as a stencil on the mask. I marked it out with pencil then painted the outline with red, and filled it in. To finish, I painted black around the eyes with acrylic. Now I'll tell you about my least favourite part, the sword. I didn't like the sword because it didn't turn out the way I wanted. I made the hilt out of 6 tic tac boxes covered in duct tape. They were made in two rows of three. Between the two layers I put the end of the wire frame of the blade. The wire frame was very hard to get straight and scaled the way I wanted. Then I covered the wire frame in paper mache, in the shape I wanted the blade to be. After putting on more layers of paper mache until the blade wasn't flimsy and was the right thickness, I decided to move on to painting it. There was a problem with that though, I thought I had silver paint, but I didn't. I couldn't buy the paint so I ended up covering the blade in aluminum foil. After it got put on, the aluminum foil got wrinkled, as you can see in the picture. That's what I don't like about the sword. I think the only things I haven't written about yet are the shoes (I know there aren't any in the picture), the arm band (also not present in the pictures), and the red belt and straps. The belt and straps are made of a red satin fabric that I cut and folded into the right shape and size, and tied on for Arwen. She had shoes to wear with the costume, but like I did with my costume, forgot to put them on for pictures and didn't get another chance to take pictures. They were a pair of dark grey tennis shoes that matched the costume. She also had a band to put on her arm that was made of white fabric and had a dot like on her mask painted on it, but it was lost when we took pictures. I think that I've talked about all of the pieces now.
I wanted to get her a black wig, but it didn't fit in the budget.
Something funny happened while I was working on the mask. I left it on the table overnight to dry, and when I checked on it in the morning, a chunk was missing out of it, and the whole thing was torn up. I got annoyed. Eventually though, I figured out what had happened. The cat had eaten part of it, and chewed on the rest. After that I kept the mask away from the cat. Thankfully I was able to repair it.
We had a lot of fun making these costumes and wearing them.
Thanks for reading!
Rating: 4.0 of 5. Votes: 2
|
2 votes
|