

Captain Rex Costume
Rate this costume:
|
269 votes
| 1 comment · add a comment |
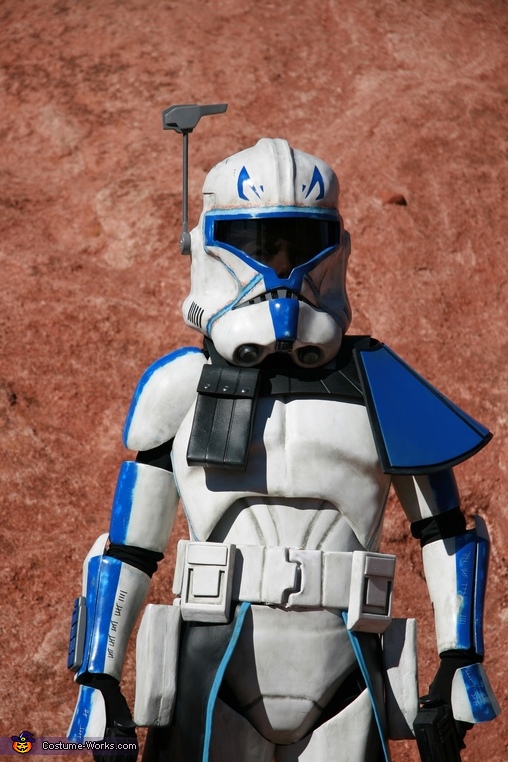
Captain Rex


| Costume type: | Costumes for Boys |
| Category: |
This homemade costume for boys entered our 2015 Halloween Costume Contest.
A word from Jeff, the 'Captain Rex' costume creator:
My family is pretty crazy about Halloween costumes, so the kids need to decide on their costumes early to give me enough time to build them. Luckily, my 10 year old son had his heart set on a Star Wars Clone Wars theme for quite a while. I think he has seen every episode of the animated series a half dozen times. My son is also into all things armor (he was a Medieval Knight last year), so he naturally gravitated towards one of his favorite characters, Captain Rex, the Clone Trooper Commander, who also happens to be General Anakin’s right hand man (yes, Dad was General Anakin this year).
After doing some research on Storm Trooper / Clone Trooper costumes over at the 501st legion reference library, I decided that Captain Rex was going to have to be made up to 501st standards. This meant this was going to be a pretty involved costume, as a full Captain Rex suit has 25 or so parts. Now you can buy very nice Storm Trooper / Clone Trooper armor for adults (for a pretty hefty sum), but even if you could find it for kids, that would not be nearly as fun as making it myself.
The armor:
Most of the advice on the StormTrooper costume boards recommended using .093” thick ABS plastic for the armor, which is typically vacuformed. Vacuforming is a process where plastic sheet is heated up until it is soft (or sags) and then is draped over a mold. You then apply vacuum to the plastic sheet on the mold to draw the sheet perfectly around the mold. Separate the cooled sheet from the mold, and cut out the form from the sheet that you want to keep – and you have a part. This process is used in industry all the time, using machines and molds costing tens of thousands of dollars. For me, this meant I was going to be making my own wooden vacuform table, hooking it up to a shop vac, and heating my plastic sheets in the kitchen oven (almost the same right…) for a lot less $$.
I first started the design in 3D CAD software. I got some help on a few parts by starting from low resolution Storm Trooper models made freely available by a guy (gal?) named “Fierfek” (very helpful). After modeling the armor to match my son’s size and Captain Rex’s specific Clone Trooper armor details, I then prototyped some of the more complicated pieces in cardstock, using Pepakura software to flatten the model. This made sure I got the right size before spending a ton of time on molding each piece. I then set out to make vacuform molds from the CAD models. For me, this involved partitioning each part in the model into half inch slices, so I could then transfer a 2D sketch from each slice onto cardstock and then trace the cardstock onto half inch thick construction foam (the pink stuff at the hardware store). I then cut each slice of insulation foam to shape using a scroll saw and then glued the slices together. After a lot of sanding to smooth out the rectangular edges of the assembled foam mold, I then coated each mold with Plaster of Paris to protect the foam from the heat of the plastic during vacuforming. Given that most of the armor parts had a front and back and left and right side, making all the molds was extremely time consuming. It would have been a little easier (if not faster) to use a 3D printer or 3-axis CNC machine to make the molds - if you were lucky enough to have those.
After molds were done and cured, it was time for the fun part. For the ABS plastic, I purchased 4’x8’ sheets from a plastics supply house and then cut them into 12” x 18” sheets to fit my vacumform table. Each sheet was assembled into a metal frame, placed in the oven at 350 F, allowed to get soft and sag, and then vacuformed over the mold. …. I am making it sound a little simpler than it was. Getting just the right temperature and sag, making sure the mold was just the right size for the table, and getting the timing just right for pulling the plastic from the oven to placing it over the mold and turning on the vacuum ended up in more than a few redo pieces. Luckily I bought extra plastic.
After I finally got a good draw on the mold, I then separated the mold and the plastic (easier said than done) and then trimmed the part I wanted to keep out of the sheet using a Dremel cutter.
Since my oven and vacuum table only supported 12” x 18” sheets, I had to make some of the larger armor parts in two halves. Many parts also have a front and back side by design. To glue the ABS parts together, I mixed up a paste using acetone (use ventilation!) and ABS plastic chips. I backed each seam up with 1/16” inch ABS plastic strips as well. The glue joints worked very well, but each had to be glued carefully and clamped in place until the paste dried. Getting the edges of each piece to line up for gluing was also a bit challenging, and required a lot of trimming and sanding to fit. After gluing, I finished up the rough edges of each armor piece using sandpaper.
For finishing, I spray painted each piece with white primer and flat white spray paint. Blue stripes were also masked off and spray painted. Since Captain Rex is not a “shiny”, the armor needed weathering as well. I rubbed the blue stripes with mineral spirits to wear off some of the blue paint. I also coated each piece in gray water based acrylic paint, let the acrylic paint partially set up, and then buffed off the “dirt” with a wet cloth until I got the right weathering. For the fake blue and orange welding lines on the chest and helmet (Captain Rex fashioned his own custom armor as well), I brushed on acrylic paints.
I then fitted each piece to my son, using EVA craft foam strips glued to the backside of the armor with contact cement, and applied Velcro straps and closures (also with contact cement).
The kama :
This is fake leather sewn to blue fabric trim, with a Velcro waist band.
The pauldron and chest pouch:
This is EVA foam, formed with a heat gun where needed, glued together with contact cement, coated with Plasti Dip, and spray painted to color
DC-17 pistols:
Made out of laminations of MDF sheet. I embedded LED flashlights into the barrel of each pistol, so when the trigger was pulled the light flashed.
Helmet visor:
I heated a tinted acrylic plastic sheet over a curved form. I also made a clear plastic visor for nighttime. They were swapped into the helmet using Velcro attachments.
Whew. This was one of those projects where I quickly realized I was in for it and it was going to take forever, yet what do you do?….. After waaay too many hours and countless fittings, it was done. My son though it was pretty awesome (he better…). He had quite the presence at all the costume parties and Halloween events. We even managed to run into some 501st troopers and get some great Star Wars action shots.
Rating: 4.2 of 5. Votes: 269
|
269 votes
|