
by Julie


Rate this costume:
|
29 votes
| 2 comments · add a comment |
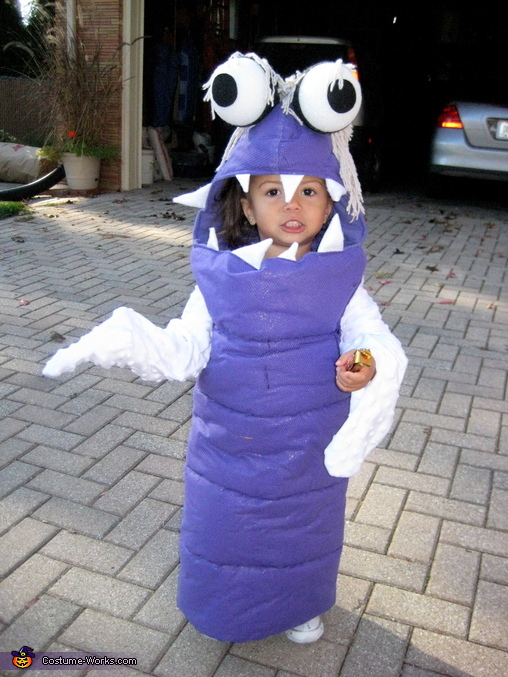
Boo from Monsters Inc.


| Costume type: | Costumes for Babies |
| Categories: |
This homemade costume for babies entered our 2013 Halloween Costume Contest.
I've had many people say that my daughter looks like Boo from Monsters Inc. As well, I found the Monsters Inc, Sully costume for my son so it would be a themed Halloween! Jayla is just about the age Boo was in the movie, so if I was going to pick a year to do it, this was the best opportunity!
I started by buying fabric for the outfit. The amount of fabric you buy will be determined by the measurements of the person for which you are making it (height from chin to ankles, circumference around chest, shoulder width, and extra fabric for the hood). We bought between 1 and 1.5 yards of each fabric. I couldn't find scaly purple fabric, so I found a sparkly fabric that felt a little rubbery. Then I added a layer of purple tool to add texture and the appearance of scales. I used white minky fabric for the arms to mimic the squid like appearance of the one in the movie. I layered the inside of the costume with purple felt to make it warm and comfy since we live in Wisconsin.
The purple body was constructed first. To make it puffy, batting was used as a layer between the skin fabrics (sparkly fabric and tool) and the felt. The batting and tool made it look great, but they also made it very difficult to sew! I kept the top of the body only pinned until later when I would attach the teeth. Then, using one of her long sleeve shirts as a guide, the arm holes were drawn and sewn. After sewing the holes, I cut away the fabric and cleaned up the opening.
The hood was the hardest part! I chose to base her hood off of an actual hood and made it longer in front than a normal hood, but thought it would fit better than a large floppy hood. I used all three layers of fabric for the hood, so it would match the body. I also stuffed it with a little batting so that it would hold it's shape. The teeth were pinned and then sewn to the hood and front of the body. To give them more of a tooth appearance, I folded a square piece of felt into a triangle and sewed the edges.
The eyes were also a little tricky. I decided to use a heavier duty wire to support them, but still wrapped it with black pipe cleaners. For the black part of the eyes, I used adhesive felt. I cut a pattern into the black felt and then carefully worked my way around the Styrofoam ball securing the felt to it as flat as possible - making sure to eliminate as many raised creases as I could. I also used flat head push pins to help hold things in place. Then I cut out a circle for the eye in the center. Overall, I think it came out looking pretty great!
For the hair, all you need is a dollar store mop. Take off the handle and cut off the mop hairs and you've got yourself the hair for the costume. I cut two disks of the sparkly purple fabric out and pinned the mop hair into it, making a sandwich. Sewing around the edge of the hair-sandwich secured the hairs in the disk. Hand sewn to the the top of the purple disk were clumps of mop hair, in order to cover the fabric and fill out the hair. To make things easier on myself, I used hand sewn pockets and snaps to secure the hair and eyes to the costume. Hot glue might work too, but I thought that would make quite a mess. To keep the eyes from falling out, they were placed under the snapped hair-sandwich (thanks to the genius of my mom!)
The minky fabric was hand sewn to the arm holes. I used Velcro to attach the hood to the costume, in addition to buttons and elastic loops to close the costume down the back.
In all, the materials for the Boo costume cost about $40 and took about 16 hour, spread over a few days, to complete.
Similar costumes:
Rating: 4.1 of 5. Votes: 29
|
29 votes
|

