

Bath & Body Works Candle Costume
Rate this costume:
|
5 votes
| 1 comment · add a comment |
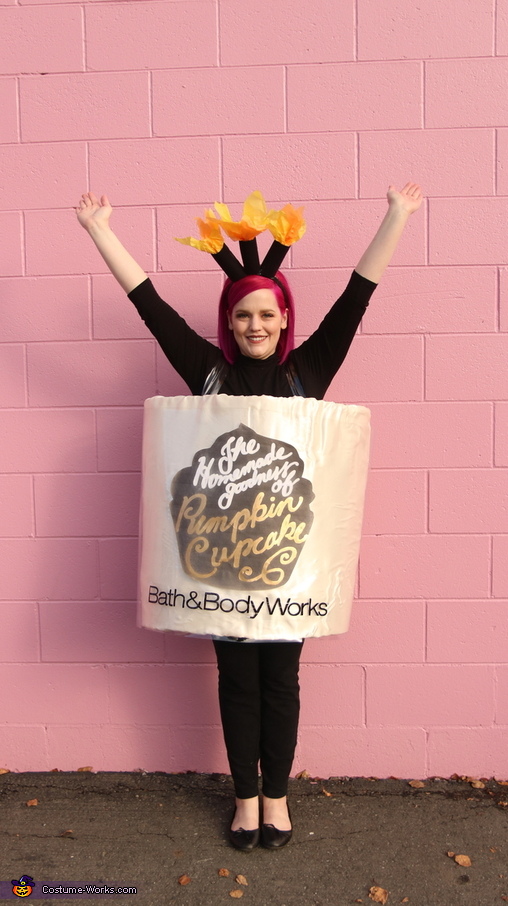
Bath & Body Works Candle DIY Halloween Costume


| Costume type: | Costumes for Women |
| Category: |
This homemade costume for women entered our 2017 Halloween Costume Contest.
A word from Ashley, the 'Bath & Body Works Candle' costume creator:
I made this Bath & Body Works Candle costume for myself. My favorite thing to buy in the world are these candles so I knew I had to make one for my Halloween costume this year. I had been brainstorming this for a year!
Supplies:
Exacto knife
Long acrylic ruler
Pencil
Black sharpie
Hot glue gun
Spray adhesive
2 safety pins
White chalk pen
2 yards thick plastic
1 yard thin plastic
2 yards champagne satin fabric
2 yards thick foam
Gold paint marker
Orange & yellow tissue paper
Black headband
Black fabric
3 cardboard toilet paper rolls
How To:
1. To figure out how much foam, satin fabric, & plastic you need pull the foam around you and have a friend pull the foam around you to help you create the circular shape at the store. Cut and take home!
2. I took a printout on 9 1/2 x 11 paper of the candle I was going to recreate (Bath and Body Works, The Homemade Goodness of Pumpkin Cupcake) to Office Max and got it blown up to 10" tall on an engineer print. My original plan was to cut the cupcake out of black posterboard and cut the letters out with an exacto knife and then trace the letters onto the cutout. But my mom suggested I just draw right over the letters with the paint pens. That seemed like the easier solution, so I just cut out my engineer print and used the gold and white paint pens to go over the letters.
3. When you get home and wrap the foam around you again, to hold the circular shape use fabric adhesive spray on the small piece of overlap.
4. Then hot glue to reinforce.
5. Keep the satin fabric folded in half as it comes off the bolt. (I opened it and used spray adhesive and then folded it back in half. I would not recommend this because it was very hard to flatten out without wrinkles. It was an unnecessary step and I wouldn't do it again.) Spray the foam with adhesive and then lay the satin down, smoothing as you go. Be sure to leave extra fabric at the top and bottom to fold the edges inside and glue. Once all of the fabric is glued down, cut any excess and fold over. Use a hot glue gun to secure.
6. Put two large hot glue drops at the top and bottom of the silk fabric. (Important Note: lineup the edge of the plastic with the edge of the fabric you folded over. I didn't do this and didn't realize until it was too late. I think it would look nicer with one edge.) Gently push the plastic onto the fabric with the edge of a pencil, not your finger! Because hot glue hurts! Then two more dots to attach the other side of the plastic. I luckily found all of my plastic in the remnants bin at Walmart so if you look close enough, I have a small patch of the thinner plastic behind the large piece. But hopefully you can just purchase one piece that is the right size.
7. Center the cupcake cutout on the fabric and also make sure it lines up so the back line of all fabrics is in the back. Then use hot glue to secure. I used about 6 tiny drops all around. Making sure to use small drops, so you can't see the glue marks.
8. The thinner plastic will be cut into 3 pieces. 2 are the straps and one is to write the logo.
9. You'll need help for this step! Cut two pieces of plastic long (about 10"). Put the costume on and see where you want it to sit on your body. Pin the two flaps of plastic on the back inside of the costume about shoulder width apart, then hold it up while someone safety pins the front pieces. To get out of the costume, carefully slip the straps off and shimmy the costume down and step out. (I would recommend using a stronger material for the straps, mine kept breaking when I would take pictures in it, so I kept having to repin.
10. For the Bath & Body Works logo I saved the full resolution image and then used Grab on my computer to select half of the logo. From "B to o" and then "d to s" I printed each on two pieces of paper horizontally. Then I taped the logo together and laid the plastic on top and taped to my rotary mat, so it wouldn't move. I used a sharpie to trace the logo onto the plastic. I had to go over it in some spots to make sure it was dark enough, so I recommend using a brand new sharpie so it has enough ink to just go over it one time. Use three dots of hot glue to attach under the cupcake.
11. To make the headband, I used an old 2017 headband from the Target dollar bin I already had. It was actually easier using a headband that already had something flat attached to it to glue the candlesticks onto for support.
12. First wrap the toilet paper rolls in thin black fabric, attach with hot glue. You don't have to use fabric, I just used that because I already had some leftover. You could use paper, felt, or paint.
13. Then cut the tissue paper into smaller sections and pouf just as you would if you were packing a present. Glue the inside edge of the roll and stuff the tissue paper in.
14. Go put on your costume and head into Bath & Body Works to take a picture next to your candle mini-me!
Check out my website for more photos www.ashleytheowl.com
& Instagram for other Halloween ideas @ashleytheowl
Rating: 4.6 of 5. Votes: 5
|
5 votes
|