
by Ashleigh


Rate this costume:
|
328 votes
| 52 comments · add a comment |
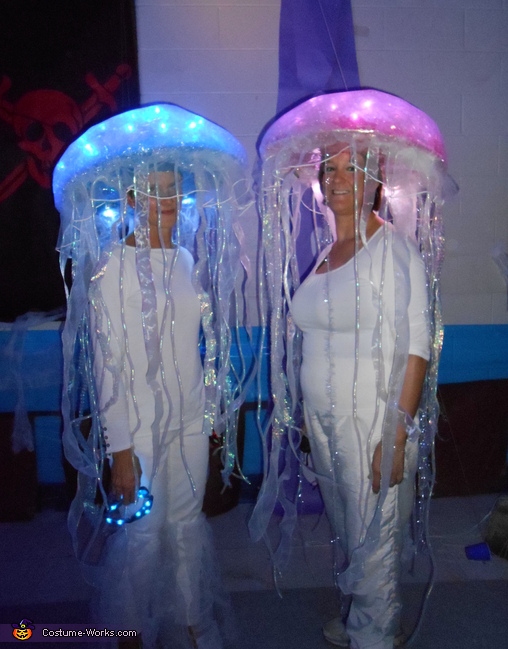
DIY Glowing Jellyfish costumes


| Costume type: | Costumes for Women |
| Categories: |
This homemade costume for women entered our 2012 Halloween Costume Contest.
I was inspired by pictures of jellyfish costumes that I saw on other websites, plus the fact that they glow! I was going for something not too expensive and also not heavy or cumbersome so I decided to use a hybrid of methods I found on the web and added my own twist.
Materials:
How to make a jellyfish costume:
Started with the cowboy hat (sombrero seemed to flimsy as I wanted to be able to move about and dance easily).
Cut foam board in a 20 inch diameter circle (this was pretty large- I would do smaller next time, maybe 18 inches). Then cut a closefitting hole in the foamboard for the top of the hat to fit through (foam board is sitting on top of hat). I cut carefully each time to ensure the hole and hat fit my head closely.
I then applied hot glue around the top of the cowboy hat rim and firmly pressed the foamboard circle onto it. I poked a hole from underneath on each side of the hat in order to thread the battery operated light wire through from underneath the hat. Hot glued and adhered the 3 tap on lights underneath and behind where my head would fit – these make the large tentacles.
I covered the top of the hat with white duct tape and then glued metallic tissue all over the top and underneath of the hat. I also taped some of the colored tissue over each of the tap on lights. I used blue for one jellyfish and pink for the other one.
Hot glued the battery operated light control to the underside of the hat – one on each side (near where my ears were for balance). Made sure that tops were exposed so that I could change the batteries if needed.
To build up the top of the hat, I used a some white plastic bags, lots of drycleaning bags and even some toilet paper rolls – attached with the shipping tape. * make sure to keep the light string out!
Once I achieved the basic shape and height I wanted, I then taped the iridescent, metallic tissue all over the top with clear tape. Next, I attached the lights. No particular pattern, just enough to make sure the entire top would glow and be spaced out nicely. Used the clear packing tape to attach. Then I covered the entire top of the hat with the large bubble wrap bringing over the edge and attached it underneath (about an inch or so inside/underneath) with staples and glue.
Now it was time for the tentacles. For the three inside tentacles, I unraveled a long white loofah and cut them at my knees. Then attached them around the 3 tap on lights – so the light would shine down inside of the tentacle. I measured the mesh tubing, ribbon and small bubblewrap and cut so each tentacle came to my knees and varied the lengths a little. I scrunched the ribbon. Attached all to the underneath of hat with hot glue. I used an old veil found at the thrift store to cover the entire jellyfish, leaving about 3 inches extra underneath the hat, but you can use any sheer, iridescent material – just look for something you like!
Dressed all in white (can do all black too if you like). We glowed all night and had so many compliments and photos taken. The kids loved seeing us out trick or treating! Fun, fun, fun!
More Jellyfish Costume Ideas:
Rating: 4.0 of 5. Votes: 328
|
328 votes
|


